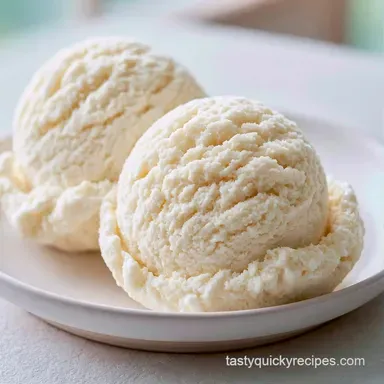
No Churn Ice Cream with Condensed Milk

- Time: 15 min active + 6 hours 15 mins chilling
- Flavor/Texture Hook: Rich, smooth, and irresistible
- Perfect for: Summer parties and beginner friendly sweet treats
The sound of a hand mixer hitting a glass bowl is usually where the magic starts. But for a long time, my homemade frozen treats had a major problem. They would come out of the freezer with these gritty, icy shards that felt like eating a frozen slushie.
It's a common failure because without a machine to stir the mixture, the water in the cream freezes into large crystals.
I found that the trick is using a specific combination of fats and sugars to block those crystals. This version stays creamy and smooth, almost like it came from a high end shop. You don't need to worry about the equipment or the timing of a churner.
This No Churn Ice Cream is designed to be a reliable fix for anyone who wants a decadent dessert without the stress. It's a straightforward process that focuses on air and temperature. Once you see how it holds its shape, you'll never go back to those expensive store brands.
Easy No Churn Ice Cream
The Air Factor: Beating the cream creates tiny bubbles that keep the dessert from freezing into a solid block. The Sugar Effect: The high sugar content in condensed milk lowers the freezing point, which keeps the texture smooth.
| Method | Equipment | Texture | Best For |
|---|---|---|---|
| Traditional Churn | Ice Cream Maker | Very Dense | Classic flavors |
| No Churn | Hand Mixer | Light & Airy | Quick prep |
| Hand Stirred | Bowl and Spoon | Grainy | Emergency treats |
What Each Ingredient Does
| Ingredient | What It Does | Best Swap |
|---|---|---|
| Heavy Cream | Adds fat and air | Mascarpone (thicker) |
| Condensed Milk | Sweetens and softens | Evaporated milk + sugar |
| Vanilla Extract | Adds aromatic depth | Almond extract |
| Sea Salt | Balances the sugar | Fine table salt |
The Ingredient List
Gather these items before you start. Make sure your dairy is cold, as this helps the cream hold air.
- 2 cups heavy whipping cream, chilled Why this? High fat content is needed for stiff peaks.
- 14 oz sweetened condensed milk, chilled Why this? Prevents ice crystals from forming.
- 1 tsp vanilla extract Why this? Standard flavor base.
- 1/4 tsp sea salt Why this? Cuts through the heavy sweetness.
If you're looking for a different kind of dessert, you might enjoy the Crunch Recipe for 6 for something more tart.
| Original Ingredient | Substitute | Why It Works |
|---|---|---|
| Heavy Cream (2 cups) | Full fat Coconut Cream | Similar fat content. Note: Adds tropical flavor |
| Condensed Milk (14oz) | Honey + Heavy Cream | Natural sweetener. Note: Changes texture significantly |
Quick Recipe Details
You don't need a lot of gear for this. A standard stand mixer such as KitchenAid works great, but a hand mixer is just as good.
- Prep time: 15 minutes
- Cook time: 0 minutes
- Total time: 6 hours 15 mins
- Yield: 12 servings
- Pan size: 9x5 inch metal loaf pan
Step by step Method
Follow these steps closely. The texture depends entirely on how you handle the cream.
- Pour the chilled heavy whipping cream into a bowl. Beat on medium high speed until stiff peaks form. The cream should stand straight up without drooping. For tips on achieving the right consistency, check out King Arthur Baking's guide on whipping cream.
- Grab a separate medium bowl. Whisk together the sweetened condensed milk, vanilla extract, and salt.
- Use a rubber spatula to gently fold the condensed milk mixture into the whipped cream. Use a cut and fold motion until the color is uniform.
- Line a 9x5 inch metal loaf pan with plastic wrap or parchment paper.
- Pour the mixture into the pan. Smooth the top with a spatula.
- Press a piece of plastic wrap directly onto the surface of the cream. This seals out air.
- Freeze for at least 6 hours or overnight until firm to the touch.
- Remove from the freezer 5 minutes before scooping to make it easier to serve.
Chef's Note: If you want to add mix ins like chocolate chips or nuts, fold them in during step 3. Don't over mix, or you'll deflate the air you just beat into the cream.
Fixing Frozen Treat Issues

Even with a simple recipe, things can go sideways. Usually, it's a temperature or mixing issue.
Overbeaten Cream
If you beat the cream too long, it turns grainy and eventually becomes butter. This ruins the smooth feel of your No Churn Ice Cream. If it looks curdled, stop immediately and fold in a tablespoon of liquid cream to smooth it out.
Icy Surface Crystals
When air hits the surface of the frozen cream, it creates a layer of ice. This happens if the pan isn't sealed. Always press the plastic wrap directly onto the cream to prevent this.
Sinking Mix ins
Heavy chunks of fruit or chocolate often sink to the bottom. To fix this, freeze the base for 1 hour first, then fold in your mix ins and finish freezing.
| Problem | Root Cause | Solution |
|---|---|---|
| Too Soft | Not enough freeze time | Freeze for another 2 hours |
| Grainy Texture | Over whipped cream | Use cold cream, stop at stiff peaks |
| Too Sweet | Missing salt | Add a pinch of salt to the mix |
Adjustment and Scaling
You can easily change the size of this batch. Just remember that the freezing time changes based on the volume.
Scaling Down (Half Batch): Use 1 cup of cream and 7 oz of condensed milk. Use a smaller 4x6 inch container. The freezing time usually drops by about 20%, but still give it at least 4 hours.
Scaling Up (Double Batch): If you're doubling the recipe, work in batches. Beating 4 cups of cream at once can overflow some mixers. Use two separate loaf pans rather than one deep one, otherwise the center will stay liquid while the edges freeze.
Truth About Frozen Desserts
Some people think you need a machine to get a professional result. That's just not true. The machine mostly incorporates air and keeps the mixture moving. By whipping the cream first, we do that work manually.
Another myth is that using low-fat cream will work the same. It won't. The fat is what stabilizes the air bubbles. If you use a lower fat percentage, your dessert will be icy and hard.
Storage and Prep Tips
Keep your finished treat in an airtight container or keep the plastic wrap tightly sealed. It stays fresh in the freezer for up to 2 months.
For zero waste, if you have a bit of leftover whipped cream, don't throw it away. You can dollop it onto a slice of Cinnamon Applesauce Bread for a quick breakfast. Any leftover condensed milk can be stirred into coffee for a creamy, sweet kick.
Serving and Color Ideas
To make your dessert look irresistible, focus on color balance. The white base is a blank canvas.
- Mint Green: Add a drop of peppermint extract and a tiny bit of green food coloring. Garnish with a fresh mint leaf.
- Raspberry Red: Swirl in 2 tablespoons of raspberry jam before freezing. The deep red against the white looks stunning.
- Golden Honey: Drizzle warm honey over the scoop just before serving. Add a sprinkle of crushed pistachios for a pop of green.
Flavors and Swaps
This No Churn Ice Cream is a base that you can change every week.
Double Chocolate Fudge: Whisk 1/2 cup of cocoa powder into the condensed milk before folding. Stir in chocolate shavings at the end.
Fresh Strawberry Swirl: Puree 1 cup of strawberries with a squeeze of lemon. Swirl the puree into the base before freezing.
Dairy-free Alternative: Use chilled coconut cream and a vegan condensed coconut milk. The process is identical, though the flavor will be nuttier.
The Adult Twist: Add 1 tablespoon of bourbon or dark rum to the condensed milk. The alcohol lowers the freezing point further, making it even softer.
Recipe FAQs
How to make vanilla ice cream without an ice cream maker?
Beat chilled heavy whipping cream until stiff peaks form. Gently fold in a mixture of sweetened condensed milk, vanilla, and salt before freezing in a loaf pan for at least 6 hours.
Is it true that you need an ice cream maker to get a smooth texture?
No, this is a common misconception. Beating heavy cream to stiff peaks provides enough aeration to keep the dessert creamy without a machine.
How to make vanilla ice cream using sweetened condensed milk?
Whisk together the sweetened condensed milk, vanilla extract, and salt in a medium bowl. Fold this mixture into stiffly beaten heavy cream using a rubber spatula and freeze until firm.
Can I make no churn ice cream without condensed milk?
No, not using this method. The condensed milk provides essential stability and sweetness; for other easy-to-prep treats, try our applesauce muffins.
How do I prevent ice crystals from forming on top?
Press a piece of plastic wrap directly onto the surface of the cream. This seals out air and prevents freezer burn from affecting the texture.
How long does no churn ice cream need to freeze?
Freeze for at least 6 hours or overnight. This ensures the mixture is fully firm and reaches the proper scoopable consistency.
What is the simplest recipe for creamy ice cream?
Combine whipped heavy cream with sweetened condensed milk. This minimal base, combined with vanilla and salt, removes the need for churning while maintaining a rich, professional feel.
Creamy No Churn Ice Cream