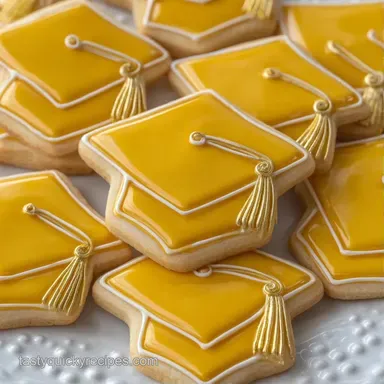
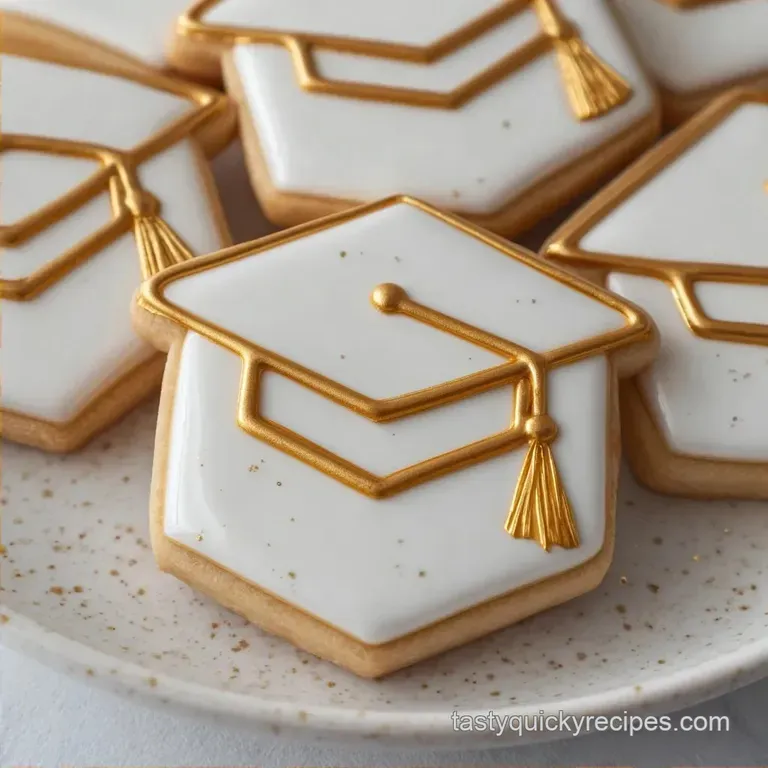
Cut out Graduation Cookies: No-Spread and Sharp
- Time: 20 min active + 10 min baking
- Flavor/Texture Hook: Velvety almond vanilla flavor with a clean, snap off bite
- Perfect for: Graduation parties, dessert platters, or school gifts
The smell of toasted almond and sweet vanilla always takes me back to my first year teaching. I remember trying to make party treats for my students, but my cookies always turned into amorphous blobs. I thought I just had a "bad oven" or that my flour was too light.
Forget the idea that you need a commercial kitchen or a specialized chiller to get those crisp, sharp edges. The truth is, most home cooks just rush the fat stabilization process. Once I stopped treating the freezer as an optional step, everything changed.
You can expect these Cut Out Graduation Cookies to hold their shape perfectly. They aren't cakey or puffy, which is exactly what you want when you're spending time on the icing. We're going for a smooth surface that acts like a canvas for your decorations.
Cut Out Graduation Cookies
The trick to a cookie that doesn't move is controlling the butter. When butter hits a hot oven, it melts instantly. If the dough is too warm when it goes in, the cookie spreads before the flour and egg can set. By chilling the rolled dough, we lock those fats in place.
According to the experts at Serious Eats, temperature control is the biggest factor in cookie spread. When you freeze the disc for a few minutes, you create a buffer. This gives the starch time to gelatinize and the proteins time to set, keeping your graduation caps looking like caps and not circles.
If you're in a massive rush, you might be tempted to skip the chill. Don't do it. I've tried, and the results are always disappointing. If you want a faster starting point for your dough, you can check out my Dough in 15 Minutes recipe for other quick bake ideas.
Baking Method Comparison
| Method | Time | Texture | Best For |
|---|---|---|---|
| Standard Oven | 10 mins | Consistent, flat, matte | Cut out shapes |
| Stovetop Pan | 6 mins | Crispy edges, uneven center | Rustic drops |
Decision Shortcut If you want a softer bite, remove them at 8 minutes. If you want a sharper edge, freeze the dough for 20 minutes instead of 15. If you want a glossy icing, add one drop of corn syrup to the royal icing.
Secrets For Sharp Edges
Fat Stabilization: Freezing the dough slows the melting of butter, preventing the cookies from flattening.
Low Rise Chemistry: We use a tiny amount of baking powder so the cookies don't puff up and distort the shape.
Icing Tension: Meringue powder creates a stiff structure that allows you to layer colors without them bleeding into each other.
Starch Alignment: Rolling the dough between parchment prevents over working the gluten, which keeps the cookies from shrinking.
Essential Recipe Specs
For the best results, use a digital scale. Volume measurements for flour can vary wildly depending on how you scoop, which often leads to dry, crumbly cookies. I recommend following the King Arthur Baking guidelines for "spoon and level" if you don't have a scale.
Component Analysis
| Ingredient | Science Role | Pro Secret |
|---|---|---|
| Unsalted Butter | Provides structure & flavor | Use "cool room temp" (should resist a finger poke) |
| Meringue Powder | Stabilizes the icing | Prevents the royal icing from collapsing or sweating |
| Almond Extract | Deepens the flavor profile | A tiny bit makes the sugar taste "expensive" |
| All Purpose Flour | Creates the crumb | Sift it to avoid lumps in the royal icing base |
The Pantry List
For the Cookie Dough
- 1 cup (225g) unsalted butter, softened Why this? Essential for a velvety, melt in-mouth texture
- 3/4 cup (150g) granulated sugar Why this? Provides the classic sweetness and crisp edges
- 1 large egg (50g) Why this? Binds the fats and flours together
- 1 tsp (5ml) vanilla extract
- 1/2 tsp (2.5ml) almond extract
- 3 cups (375g) all purpose flour Why this? Standard protein content for a sturdy cut out
- 1/2 tsp (3g) baking powder
- 1/4 tsp (1.5g) salt
For the Royal Icing
- 4 cups (480g) powdered sugar Why this? Creates the smooth, glossy finish
- 3 tbsp (45ml) meringue powder Why this? Ensures the icing dries hard for stacking
- 6 tbsp (90ml) warm water
- Gel food coloring Why this? Stronger pigment than liquid without thinning the icing
Necessary Kitchen Tools
You don't need a professional studio, but a few things make this way easier. A rolling pin and two large sheets of parchment paper are non negotiable. If you don't have parchment, you'll end up fighting with sticky dough and a flour covered counter.
For the decorating, I suggest using small piping bags or even Ziploc bags with a tiny corner snipped off. The "flood" technique requires the icing to flow smoothly, so make sure your bowls are clean and your colors are mixed well.
Graduation cap cut out cookies cutters are the stars here, but you can also use a square cutter and trim the corners with a knife.
Step-by-step Baking Process

1. Creating the Foundation
Cream the butter and sugar together on medium high. Do this for 2-3 minutes until the mixture looks light and fluffy. Beat in the egg, vanilla, and almond extract. Mix until it's smooth and velvety.
2. Mixing the Dry Ingredients
Gradually add the flour, baking powder, and salt. Mix on low speed until a soft dough forms and pulls away from the bowl. Don't overmix here, or the cookies will be tough.
3. The Rapid Chill Process
Roll the dough into a disc. Place it between two sheets of parchment paper. Roll it out to 1/4 inch (6mm) thickness. Slide the parchment and dough onto a baking sheet and place it in the freezer for 15 minutes.
4. Precision Cutting & Baking
Remove from the freezer. Immediately use your cutters to create the shapes. Place the Cut Out Graduation Cookies 2 inches apart on a lined sheet. Bake at 350°F (175°C) for 8-10 minutes.
Remove them when the edges are barely set and no browning is visible.
5. Preparing the Glossy Icing
Whisk the powdered sugar, meringue powder, and warm water together. Stir until the icing is glossy and holds a stiff peak. Divide the icing into small bowls and stir in your gel food coloring.
6. Streamlined Decorating
Use the flood technique to fill the center of the caps. Let this set for 20 minutes. Once firm, pipe a contrasting color for the tassel. This layering creates a professional, 3D effect.
Chef's Note: If your icing is too thick to "flood" (it doesn't spread on its own), add water one drop at a time. One drop too many and it becomes a soup, so be patient.
Fix Common Cookie Errors
When I first started making these, I had a batch that looked more like pancakes than caps. Usually, if the cookies are spreading, it's a temperature issue. If the icing isn't drying, it's usually a humidity or ratio issue.
Cookies Are Spreading Too Much
This happens when the butter is too warm or the dough wasn't chilled long enough. The fats melt before the structure sets.
Royal Icing Is Too Runny
Adding too much water or using liquid food coloring instead of gel can break the tension of the icing, making it bleed.
Cookies Are Breaking
Over baking makes the cookies brittle. If they snap too easily during decorating, you've left them in the oven a few minutes too long.
Troubleshooting Guide
| Problem | Root Cause | Solution |
|---|---|---|
| Rounded edges | Dough too warm | Chill rolled dough for 15-20 mins |
| Icing bleeding | Too much water | Add 1 tsp powdered sugar to thicken |
| Hard to cut | Dough too cold | Let sit at room temp for 2 mins |
Common Mistakes Checklist
- ✓ Don't skip the freezer step.
- ✓ Use gel colors, not liquid.
- ✓ Avoid browning the edges in the oven.
- ✓ Let icing set for 20 mins before adding details.
- ✓ Measure flour by weight for consistency.
Mix ins And Swaps
You can easily tweak this recipe to fit your flavor preferences. If you want something different, you might try my Sugar Cookies for 24 recipe for a slightly different texture.
Ingredient Substitutions
| Original Ingredient | Substitute | Why It Works |
|---|---|---|
| Almond Extract | Lemon Extract | Similar strength; gives a bright, citrusy note |
| Unsalted Butter | Vegan Butter | Similar fat content. Note: May spread slightly more |
| All Purpose Flour | gluten-free Blend | Use a 1:1 baking blend. Note: Result is slightly grittier |
| Meringue Powder | Egg White Powder | Similar stabilizing properties. Note: Check for additives |
For those who want a twist, try adding a pinch of cinnamon to the dough for a warmer flavor. You can also replace the vanilla with maple syrup for a fall themed celebration. Just remember that if you add liquid sweeteners, you'll need to add an extra tablespoon of flour to keep the dough from becoming too sticky.
Adjustment Guidelines
When you need to make a larger or smaller batch, don't just multiply everything blindly. Baking is more like a chemistry experiment than a stew.
Scaling Down (1/2 Batch) Reduce all ingredients by half. Since you can't easily half an egg, beat one egg in a small bowl and use 25g of it. Use a smaller baking sheet to maintain heat distribution, and check the oven 2 minutes early.
Scaling Up (2x-4x Batch) Increase flour and sugar linearly. However, only increase the salt and baking powder to 1.5x for a double batch to avoid a metallic taste. Work in batches when rolling the dough; if the dough sits out too long while you cut the first tray, the later ones will spread.
Freshness And Waste
These cookies stay fresh if you keep them in an airtight container. I recommend placing a piece of parchment paper between layers so the icing doesn't stick.
- Room Temp
- 3-5 days in a sealed container.
- Fridge
- 7 days (though the icing can sometimes "sweat").
- Freezer
- 3 months. Freeze the baked, un iced cookies for the best results.
Zero Waste Tips If you have leftover royal icing, don't throw it away. You can use it to decorate a batch of cupcakes or store it in a piping bag in the fridge for 48 hours.
For the leftover meringue powder, it's a great stabilizer for homemade whipped cream or a quick batch of macarons.
Serving Your Treats
How you present these Cut Out Graduation Cookies can make them feel like they came from a high end bakery. Depending on the event, you can go from a casual plate to a full on display.
Plating Levels
| Level | Setup | Pro Tweak |
|---|---|---|
| Simple | Flat white plate | Group by color for a pop of contrast |
| Polished | Individual clear bags | Tie with a ribbon matching the school colors |
| Restaurant | Three tier cake stand | Dust the base with a tiny bit of powdered sugar |
For a real party vibe, I love arranging these on a platter with some fresh berries and mint leaves. The bright red of strawberries looks great against the school colors of the icing. If you're giving them as gifts, the individually wrapped approach is best.
It keeps the icing from rubbing off and makes them easy for guests to grab.
Right then, you've got everything you need. Just remember to trust the freeze time and keep an eye on those edges. Your Cut Out Graduation Cookies are going to look incredible, and your guests will be impressed that you did them from scratch. Happy baking!
Recipe FAQs
How to make graduation cookies from scratch?
Cream butter and sugar, mix in wet ingredients, then blend in dry ingredients. Roll the dough to 1/4 inch thickness, chill for 15 minutes, and bake at 350°F for 8-10 minutes.
What is the trick to prevent cookies from spreading?
Freeze the rolled dough for 15 minutes before cutting. This locks the fats so the graduation cap shapes stay sharp and defined during baking.
How far ahead can you make cut out cookies?
Bake them up to 5 days in advance. Store them in an airtight container at room temperature; these treats pair perfectly with a celebratory brunch classic.
How to get the cleanest edges when cutting dough?
Press the cutter straight down and lift quickly. Lightly dip the cutter in flour between cuts to prevent the dough from sticking to the edges.
Is it true that you must bake cut-out cookies at 400°F to keep their shape?
No, this is a common misconception. Baking at 350°F for 8-10 minutes ensures the edges set without over browning the cookies.
How much should I charge for a dozen homemade cookies?
Charge between $12 and $24 per dozen. The final price depends on the complexity of your icing design and your local market rates.
How to fix royal icing that is too runny?
Whisk in more powdered sugar until the mixture is glossy and stiff. The meringue powder provides the necessary structure to prevent the icing from bleeding.
Cut Out Graduation Cookies