No-Stress Pencil Sugar Cookies: School Treats
- Time: 20 min active + 15 min setting
- Flavor/Texture Hook: Crisp sugar snap with smooth chocolate
- Perfect for: Teacher gifts or school bake sales
Back to School Pencil Wafer Cookies
The smell of fresh notebooks and new erasers always hits me around August. It's that electric feeling of a fresh start, but for us parents, it usually means a frantic search for a treat that looks impressive but takes almost zero effort.
I need something that doesn't require me to hover over an oven while I'm trying to find a lost sneaker.
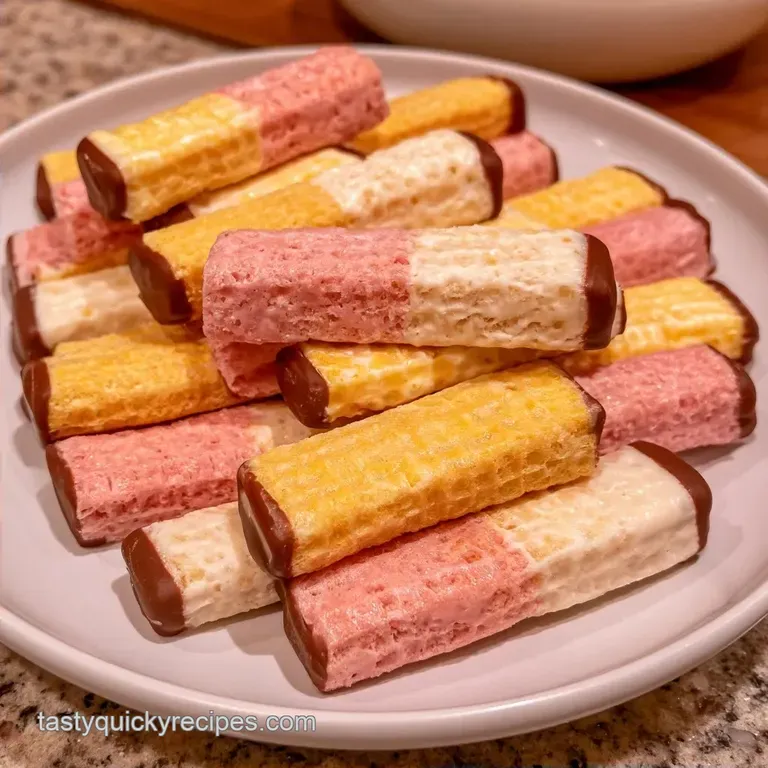
These little pencils are a total win. You get the satisfying crunch of a wafer and the sweetness of melted chocolate, and they look like they took hours of detailed work. Honestly, the payoff is huge compared to the actual work involved.
You can whip up a batch of Back to School Pencil Wafer Cookies in about 20 minutes of active time. They're light, colorful, and just the right size for a little midday sugar boost.
What Makes These Work
- Wafer Base: The pre baked sugar wafers provide a rigid, straight edge that doesn't bend or slump under the chocolate.
- Melting Wafers: These set much faster than traditional chocolate, so you don't have to wait hours for the colors to harden.
- Color Blocking: Using three distinct colors creates a clean, recognizable look that mimics a real No. 2 pencil.
| Goal | What to change |
|---|---|
| Brighter Colors | Use candy melts instead of wafers |
| Less Sweet | Swap semi sweet chips for dark |
| Faster Set | Chill wafers 10 mins first |
Quick Recipe Specs
Since we're focusing on a quick win, the process is mostly about the dip. The "cooking" part is really just melting chocolate in a microwave. It's a low stress way to get something that looks professional.
Ingredient Deep Dive
The choice of chocolate here is what keeps the colors from bleeding into each other. Using dedicated melting wafers ensures the "eraser" stays pink and the "lead" stays white.
| Ingredient | Role | If You Don't Have It |
|---|---|---|
| Sugar Wafer Cookies | Structural base | Pirouettes (cut to length) |
| Yellow Melting Wafers | Pencil body color | White chocolate + yellow food gel |
| Pink Melting Wafers | Eraser detail | White chocolate + pink food gel |
| White Melting Wafers | Pencil tip color | White chocolate |
You'll want to make sure your wafers are fresh. If they're stale, they'll shatter when you try to slice the tip. For more ideas on quick treats, you might like these graduation sugar cookies for a different occasion.
Gear You'll Need
No special equipment is necessary. The key tool is a small serrated knife, which cuts through the wafer layers without squashing them. Use microwave safe bowls for the chocolate and plenty of parchment paper to stop things from sticking.
Bringing It Together
Right then, let's get these assembled. Work in small batches so your chocolate doesn't harden in the bowl.
Shaping the Pencils
- Lay the wafer cookies flat on your workspace. Using a small serrated knife, carefully slice one end of each wafer at a 45 degree angle to create a pointed tip.
- Gently brush away any wafer crumbs to ensure the chocolate adheres smoothly to the point.
Coating the Components
- In separate microwave safe bowls, heat the yellow, pink, and white wafers in 30 second intervals, stirring between each, until the texture is velvety and smooth.
- Dip the center and main body of each wafer into the yellow chocolate. Let the excess drip off and set them on parchment paper.
- Dip the blunt (non pointed) end of each wafer into the pink chocolate, creating a clean cap about 1/2 inch thick.
- Carefully dip the pointed end of the wafer into the white chocolate, ensuring the point is fully coated.
- While the white chocolate is still wet, press one mini chocolate chip firmly into the very tip of the point.
- Allow the cookies to sit at room temperature for 15 minutes or pop them in the fridge for 5 minutes to lock in the design.
Chef's Tip: To get a cleaner line on the eraser, dip the wafer straight down and pull it up quickly. If you linger, the pink chocolate will run down the yellow body.
Troubleshooting Guide
If your chocolate acts up, don't panic. Most issues come down to temperature or a bit of stray moisture in the bowl.
Stopping Wafer Shattering
If the wafers are breaking during the 45 degree cut, your knife might be too dull or you're pressing too hard. Use a sawing motion rather than pushing straight down.
Preventing Chocolate Seizing
Grainy chocolate usually happens if a drop of water gets in or if it overheats. You can usually fix this by stirring in a tiny bit of coconut oil.
Avoiding Smudged Erasers
If the pink and yellow merge, you're dipping too soon. Give the yellow body a few minutes to set before adding the eraser cap.
| Problem | Root Cause | Solution |
|---|---|---|
| Chocolate is lumpy | Overheating in microwave | Stir in 1 tsp coconut oil |
| Tip isn't pointed | Cut angle too steep | Aim for a shallower 45° angle |
| Chocolate sliding off | Wafer was too cold | Let wafers reach room temp |
Serving Suggestions
These look great piled in a clear jar with a ribbon or laid out on a platter. Since they're quite sweet, they pair well with something tart or a simple glass of milk. If you're putting together a full school themed spread, these go great alongside some cinnamon applesauce muffins for a bit of variety.
Storage and Waste
Store these in a cool, dry spot. They'll remain crunchy in a container for about 5 days. In warmer kitchens, the refrigerator is the best option for keeping the colors vibrant, although they may sweat slightly when taken out.
To freeze, wrap them in parchment and store in a freezer safe bag for as long as 2 months. Just let them thaw for 10 minutes before serving.
Don't discard any leftover melted chocolate. Try drizzling it over pretzels or dipping some strawberries; it's an easy way to finish off those last few grams of colored wafers.
Creative Twists
Adjust the colors to coordinate with any school's theme. Combinations like blue and gold or red and white work great for a fresh appearance.
Customizing the Colors
Swap out the yellow for blue or light green. While the method remains identical, the final aesthetic will be completely different.
Dietary Adjustments
To make these dairy-free, substitute vegan melting wafers. Since most brands melt similarly, you don't need to adjust the timing.
Alternative Toppings
Instead of a chocolate chip for the pencil lead, try a tiny sliver of dark chocolate truffle or a small silver sprinkle for a metallic effect.
Recipe FAQs
Are these a good choice for a middle school bake sale?
Yes, they are visually striking and easy to transport. These make a great addition to a spread that includes a savory sourdough roll for a balanced snack table.
How to melt the chocolate wafers?
Heat them in 30-second intervals in the microwave. Stir between each session to keep the texture velvety and smooth.
Where is the best place to store these?
Keep them in a cool, dry place in a container for about 5 days. Use the fridge if your kitchen is warm to keep the colors sharp.
Is it true that these must be baked to set the chocolate?
Actually, no. Let them sit at room temperature for 15 minutes or refrigerate for 5 minutes to lock in the design.
Which method fixes chocolate that is too thick?
Microwave the chocolate for an additional 10 to 15 seconds. Stir frequently to bring the mixture back to a smooth consistency.
Back To School Pencil Cookies