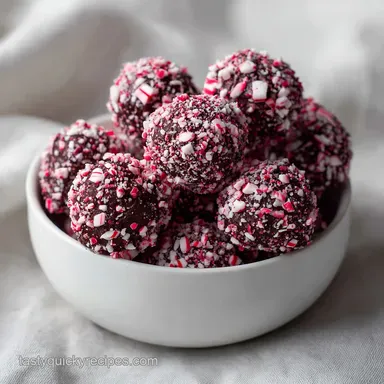
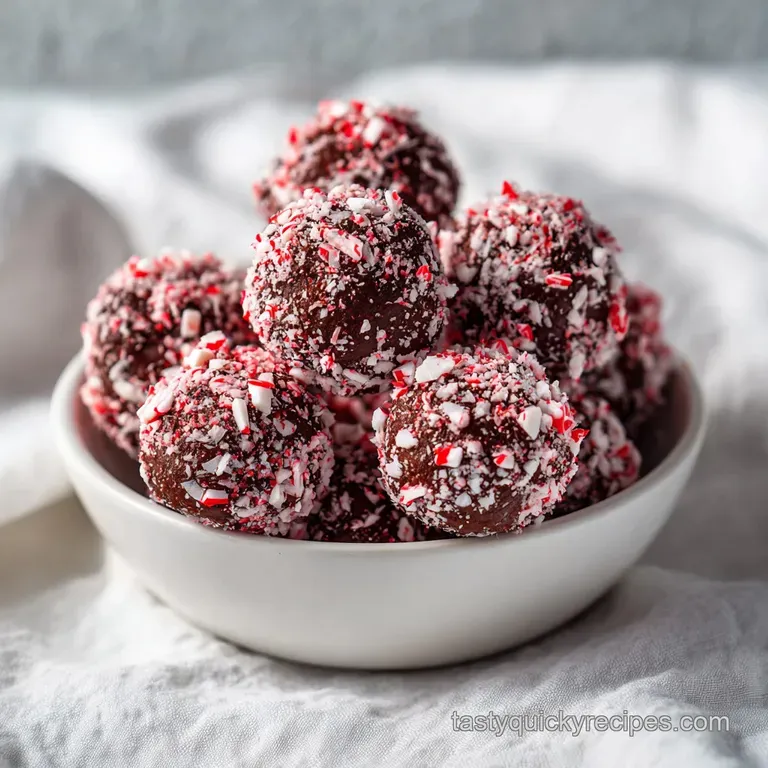
Peppermint Dark Chocolate Truffles: No Bake Treat
- Time:15 minutes active + 2 hours 10 mins chilling = Total 2 hours 25 mins
- Flavor/Texture Hook: Velvety dark chocolate with a shatter crisp peppermint finish
- Perfect for: Last minute holiday hosting or a kid friendly kitchen project
- Velvety Easy No Bake Christmas Treat Secrets
- Quick Stats For Stress Free Prepping
- The Pantry Essentials For Rich Truffles
- Essential Gear For Smooth Chocolate
- Step By Step To Fudgy Perfection
- Fixing Common Truffle Texture Issues
- Creative Twists For Different Palates
- Keeping Your Treats Fresh And Bold
- The Best Pairings For Holiday Platters
- Recipe FAQs
- 📝 Recipe Card
Velvety Easy No Bake Christmas Treat Secrets
The smell of peppermint oil hitting warm chocolate is, honestly, the official scent of December in my house. I remember one year when I tried to make a fancy baked cake for a party, and the oven decided to quit halfway through. I had a kitchen full of guests and a half raw sponge.
In a total panic, I grabbed a bar of 70% cacao and some canned coconut milk, whipped up a batch of these truffles, and rolled them in cocoa powder just as the first doorbell rang.
They didn't just save the night, they were the only thing people were talking about the next morning. This Easy No Bake Christmas Treat with Chocolate is the perfect stress free dessert for the holidays because it doesn't rely on the temperamental nature of an oven.
You get that rich, melt in-your mouth feel without the risk of a baking disaster.
Trust me on this, the secret is in the coconut milk. It gives the chocolate a specific kind of stability and a subtle creaminess that balances the bitterness of the dark cacao. You'll end up with a treat that feels like it came from a high end chocolatier, but you can make it while wearing your favorite pajamas.
Let's crack on and get these rolling.
Quick Stats For Stress Free Prepping
Before you dive in, you need to know exactly how this fits into your holiday schedule. Since there's no actual baking, the "cook" time is really just the melting phase. The bulk of the time is spent in the fridge, which is the best part because you can do other things while the chocolate sets.
When you're prepping for a crowd, it's easy to lose track of how many truffles you actually need. I've found that most people grab two or three of these because they're quite rich.
This recipe is designed to yield 24 pieces, which is plenty for a standard family gathering, but you can easily scale it if you're feeding the whole neighborhood.
| Servings | Ingredient Adjustments | Tray Size | Chill Time |
|---|---|---|---|
| 12 Truffles | Half all ingredients | Small plate | 1 hour 30 mins |
| 24 Truffles | Standard Schema quantities | 9x9 inch tray | 2 hours |
| 48 Truffles | Double all ingredients | 9x13 inch tray | 2 hours 30 mins |
Right then, keep in mind that the chill time is non negotiable. If you try to roll these while they're still tacky, you'll end up with chocolate all over your palms and truffles that look more like lumpy potatoes than elegant spheres. Patience is the only "hard" part of this recipe.
The Pantry Essentials For Rich Truffles
Choosing the right chocolate is where most people trip up. I always go for a 70% cacao dark chocolate. If you go too low (like 50%), the truffles can feel overly sweet and lose that sophisticated edge. If you go too high (like 90%), they can become slightly grainy or too intense for some guests.
The 70% mark is that sweet spot where the bitterness is balanced by the coconut milk.
For the coconut milk, make sure you're using the full fat canned version. The "carton" coconut milk you find in the refrigerated section is too watery and won't give you the structural integrity needed for rolling. You want that thick, creamy layer from the top of the can to ensure the truffles stay firm.
Component Analysis
| Ingredient | Science Role | Pro Secret |
|---|---|---|
| Dark Chocolate (70%) | Structural Base | Chop finely to ensure even melting without overheating |
| Full fat Coconut Milk | Emulsifying Agent | Shake the can before opening to integrate the fats |
| Peppermint Extract | Flavor Profile | Add at the end to prevent the volatile oils from evaporating |
| Cocoa Powder | Moisture Barrier | Sift it first to avoid clumps on the finished truffle |
Ingredients & Substitutes
- 8 oz dark chocolate (70% cacao), finely chopped Why this? Provides a stable, rich base with a snap.
- 1/2 cup full fat coconut milk (canned) Why this? Creates a dairy-free, velvety emulsion.
- 1 tbsp pure peppermint extract Why this? Adds the signature festive punch.
- 1 tsp vanilla extract Why this? Rounds out the sharpness of the mint.
- 1 pinch sea salt Why this? Enhances the chocolate notes.
- 1/4 cup crushed peppermint candy canes Why this? Adds a shatter like texture and visual pop.
- 2 tbsp unsweetened cocoa powder Why this? Prevents sticking and adds a bitter contrast.
| Original Ingredient | Substitute | Why It Works |
|---|---|---|
| Coconut Milk (1/2 cup) | Heavy Cream (1/2 cup) | Similar fat content. Note: Makes the recipe non vegan and slightly richer |
| Dark Chocolate (8 oz) | Semi Sweet Chips (8 oz) | Easy to find. Note: Sweeter and softer; may need extra chill time |
| Peppermint Extract | 1 drop Peppermint Oil | More concentrated. Note: Use sparingly to avoid a "toothpaste" taste |
If you're looking for other ways to keep the holiday treats simple, you might like my White Trash Snack Mix, which also avoids the oven entirely.
Essential Gear For Smooth Chocolate
You don't need a professional kitchen to pull this off, but a few specific tools make the process way smoother. The most important one is the double boiler. If you don't have one, don't stress, just put a glass bowl over a pot of simmering water.
Just make sure the bottom of the bowl doesn't actually touch the water, or you'll hotspot the chocolate and cause it to seize.
A small cookie scoop or a tablespoon is a lifesaver for consistency. When you're rolling 24 truffles, the last few always end up smaller than the first few if you're just eyeballing it. Using a scoop ensures they all look uniform on the platter.
Chef Note: If you find the chocolate is sticking to your hands during the rolling phase, dip your palms in a little bit of the cocoa powder first. It creates a dry barrier that lets the chocolate slide right into a sphere.
Step by step To Fudgy Perfection

Let's get into the actual movement. The goal here is to create a stable emulsion. According to the ganache principles at Serious Eats, the ratio of fat to liquid is what determines if your truffle is a soft mousse or a firm candy. We've tuned this specifically for a no bake set.
- Combine the chopped dark chocolate and coconut milk in a double boiler. Note: Using chopped bars instead of chips gives a smoother melt.
- Stir slowly over low heat until the mixture is mahogany colored and glossy.
- Whisk in the peppermint extract, vanilla, and salt until the mixture is fully unified.
- Pour the liquid chocolate into a shallow container or onto a parchment lined tray.
- Place the mixture in the refrigerator for 1 to 2 hours until firm to the touch but still slightly pliable.
- Using a small scoop, portion out the chocolate and roll between your palms to create smooth spheres.
- Roll each truffle in the cocoa powder, then press the top into the crushed peppermint candies.
Precision Checkpoints
- - The Color Shift
- The mixture should move from a dull brown to a deep, reflective mahogany.
- - The Touch Test
- When you press the chilled chocolate, it should leave a slight indentation but not stick to your finger.
- - The Sphere Size
- Aim for exactly 1 inch spheres to keep the serving size consistent.
Fixing Common Truffle Texture Issues
Even with a simple recipe, chocolate can be temperamental. The most common issue is "seizing," which happens when a tiny bit of water gets into the chocolate, causing the sugar and cocoa solids to clump together. If this happens, your mixture will look grainy instead of velvety.
Another frequent complaint is the "melting hand" syndrome. If your kitchen is too warm, the fat in the coconut milk will soften quickly as you roll. This is where the cocoa powder becomes your best friend, acting as a dry shell.
Too Soft Truffles
If the mixture won't hold a shape, it's usually because the coconut milk was too thin or the fridge wasn't cold enough. You can't "un add" liquid, but you can add a bit more finely chopped chocolate and remelt it briefly to thicken the base.
Chocolate Seizing
If the mixture becomes clumpy and matte, a tiny bit of warm coconut milk or a teaspoon of vegetable oil can sometimes bring it back to life. Stir slowly and don't overheat.
Hand Sticking
If the chocolate is sticking to your palms, your hands are likely too warm. Chill your hands under cold water and dry them thoroughly before attempting to roll again.
| Problem | Root Cause | Solution |
|---|---|---|
| Grainy Texture | Overheated chocolate | Remelt slowly in a double boiler with 1 tsp coconut milk |
| Flat Spheres | Not chilled long enough | Return to fridge for another 30 minutes |
| Bitter Taste | Cacao percentage too high | Roll in a mix of cocoa powder and powdered sugar |
Preventive Checklist:
- ✓ Chop chocolate into uniform small pieces for even melting
- ✓ Ensure the double boiler bowl never touches the simmering water
- ✓ Use full fat canned coconut milk, not the carton version
- ✓ Chill for at least 120 minutes before attempting to roll
- ✓ Sift your cocoa powder to remove any stubborn lumps
Creative Twists For Different Palates
Once you've mastered the base, you can start playing with the flavors. This is where you can turn one recipe into three different treats. For a nuttier version, I love stirring in a tablespoon of almond butter during step 3. It adds a depth that makes the peppermint feel even more indulgent.
If you want something a bit more "adult," try swapping the vanilla extract for a splash of peppermint schnapps or a tiny bit of spiced rum. Just be careful not to add too much liquid, or you'll throw off the setting time.
The Vegan Swap
This recipe is already naturally vegan thanks to the coconut milk. To keep it that way, just double check that your dark chocolate doesn't contain milk solids. Most 70% bars are vegan, but always read the label.
The Low Carb Version
You can use a sugar-free chocolate alternative and replace the coconut milk with a heavy cream alternative. Note that the texture will be slightly softer, so I recommend chilling them for 3 hours instead of 2.
Decision Shortcut:
- If you want a firmer bite, let them chill for 3 hours instead of 2.
- If you want a sharper mint flavor, add an extra 1/2 tsp of peppermint extract.
- If you want a sweeter treat, use 60% dark chocolate instead of 70%.
Keeping Your Treats Fresh And Bold
Since these don't have preservatives, you'll want to keep them chilled. I store mine in an airtight container lined with parchment paper. If you stack them without a barrier, they can stick together and ruin that beautiful cocoa powder coating.
They stay fresh in the fridge for about 5 days. However, if you're making these as part of a big December prep, they freeze beautifully. Just pop them in a freezer safe bag. When you're ready to serve, let them thaw in the fridge for an hour so they don't get condensation on the outside.
Zero Waste Tip: Don't throw away the leftover cocoa powder or crushed candy canes. I usually stir the leftover cocoa into my morning coffee for a mocha vibe, and the candy shards are great as a topping for vanilla ice cream.
The Best Pairings For Holiday Platters
To really make these stand out, you need to think about how you present them. A single truffle is a snack, but a platter is an experience. I love pairing these with something salty to cut through the richness of the dark chocolate. My Cranberry and Brie bites are the perfect companion here, as the tartness of the cranberry balances the mint.
You can also serve these alongside a glass of cold almond milk or a strong espresso. The bitterness of the coffee actually makes the peppermint pop more.
Plating Levels
| Level | Presentation Style | Key Tweak |
|---|---|---|
| Simple | Parchment paper sheet | Scattered candy cane shards |
| Polished | Mini gold cupcake liners | Single fresh mint leaf on top |
| Restaurant | Slate board or marble slab | Thin dark chocolate drizzle + gold leaf |
Right then, you've got the tools, the science, and the steps. Now it's time to get your hands messy. Just remember: don't rush the chill, don't overheat the chocolate, and definitely don't forget to sneak a few "tester" truffles for yourself before they hit the platter. Enjoy!
Recipe FAQs
Can I use milk chocolate instead of dark chocolate?
No, stick with dark chocolate. Milk chocolate has a higher sugar and dairy content, which may prevent the truffles from setting firmly enough to roll.
Why is my chocolate mixture grainy or separating?
You likely overheated the chocolate. Stir slowly over low heat to maintain a stable emulsion; if it breaks, whisk vigorously to bring the coconut milk and chocolate back together.
How to roll the truffles without them sticking to my hands?
Chill your palms or use a small scoop. Work quickly and ensure the mixture has refrigerated for 1 to 2 hours until it is firm but still slightly pliable.
How long do these truffles stay fresh in the refrigerator?
Store them for up to two weeks. Keep the finished treats in an airtight container to prevent them from absorbing other odors in the fridge.
Is it true I can just microwave the chocolate and coconut milk together?
No, this is a common misconception. Microwaving often leads to hot spots and scorched chocolate; a double boiler ensures the gentle, even heat needed for a glossy finish.
How to know when the mixture is ready for the refrigerator?
Look for a mahogany color and a glossy sheen. Stir the chocolate and coconut milk over low heat until they are fully unified and smooth.
What other treats pair well with these peppermint truffles?
Serve them on a mixed dessert platter. If you enjoyed the texture control of this ganache, the same logic for a rich interior applies to our fudgy center cookies.
No Bake Christmas Truffles