Healthy Chocolate Peanut Butter Oatmeal Bars: Nutty
- Time:15 minutes active + 2 hours chilling = Total 2 hours 15 mins
- Flavor/Texture Hook: Nutty, chewy base with a velvety chocolate shatter
- Perfect for: Morning energy boosts or a healthy school lunch addition
Easy Healthy Chocolate Peanut Butter Oatmeal Bars
The first thing that hits you is that warm, toasted scent of peanut butter mixing with maple syrup. It's that specific, cozy aroma that makes your kitchen feel like a sanctuary. I remember the first time I tried to make a version of these. I took a shortcut and used quick oats, thinking they'd be easier to mix.
Instead, I ended up with a gummy, porridge like paste that just wouldn't set. It was a sticky disaster, but it taught me that the texture of the grain is everything.
That's why I've focused on the Old-fashioned rolled oats here. They are the true hero of this dish. Unlike their quicker cousins, rolled oats keep their structure, giving you a satisfying chew that contrasts with the smooth chocolate topping.
When you press them into the pan, you can feel the resistance of the whole grains, and that's exactly what you want. This isn't just a snack; it's a way to wake up your taste buds with a hit of wholesome energy.
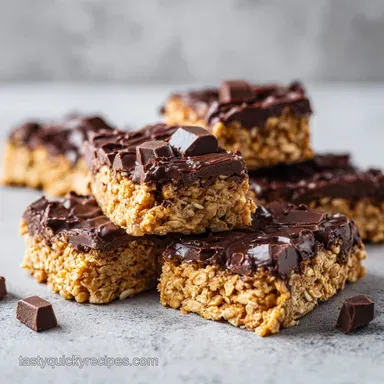
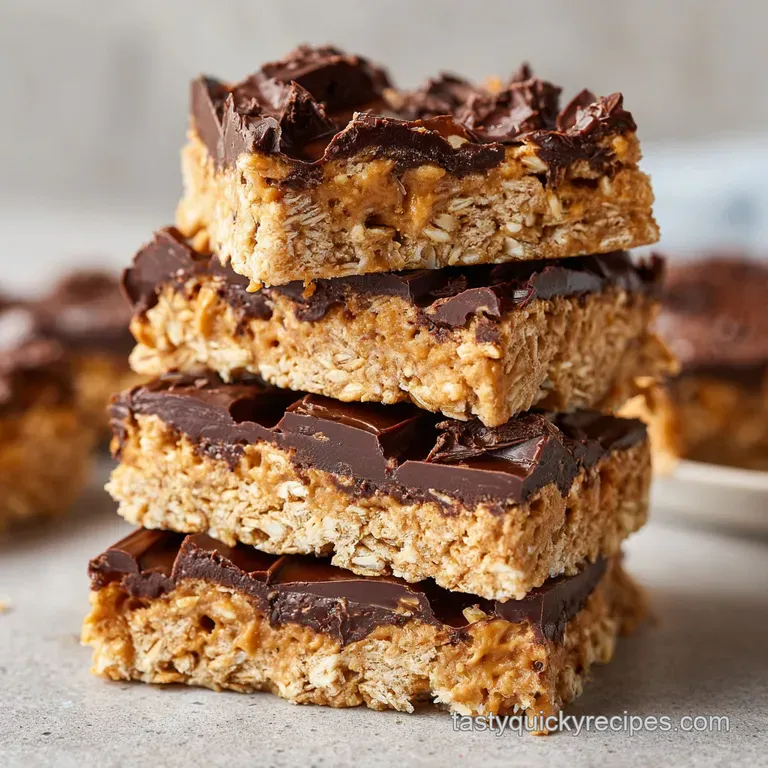
You can expect a treat that feels indulgent but doesn't leave you crashing by noon. We're talking about a base that's densely packed and slightly salty, topped with a layer of dark chocolate that actually snaps when you bite into it.
It's the kind of recipe that makes you feel like you've cheated the system, giving you a dessert like experience while keeping the ingredients clean and energizing.
Avoiding Common Recipe Flaws
Many recipes for these bars fail because they rely on too much honey or sugar, which makes the bars rock hard once they hit the fridge. Other versions use too much oil, leading to a greasy residue that separates from the oats. We avoid this by using the natural fats in the peanut butter to create a stable, chewy bond.
This ensures the bars stay flexible enough to bite into without sticking to your teeth.
Another common issue is the chocolate topping. Most people just melt chocolate chips, but without a bit of added fat, the chocolate becomes brittle and cracks into a million pieces when you try to slice the bars. By adding a touch of coconut oil, we create a more velvety finish.
This allows the chocolate to bend slightly, giving you those clean, professional looking edges every single time.
Finally,, the "no bake" label often leads people to rush the chilling process. If you try to cut these after only an hour, the base will be too soft, and the chocolate will smudge. Patience is the secret ingredient here.
Giving the bars a full two hours in the fridge allows the maple syrup to crystallize slightly and the peanut butter to firm up, locking everything in place.
| Feature | No Bake Method (This Recipe) | Classic Baked Method |
|---|---|---|
| Texture | Chewy and fudgy | Cakey and crisp |
| Nutrients | Retains raw oat enzymes | Toasted, nutty flavor |
| Effort | Low (no oven needed) | Medium (requires baking/cooling) |
Essential Recipe Specs
The magic here happens in the binding process. Since we aren't using heat to melt sugars or bake flour, we rely on the synergy between fats and natural syrups.
- The Oat Grip: Rolled oats have a larger surface area and a coarser texture, which allows the peanut butter to cling to them without turning them into mush.
- Syrup Stability: Maple syrup provides a liquid sweetness that, when chilled, creates a tacky glue that holds the oats together.
- Fat Suspension: Coconut oil lowers the melting point of the chocolate, ensuring it doesn't shatter aggressively but instead has a smooth, velvety break.
- Salt Balance: A pinch of salt doesn't just add flavor; it cuts through the richness of the peanut butter, making the chocolate taste more intense.
- If you want a firmer snap, reduce the coconut oil by 1 teaspoon.
- If you prefer a softer, more fudge like base, add an extra tablespoon of maple syrup.
- If you need a protein boost, stir in a tablespoon of chia seeds with the oats.
Smart Shopping Choices
When picking your ingredients, the quality of your peanut butter is the most important factor. I always go for the natural creamy kind where the only ingredients are peanuts and salt.
The brands that add palm oil or sugar tend to make the bars too sweet and can alter the binding consistency, sometimes making the base too soft to hold its shape.
For the chocolate, go for a dark variety (at least 70% cocoa). This keeps the sugar levels in check and provides a sophisticated bitterness that pairs beautifully with the salty peanut butter. If you use milk chocolate, the bars can become cloying, and you lose that energizing, wholesome feel we're after.
| Original Ingredient | Substitute | Why It Works |
|---|---|---|
| Old-fashioned oats (180g) | Certified gluten-free Oats | Identical texture. Note: Essential for those with Celiac disease. |
| Natural Peanut Butter (125g) | Almond Butter | Similar fat content. Note: More subtle, nutty flavor than peanut butter. |
| Pure Maple Syrup (80ml) | Honey | Same binding properties. Note: Honey is sweeter and thicker, may make bars firmer. |
| Dark Chocolate Chips (170g) | Chopped Dark Chocolate Bar | Same cocoa content. Note: Often has a smoother melt than chips. |
| Coconut Oil (30ml) | Butter (melted) | Provides necessary fat. Note: Adds a dairy flavor and changes the melt point. |
Simple Tool Setup

You don't need a fancy kitchen for this. A large mixing bowl is the main requirement, and I prefer one with a wide rim so I can stir the heavy oat mixture without it spilling over the sides. A sturdy spatula is also key, as you'll need to apply some real pressure to get the base dense enough.
For the pan, an 8x8 inch square baking pan is the standard. I highly recommend lining it with parchment paper, leaving a little overhang on the sides. This creates a "sling" that allows you to lift the entire block of bars out of the pan effortlessly.
Trying to slice them inside the pan often leads to the chocolate sticking to the edges and ruining the look of the first few bars.
Finally, a microwave safe glass bowl is best for the chocolate. Glass distributes heat more evenly than plastic, which helps prevent the chocolate from scorching in those 30 second intervals. If you don't have a microwave, a double boiler (a bowl over a pot of simmering water) works just as well.
Step by step Assembly
First, grab your large bowl and combine the 180g of rolled oats, 125g of creamy peanut butter, 80ml of maple syrup, 5ml of vanilla extract, and 1.5g of fine sea salt. Stir them together with a spatula. You'll notice the smell shift from plain oats to a rich, sweet nuttiness.
Continue stirring until the oats are fully coated and the mixture feels heavy and cohesive.
Now, transfer that thick mixture into your parchment lined 8x8 inch pan. This is the part where you can't be shy. Use your spatula to press the mixture firmly into the corners. You want a dense, level layer. If you leave air pockets, the bars will crumble when you cut them.
Press down hard until the surface is smooth and compact.
For the topping, place 170g of dark chocolate chips and 30ml of melted coconut oil in your glass bowl. Heat them in the microwave in 30 second bursts. Stir between each interval. Stop as soon as the mixture is glossy and smooth. If you overheat it, the chocolate will seize and become grainy.
Carefully pour the melted chocolate over the oat base. Use the back of a spoon or a spatula to spread it evenly all the way to the edges. While the chocolate is still wet, sprinkle a pinch of flaky sea salt across the top. This adds a tiny, crystalline crunch and an immediate aroma of salted cocoa.
The final step is the hardest: waiting. Place the pan in the refrigerator for at least 2 hours. This is the crucial window where the fats solidify and the chocolate sets into that perfect snap. Once the time is up, lift the parchment paper sling to remove the block from the pan.
Slice into 16 uniform rectangles using a sharp knife.
Solving Texture Problems
If you find that your bars are falling apart, it's usually a sign that the base wasn't pressed firmly enough or the ratio of syrup to oats was off. A crumbly base is frustrating, but it's an easy fix for next time. Make sure you're using the exact weight of oats, as too many will soak up all the binder.
Another common hiccup is the chocolate topping. If it's too hard and cracks the base when you cut it, you likely skipped the coconut oil or used a chocolate with too much stabilizer. The coconut oil acts as a buffer, making the chocolate more pliable.
Base Too Crumbly
This usually happens if the peanut butter was too dry or the oats weren't pressed down with enough force. The structure depends entirely on the mechanical bond between the oats and the sticky syrup.
| Problem | Root Cause | Solution |
|---|---|---|
| Bars crumble when cut | Under pressed base | Press firmly with a flat bottomed glass next time |
| Base feels too dry | Oats absorbed too much syrup | Add 1 tbsp of maple syrup and re press |
| Chocolate separates | Oil wasn't fully mixed | Stir more vigorously before pouring |
Chocolate Topping Issues
If the chocolate looks dull or has white streaks, it's likely "bloomed," which happens if the temperature changes too quickly. It's still safe to eat, but it loses that velvety sheen.
Cutting Without Cracking
To get those clean lines, dip your knife in hot water and wipe it dry between every single cut. The heat slices through the chocolate without dragging it down into the oat base.
Common Mistakes Checklist
- ✓ Use rolled oats, never quick or instant oats (prevents mushiness)
- ✓ Line the pan with parchment paper "slings" (prevents sticking)
- ✓ Stir chocolate every 30 seconds (prevents scorching)
- ✓ Press the base with significant force (prevents crumbling)
- ✓ Chill for a full 2 hours (ensures structural integrity)
Creative Flavor Swaps
If you're feeling adventurous, you can easily tweak this recipe to fit your mood. For a more "morning" vibe, you could swap the dark chocolate for a layer of almond butter mixed with a bit of honey. This makes them taste like a nut butter sandwich and pairs great with a cup of coffee.
For those who love extra texture, stirring in some toasted sesame seeds or hemp hearts into the oat base adds a subtle nuttiness and a bit more protein. If you're looking for something similar but in a different form, my Protein Balls use a similar flavor profile but are easier to pop in your mouth on the go.
| Original Ingredient | Substitute | Why It Works |
|---|---|---|
| Maple Syrup | Date Paste | Natural sweetness. Note: Denser texture, slightly more "fruity" flavor. |
| Peanut Butter | Cashew Butter | Creamy consistency. Note: Milder taste, makes the chocolate pop more. |
| Dark Chocolate | White Chocolate | Creamy sweetness. Note: Much sweeter; reduce maple syrup in the base. |
Smart Storage Tips
To keep these bars from getting soft, store them in an airtight container in the refrigerator. They'll stay fresh and firm for about 5 days. If you're making a big batch, you can freeze them for up to 2 months. I find that freezing them actually makes the chocolate snap even more satisfying.
When you're ready to eat a frozen bar, you can either let it thaw for 10 minutes at room temperature or eat it straight from the freezer for a cold, fudge like treat. If you're looking for another peanut heavy snack to store in your pantry, these Peanut Butter Cookies are a great companion.
As for zero waste, don't throw away the chocolate residue left in your melting bowl. Scrape it out with a piece of fruit or a cracker. Also, if you have leftover oats or peanut butter, they're great for making a quick morning porridge or a smoothie base.
Best Serving Ideas
These bars are designed for energy, so they're best served as part of a balanced morning routine. I love pairing one bar with a bowl of fresh berries and a glass of cold almond milk. The acidity of the berries cuts through the richness of the peanut butter, making the whole experience feel lighter.
For a mid day pick me-up, try pairing a bar with some sliced apple. The crispness of the apple and the chewiness of the oatmeal bar create a great texture contrast. If you're serving these to guests, you can arrange them on a platter with a few handfuls of walnuts and dried cranberries for a wholesome dessert board.
Finally, if you want to get fancy, you can drizzle a little extra melted peanut butter over the top of the chocolate just before serving. It adds a visual pop and an extra layer of flavor that makes these simple bars feel like they came from a high end cafe.
Recipe FAQs
Can I use quick oats instead of rolled oats?
No, stick with old-fashioned rolled oats. Quick oats are too fine and will result in a mushy texture rather than a chewy, structured bar.
How to melt the chocolate without burning it?
Heat in 30-second intervals in the microwave. Stirring between each interval distributes heat evenly to ensure the mixture stays glossy and smooth.
Is it true these bars require baking in the oven?
No, this is a common misconception. These are no-bake bars that rely on refrigeration to set the base and chocolate.
Why are my bars crumbling when I slice them?
Press the base more firmly into the pan. Use a spatula to pack the mixture tightly into the corners to create a dense, cohesive layer.
How to store these bars to keep them firm?
Store them in an airtight container in the fridge. This prevents the coconut oil and chocolate from softening at room temperature.
Can I substitute the maple syrup with honey?
No, maple syrup provides the specific cohesive bind needed for this texture. If you enjoy the salty sweet balance in this recipe, you will love the flavor profile of our chocolate sea salt snack.
How long should the bars chill before slicing?
Refrigerate for at least 2 hours. This ensures the chocolate is completely firm and the oat base is set enough to cut 16 uniform rectangles.
Healthy Chocolate Peanut Butter Bars