Candy Cane Frosted Cookies: Soft Buttery Snap
- Time:15 minutes active + 30 minutes chilling = 57 minutes total
- Flavor/Texture Hook: Velvety peppermint icing with a soft, buttery snap
- Perfect for: Holiday cookie exchanges, beginner bakers, and festive dessert platters
Bake Stunning Candy Cane Frosted Cookies
The second that peppermint extract hits the butter, your whole kitchen starts to smell like a winter wonderland. I remember the first time I tried making these, I thought I needed a fancy piping bag and a degree in art to get those red and white stripes.
I spent an hour trying to pipe lines of dough onto a tray, and they just merged into a pink blob the moment they hit the oven. It was a total mess, and I almost gave up on the whole "cane" look entirely.
But then I realized the trick is all in the chill. Forget the precision piping and the stress. By rolling the dough into logs and twisting them, you get a natural, rustic swirl that actually holds its shape. It's a foolproof way to get that professional look without the professional headache.
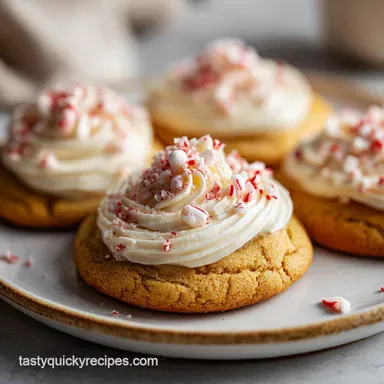
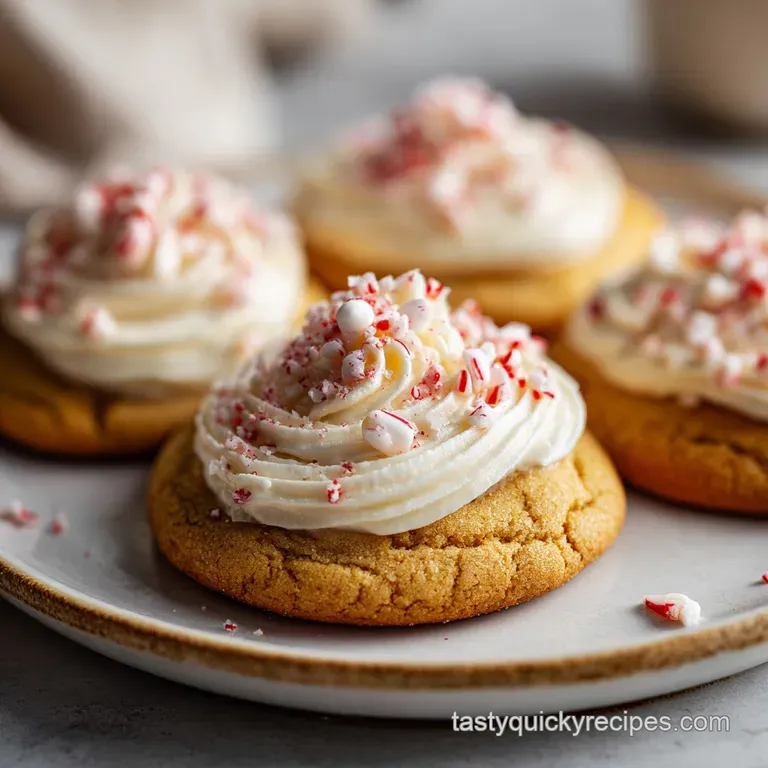
These cookies aren't just about the looks, though, the combination of the buttery base and the sharp, cool peppermint icing is just irresistible.
You can expect a cookie that is soft and tender, not crunchy like a ginger snap, but with enough structure to hold a generous swirl of frosting. The red gel coloring gives a vibrant pop that makes them look like they came from a high end bakery.
Trust me on this, once you see how easy the twisting method is, you'll never go back to the "blob" method again. Let's crack on and get these in the oven.
Quick Guide to the Bake
Before we dive into the flour and sugar, it's helpful to know exactly how much you're making and how to adjust for a bigger crowd. Most people find that 24 cookies are plenty for a small family, but if you're taking these to an office party, you'll want to scale up.
Since these are rich, peppermint forward treats, people usually only grab one or two. But for a huge party, the logistics change slightly. You'll need more parchment paper and potentially multiple baking sheets to avoid overcrowding the oven, which can lead to uneven baking.
| Servings | Ingredient Adjustments | Pan Size | Cook Time |
|---|---|---|---|
| 12 people | ½ batch (all ingredients halved) | 1 medium sheet | 10-11 minutes |
| 24 people | 1 full batch (as listed) | 2 medium sheets | 12 minutes |
| 48 people | 2 full batches | 4 medium sheets | 12 minutes (per batch) |
Having this layout helps you plan your oven space. If you don't have four sheets, just work in batches. Just remember that the dough needs to stay cold, so keep the extra logs in the freezer until the very second you're ready to slice and bake them.
Essential Ingredients for Festive Sweets
Right then, let's talk about what's going into the bowl. The secret to a cookie that doesn't spread into a pancake is the balance between the fat (butter) and the structure (flour). We're using a classic creamed butter method here, which gives us that velvety mouthfeel.
The peppermint extract is the star, but it's a powerful one. I've seen people go overboard and end up with cookies that taste like toothpaste. We're using a precise amount to ensure it's refreshing and festive, not overwhelming.
The red gel coloring is also a key choice here, as liquid colors can throw off the hydration of the dough, making it too sticky to roll.
Why the Chill Matters: Freezing the twisted logs for 30 minutes solidifies the butter. This prevents the dough from flattening instantly in the oven, preserving the "cane" swirl.
Sugar Stability: Using powdered sugar in the icing creates a tight molecular structure. This ensures the frosting stays put and doesn't slide off the cookie as it sits at room temperature.
Butter Aeration: Beating the butter and sugar until pale incorporates tiny air bubbles. These bubbles expand during baking, giving the cookies a light, tender crumb.
| Ingredient | Science Role | Pro Secret |
|---|---|---|
| Unsalted Butter | Provides fat and structure | Use a thermometer to ensure it's exactly 65°F |
| All Purpose Flour | Builds the gluten network | Spoon and level for a lighter cookie |
| Peppermint Extract | Primary flavor volatile | Add to the frosting separately for a double punch |
| Powdered Sugar | Icing stability and sweetness | Sift it to avoid tiny lumps in the velvet finish |
For the Cookie Dough
- 1 cup (225g) unsalted butter, softened Why this? Provides the rich, buttery base for the cookie
- Substitute: Salted butter (omit the extra salt in the recipe)
- 1 cup (200g) granulated sugar Why this? Helps with browning and sweetness
- Substitute: Caster sugar for a finer crumb
- 1 large egg (50g) Why this? Binds the ingredients together
- Substitute: 1/4 cup whisked egg or egg replacer
- 1 tsp (5ml) vanilla extract Why this? Rounds out the sharp peppermint flavor
- Substitute: Almond extract for a nutty twist
- ½ tsp (2.5ml) peppermint extract Why this? The signature holiday flavor
- Substitute: Finely crushed peppermint candies (though less intense)
- 2 ½ cups (310g) all purpose flour Why this? Standard structure for a soft cookie
- Substitute: 1:1 gluten-free flour blend
- 1 tsp (5g) baking powder Why this? Gives a slight lift to the dough
- Substitute: 1/4 tsp baking soda + 1/2 tsp cream of tartar
- ¼ tsp (1.5g) salt Why this? Enhances all other flavors
- Substitute: Fine sea salt
For the Peppermint Frosting
- 2 cups (240g) powdered sugar Why this? Creates the thick, white base
- Substitute: Confectioners' sugar
- 2 tbsp (30ml) heavy cream Why this? Adds richness and controls consistency
- Substitute: Whole milk or coconut cream
- ¼ tsp (1.25ml) peppermint extract Why this? Reinforces the peppermint theme
- Substitute: A drop of peppermint oil (be very careful with potency)
For the Garnish
- 2-3 drops red gel food coloring Why this? High pigment without adding extra liquid
- Substitute: Beet powder (will be more muted pink)
- ½ cup (60g) crushed candy canes Why this? Adds a shatter like crunch
- Substitute: Red and white nonpareils
Gear for Stress Free Baking
You don't need a professional kitchen to make these, but a few specific tools make the process much smoother. I always recommend a stand mixer if you have one, like a KitchenAid, because creaming butter and sugar by hand is a workout I'd rather avoid during the holidays.
If you're doing this by hand, a sturdy whisk and a handheld mixer will work just fine. The most important "gear" here is actually the parchment paper. Without it, these cookies can stick to the pan, and trying to peel a "cane" shape off a metal sheet is a recipe for disaster.
Chef's Note: If you don't have a rolling pin for the logs, just use your hands to roll the dough on a clean counter. The warmth of your palms actually helps the dough come together more smoothly.
Make sure you have a wire rack ready. Moving cookies from a hot pan to a cool rack prevents the bottoms from overcooking due to carryover heat. Also, a small offset spatula is a lifesaver for applying the frosting in a velvety, smooth layer.
Step by step Baking Guide
Right then, let's get into the action. This process is divided into three phases: the dough, the shaping, and the frosting. Take your time with the shaping, as that's where the magic happens.
Phase 1: The Dough Base
- Beat the softened butter and granulated sugar. Use a medium speed until the mixture is pale and fluffy. Note: This creates the air pockets needed for a tender cookie.
- Beat in the egg, vanilla, and peppermint extract. Mix until fully incorporated and smooth.
- Gradually add the flour, baking powder, and salt. Mix on low until a soft dough forms and no streaks of flour remain. Note: Overmixing at this stage can make the cookies tough.
- Divide the dough into two equal portions. Add the red gel coloring to one half and mix until the color is vibrant and uniform. Leave the other half white.
Phase 2: Shaping & Baking
- Roll each colored dough into a log. Twist the red and white logs together gently, like a rope, and place them in the freezer for 30 minutes. Note: This is the most critical step for shape retention.
- Preheat your oven to 350°F (175°C).
- Slice the chilled logs into 1 inch pieces. Gently curve the top of each piece with your fingers to create a cane shape.
- Place the cookies on a parchment lined sheet. Bake for 10-12 minutes until edges are just set but still pale. Note: Do not let them brown, or you'll lose the festive white and red contrast.
- Let cookies rest on the pan for 5 minutes until they firm up, then move them to a wire rack to cool completely.
Phase 3: The Frosted Finish
- Whisk together the powdered sugar, heavy cream, and peppermint extract. Mix until you have a stable, velvety icing.
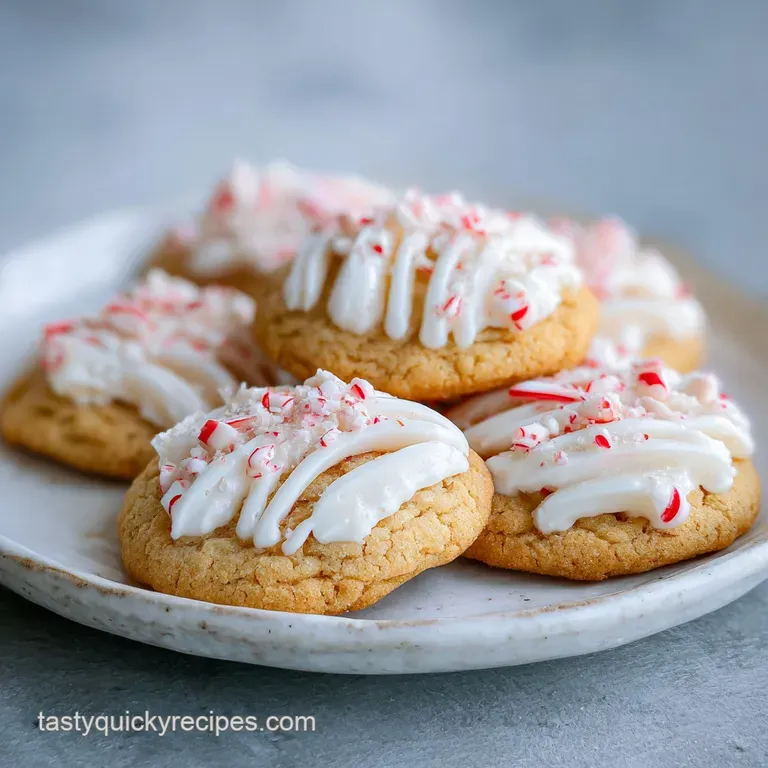
- Apply a generous dollop of icing to the cooled cookies. Garnish immediately with crushed candy canes before the icing sets.
Fixing Common Baking Blunders
Even the best of us have "cookie catastrophes." Most issues with this recipe come down to temperature. If your kitchen is too hot, the butter softens too quickly, and your beautiful canes will turn into red and white puddles.
Preventing Cookie Spread
If your cookies flatten out, it's usually because the dough was too warm when it hit the oven. This happens if the freezer time was skipped or if the oven wasn't fully preheated. To fix this in the future, make sure the dough feels firm to the touch, almost like cold clay, before slicing.
Fixing Runny Frosting
Frosting that slides off the cookie usually has too much liquid. Powdered sugar is very sensitive to humidity. If the icing is too thin, add more powdered sugar one tablespoon at a time. You want a consistency that holds a peak but still flows smoothly.
| Problem | Root Cause | Solution |
|---|---|---|
| Cookies are flat | Dough was too warm | Freeze logs for a full 30 mins |
| Icing is transparent | Not enough powdered sugar | Add 1 tbsp sugar at a time |
| Colors bled together | Over mixed while twisting | Twist gently; don't over knead |
- ✓ Pat the baking sheet with a bit of flour or use high-quality parchment to prevent sticking.
- ✓ Ensure butter is softened but not melting (it should dent when pressed, not ooze).
- ✓ Slice the logs with a sharp knife to avoid squashing the swirl.
- ✓ Wait until the cookies are completely cold before frosting, or the icing will melt.
- ✓ Use gel colors rather than liquid to maintain dough consistency.
Creative Twist and Variations
While the classic version is a winner, you can definitely play around with the flavors. If you're feeling adventurous, try a chocolate peppermint hybrid. You can replace a small portion of the flour with cocoa powder in the red dough to create a "dark chocolate and peppermint" swirl.
It's a bit more decadent and pairs beautifully with the white icing.
For those who want a different texture, you could try making these as a thumbprint cookie. Instead of twisting logs, roll them into balls, press a thumbprint in the center, and fill it with the peppermint frosting. If you love other festive treats, you might also enjoy my Christmas Cookies recipe, which uses a similar buttery base but a different shaping method.
If you want to lean into the "frozen" aspect of peppermint, try adding a pinch of cream of tartar to the icing. This gives it a slightly tangier, more "frosty" taste that cuts through the sweetness of the powdered sugar.
For a more adult version, you can replace the heavy cream in the frosting with a teaspoon of peppermint schnapps.
| Premium Ingredient | Budget Alternative | Flavor Impact | Savings |
|---|---|---|---|
| Pure Peppermint Extract | Peppermint Flavoring | Slightly more artificial | $3-5 |
| Heavy Cream | Whole Milk | Less richness, thinner icing | $1-2 |
| Gel Food Color | Liquid Food Color | More muted color, softer dough | $2-3 |
If you're not in the mood for peppermint but want a similarly visually striking cookie, consider my Fudgy Chocolate Crinkle Cookies for a deep chocolate alternative that's just as festive.
Storage and Waste Tips
These cookies stay fresh and soft for quite a while if stored correctly. I recommend an airtight container with a piece of parchment paper layered between the cookies. This prevents the frosting from sticking to the cookie above it, which would ruin that velvety finish.
In the fridge, they'll last about 5-7 days. In the freezer, they can go up to 3 months. If you freeze them, I suggest freezing them before frosting. Once they're baked and cooled, freeze them in a single layer on a tray, then move them to a bag.
Thaw them at room temperature and apply the frosting fresh for the best experience.
To avoid waste, don't throw away the leftover frosting. It's essentially a peppermint glaze. You can drizzle it over a warm brownie or use it as a dip for fresh strawberries. If you have leftover crushed candy canes, they're great as a topping for morning oatmeal or stirred into a batch of homemade hot chocolate.
Perfect Matches for Peppermint
Serving these as a standalone treat is great, but pairing them with the right drink takes the whole experience to another level. Because the cookies are quite sweet and buttery, you want something that provides a contrast.
A strong, dark roast coffee is the best companion. The bitterness of the coffee cuts through the sugar of the icing, and the warmth brings out the peppermint notes in the cookie base.
If you're serving these at a party, a steaming pot of Earl Grey tea also works wonderfully, as the bergamot adds a citrusy layer that complements the mint.
For a more indulgent pairing, try a glass of cold milk or a white hot chocolate. The creaminess of the drink mirrors the velvety texture of the frosting, creating a cohesive, dessert like experience.
If you're looking for something non alcoholic and festive, a sparkling cranberry spritzer provides a tart, bubbly contrast that cleanses the palate between bites of these rich sweets.
Recipe FAQs
Can I freeze these cookies?
Yes, for up to 3 months. Freeze them after baking and cooling but before frosting. Thaw at room temperature before applying the icing.
How to prevent the cookies from spreading too much?
Freeze the twisted dough logs for 30 minutes before slicing. This ensures the butter stays cold, helping the cookies keep their cane shape during baking.
Is it true I should bake them until they are golden brown?
No, this is a common misconception. Bake for 10-12 minutes until the edges are just set but the cookies remain pale to ensure a soft texture.
How to get a stable frosting that doesn't run?
Whisk powdered sugar, heavy cream, and peppermint extract until thick. The fat in the heavy cream creates a more stable structure than milk would.
Can I use liquid food coloring instead of gel?
No, stick with gel. Liquid coloring adds too much moisture, which can make the dough too sticky to roll and twist effectively.
How to store these cookies to keep the frosting intact?
Use an airtight container with parchment paper layers. Placing paper between cookies prevents the icing from sticking and ruining the finish.
Can I substitute the peppermint extract for another flavor?
Yes, other extracts work well. If you enjoyed managing distinct flavor profiles here, see how we balance tastes in our chewy snickerdoodle cookies.
Candy Cane Frosted Cookies