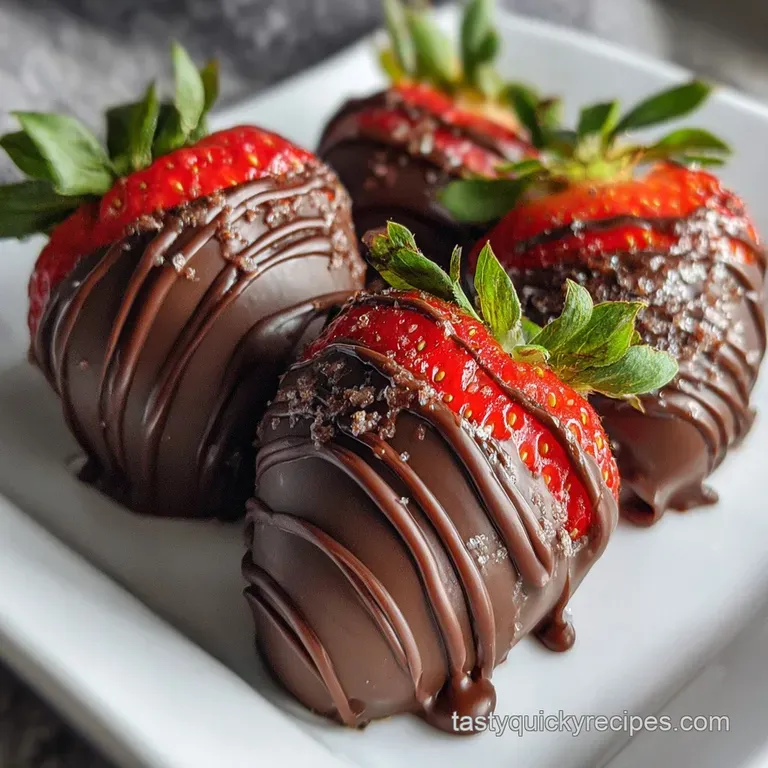
Valentines Strawberry Idea with Dark Chocolate Cover
- Time: Active 15 minutes, Passive 20 minutes, Total 35 minutes
- Flavor/Texture Hook: Velvety dark chocolate shell with a juicy, vibrant strawberry burst
- Perfect for: Romantic surprises, decadent gift giving, or an impressive holiday centerpiece
- Elegant Valentines Strawberry Idea with Dark Chocolate Cover
- Understanding the Physics of Glossy Shells
- Selecting Premium Components for Quality Results
- Essential Tools for Professional Sweet Results
- A Foolproof Method for Consistent Success
- Expert Solutions for Dipping and Setting Blunders
- Modifying Your Treats for Specific Preferences
- Debunking Common Chocolate Dipping Myths
- Keeping Your Berries Fresh and Using Leftovers
- Creating the Ultimate Dessert Spread
- Recipe FAQs
- 📝 Recipe Card
Imagine the sound of a thin, dark chocolate shell giving way to a sudden, juicy burst of a ripe berry. We've all been there, staring at a tray of "sweating" strawberries or chocolate that looks dull and grey.
It's frustrating when you want to create something special, but the physics of fruit and fat just won't cooperate.
Indulge in this exquisite Valentine's Strawberry Idea with Dark Chocolate Cover, a guaranteed showstopper. I remember the first time I tried this; I didn't dry the berries properly and the chocolate literally slid off into a puddle.
Since then, I’ve obsessed over the tiny details that separate a home kitchen mishap from a boutique style confection.
We are going to focus on the textures that matter: the shattering snap of tempered chocolate and the silky, unblemished skin of the fruit. This isn't just about dipping fruit in a bowl; it's about managing moisture and temperature to get that professional, high gloss sheen that makes everyone think you ordered these from a high end chocolatier.
Elegant Valentines Strawberry Idea with Dark Chocolate Cover
The secret to a stunning result lies in how we handle the fat crystals in the cocoa butter. When we talk about this Valentines Strawberry Idea with Dark Chocolate Cover, we are really talking about creating a stable emulsion that clings to the surface of the fruit without seizing or streaking.
The Science of Why it WorksFat Stabilization: Adding refined coconut oil lowers the melting point of the dark chocolate just enough to prevent it from becoming brittle, while the saturated fats ensure a glossy, smooth finish.
Surface Tension: Removing every microscopic drop of water from the berry skin allows the hydrophobic chocolate to form a tight, unyielding bond with the fruit.
By understanding how these elements interact, you can avoid the dreaded "chocolate foot" (that pool of chocolate at the base) and ensure a uniform, velvety coating. It's similar to the coating technique used in our Valentines Chocolate Covered Strawberry recipe, where texture and appearance are the primary goals.
| Component | Science Role | Pro Secret |
|---|---|---|
| Dark Chocolate (60%) | Provides the structural base via cocoa butter crystals. | Use bars, not chips, for a higher cocoa butter ratio. |
| Refined Coconut Oil | Acts as a thinning agent and adds a high gloss sheen. | Refined oil ensures no coconut flavor interferes with the cocoa. |
| Fresh Strawberries | The moisture source that must be strictly controlled. | Leave the green calyx on to act as a natural dipping handle. |
| White Chocolate | Higher sugar/milk solid content for decorative contrast. | Melt at a lower temperature than dark chocolate to avoid graininess. |
Keeping the berries at room temperature before dipping is another trick I learned the hard way. Cold berries cause the chocolate to set too fast, often leading to cracks as the fruit expands slightly while warming up.
We want a marriage between the shell and the fruit, not a forced arrangement that falls apart at the first bite.
Understanding the Physics of Glossy Shells
When you melt chocolate, you are essentially breaking down a highly organized structure of crystals. To get that "shatter" when you bite in, those crystals need to realign in a specific way.
If you just blast it in the microwave, the crystals become chaotic, resulting in a matte, soft coating that melts the second your fingers touch it.
Chef's Tip: If you want a truly professional shine, use a hairdryer on the lowest, coolest setting to gently blow air over the berries right after dipping. This helps set the outer "skin" of the chocolate quickly, locking in the light reflective properties for a mirror like finish.
The choice of 60% cacao is intentional. Anything higher can become too bitter when paired with the natural acidity of the strawberry, and anything lower often contains too many fillers that prevent a clean set.
It's all about finding that sweet spot where the richness of the cocoa complements the bright, floral notes of the fruit.
| Original Ingredient | Substitute | Why It Works |
|---|---|---|
| Dark Chocolate (8 oz) | Semi sweet Chocolate | Slightly sweeter but maintains a similar setting point. |
| Coconut Oil (1 tsp) | Cocoa Butter (1 tsp) | The purest way to add gloss without altering the fat profile. |
| White Chocolate (2 oz) | Ruby Chocolate | Adds a natural pink hue and a tart, berry like flavor profile. |
If you find yourself with extra berries and chocolate, they make a fantastic addition to a Valentines Charcuterie Board recipe. The contrast between the salty cheeses and the snappy chocolate covered fruit is nothing short of magical.
Selecting Premium Components for Quality Results
To make this Valentines Strawberry Idea with Dark Chocolate Cover, you need to start with the best fruit available. Look for berries that are heart shaped, firm to the touch, and have vibrant green leaves.
If the leaves are wilting, the berry is already losing internal moisture, which leads to "sweating" inside the chocolate shell later.
- 1 lb fresh strawberries: Look for uniform sizing so they all set at the same rate. Why this? Uniform berries ensure even chocolate distribution and a balanced presentation.
- 8 oz high-quality dark chocolate (60% cacao): Avoid "candy melts" which use palm oil instead of cocoa butter. Why this? High cocoa butter content is essential for that signature shattering snap.
- 1 tsp refined coconut oil: This is your secret weapon for that professional glow. Why this? It thins the chocolate for a delicate, rather than clunky, shell.
- 2 oz white chocolate: Used for the decorative drizzle. Why this? Provides a visual pop and a creamy counterpoint to the dark cocoa.
- 1 pinch flaked sea salt: A tiny amount to brighten the chocolate. Why this? Salt suppresses bitterness and highlights the fruit’s natural sugars.
I’ve found that washing the berries at least 2 hours before you plan to dip them is the only way to go. Even the slightest hint of dampness around the green leaves will cause the chocolate to seize, turning your silky mixture into a grainy, clumpy mess.
I usually lay mine out on a clean kitchen towel and even use a gentle fan to make sure they are bone dry.
Essential Tools for Professional Sweet Results
You don't need a professional laboratory, but a few specific tools will make your life much easier. A glass or metal bowl is better than plastic for melting chocolate because plastic can retain odors or moisture that might ruin the flavor.
- Small glass bowls: For the double boiler method or microwave.
- Parchment paper: Essential for a non stick surface that allows for clean removal.
- Toothpicks or bamboo skewers: Helpful if your berries have very short stems.
- Small piping bag: Or a sandwich bag with the corner snipped for the white chocolate drizzle.
- Baking sheet: To provide a flat, stable surface for the berries to set.
I once tried to set these on a regular plate, and they stuck so badly I ended up eating the chocolate with a spoon while the berries stayed on the ceramic. Always use parchment or a silicone mat.
The way the chocolate releases from parchment is incredibly satisfying it leaves a perfectly smooth bottom with no jagged edges.
A Foolproof Method for Consistent Success
Getting the temperature right is the difference between a dull brown berry and a masterpiece. We want to avoid overheating at all costs. If you smell the chocolate "toasting," it's already too late. Slow and steady is the mantra here.
- Wash and dry the 1 lb fresh strawberries thoroughly. Note: This prevents the chocolate from sliding off.
- Chop the 8 oz dark chocolate into uniform, small shards. Note: Smaller pieces melt evenly and faster, preventing hot spots.
- Melt the dark chocolate with 1 tsp refined coconut oil using a double boiler. Note: Steam should never touch the chocolate.
- Stir the mixture until it is completely velvety and fluid.
- Hold a strawberry by the green stem and submerge it into the dark chocolate. Note: Leave a small sliver of red showing at the top for contrast.
- Lift and swirl the berry, allowing the excess chocolate to drip back into the bowl. Note: This prevents the "chocolate foot" from forming.
- Place the berry on a parchment lined tray until the surface begins to lose its wet look.
- Melt the 2 oz white chocolate in a separate small bowl.
- Drizzle the white chocolate in thin, sweeping motions across the berries.
- Sprinkle a tiny pinch of flaked sea salt until the chocolate is fully set and firm.
Wait for the chocolate to set at room temperature if possible. Shoving them straight into the fridge can cause condensation to form, which ruins the gloss. If your kitchen is very warm, 10 minutes in the fridge is okay, but bring them back to room temperature before serving for the best flavor.
Expert Solutions for Dipping and Setting Blunders
Even with the best intentions, chocolate can be temperamental. One of the biggest issues people face is "seizing." This happens when a tiny drop of water gets into the melting chocolate, causing the sugars to clump together. If this happens, don't panic, but you might need to start that batch over for dipping.
Why Your Chocolate Is Grainy
If your chocolate looks clumpy or thick, it likely seized from moisture or was scorched by high heat. Chocolate is very sensitive to temperatures above 115°F.
| Problem | Root Cause | Solution |
|---|---|---|
| Chocolate is thick/lumpy | Moisture contamination (seizing) | Add a teaspoon of vegetable oil and stir vigorously to smooth. |
| White streaks on surface | Fat bloom from temperature shock | Store in a cool, dry place; avoid rapid temperature changes. |
| Berries are "weeping" | Internal moisture escaping the shell | Dip berries as close to serving as possible; don't hull them. |
Why Your Drizzle Is Messy
If your white chocolate drizzle looks like thick globs instead of elegant lines, it’s usually because the chocolate hasn't been thinned enough or it has cooled too much. Ensure it's fluid enough to run off a spoon in a continuous ribbon.
Modifying Your Treats for Specific Preferences
This recipe is naturally quite flexible. If you are looking for a dairy-free version, many high-quality dark chocolates are already vegan, but always check the label for "milk solids." For a keto friendly version, you can find excellent sugar-free chocolate chips that melt beautifully when combined with the coconut oil.
- For a Vegan Indulgence: Use a dairy-free dark chocolate and skip the white chocolate drizzle or use a cashew based alternative.
- For a sugar-free Treat: Use stevia sweetened chocolate bars; they have the same fat content and will set just as well.
- For Added Texture: Roll the freshly dipped berries in crushed pistachios or toasted coconut before the chocolate sets.
When it comes to scaling this recipe, it's remarkably easy. If you're hosting a large party and need to double the batch, just remember that the chocolate will cool down as you dip cold berries into it. You may need to gently reheat the chocolate every 10-15 berries to keep it at that perfect dipping consistency.
Debunking Common Chocolate Dipping Myths
One of the biggest myths is that you must use a complicated tempering process with a thermometer to get a good result. While tempering is great for candy making, the "shortcut" of using a small amount of coconut oil or "seeding" (adding un melted chocolate to melted chocolate) works perfectly for fruit.
Another misconception is that the fridge is the best place to store chocolate covered strawberries. In reality, the fridge is the enemy of the chocolate's gloss. The humidity in a refrigerator causes sugar bloom, which is that white, dusty film you sometimes see.
Unless your house is over 75°F, the counter is actually a better spot for the first few hours.
Chef's Note: Searing or "sealing" the strawberry by dipping it won't stop it from eventually breaking down. Strawberries are mostly water, and once they are picked, they start to soften. The chocolate shell acts as a barrier, but it won't keep a berry fresh for days.
Keeping Your Berries Fresh and Using Leftovers
These are truly best eaten the day they are made. If you must store them, place them in a single layer in a container lined with paper towels to absorb any moisture. Do not seal the lid tightly; a bit of airflow prevents the berries from fermenting or getting mushy.
They will stay "okay" for about 24 hours in the fridge, but the chocolate may lose its snap.
For zero waste, never throw away the leftover chocolate in your dipping bowl! I like to scrape it onto a piece of parchment, spread it thin, and sprinkle it with leftover salt or nuts to make a quick "fridge bark." Or, stir it into warm milk for the richest hot chocolate you've ever had.
You can also freeze leftover melted chocolate in silicone molds for future baking projects.
Creating the Ultimate Dessert Spread
Presentation is where you can really let your personality shine. Depending on the vibe of your evening, you can go from "rustic chic" to "fine dining" with just a few small tweaks.
| Plating Level | Technique | Visual Effect |
|---|---|---|
| Simple | Single dip, no drizzle | Clean, minimalist, and focuses on the fruit quality. |
| Polished | Double drizzle (Dark & White) | High contrast, classic "bakery window" look. |
| Restaurant | Gold leaf + Crushed nuts | Opulent, textured, and truly "showstopper" status. |
To Achieve a Bone Dry Surface
Before you even think about the chocolate, use a hairdryer on the "cool" setting to blow over the berries. This ensures that even the hidden moisture tucked under the green leaves is gone. It sounds extra, but it's the difference between success and failure.
To Stop the "Chocolate Foot"
When you lift the berry out of the chocolate, don't just put it down. Scrape the bottom of the berry against the edge of the bowl, then "twirl" it in the air for 5 seconds. This allows the chocolate to begin setting around the fruit rather than pooling on the parchment.
Fast vs. Classic Comparison
| Feature | Microwave (Fast) | Double Boiler (Classic) |
|---|---|---|
| Heat Control | High risk of scorching | Very gentle and consistent |
| Speed | 2-3 minutes | 8-10 minutes |
| Result Texture | Can be slightly soft | Maximum snap and gloss |
If you want a quick treat for yourself, the microwave is fine. But if you're making these as a gift for this Valentines Strawberry Idea with Dark Chocolate Cover, take the extra five minutes for the double boiler. The result is a much more stable chocolate that won't melt the moment someone picks it up.
Trust me, that extra effort is what makes these feel like a luxury.

Recipe FAQs
Can I use frozen strawberries for this recipe?
No, stick with fresh. Frozen berries release moisture and bleed color into the batter, making it difficult for the chocolate to adhere properly.
How do I achieve a glossy finish on the chocolate?
Use refined coconut oil and ensure berries are bone dry. The oil thins the chocolate for a smooth sheen, and removing all surface moisture prevents the chocolate from seizing and losing its shine.
What's the best way to melt dark chocolate without burning it?
Melt at 50% power in 20-second intervals, stirring between each. This gentle approach prevents scorching and allows the chocolate to melt evenly.
Why do my chocolate covered strawberries get a white, chalky coating?
This is called fat bloom and is usually caused by temperature fluctuations. Store them at room temperature for the best gloss; refrigeration can cause condensation and damage the chocolate's appearance.
How can I prevent the chocolate from sliding off the strawberries?
Ensure the strawberries are completely dry and at room temperature. Any moisture or coldness on the berry's surface will prevent the chocolate from adhering properly.
What is the secret to the "snap" when biting into the chocolate shell?
Use high-quality dark chocolate with a good cocoa butter content and avoid overworking it. The structure of the cocoa butter crystals is what gives chocolate its characteristic snap when properly set.
Can I substitute the refined coconut oil with something else?
Yes, you can substitute with cocoa butter for a similar glossy effect. Cocoa butter is the natural fat in chocolate and will help thin the coating for a more professional finish, similar to how it's used in creating a stable emulsion in our Valentines Chocolate Covered Strawberry recipe.
Valentines Strawberry Idea With Dark Chocolate

Ingredients:
Instructions:
Nutrition Facts:
| Calories | 144 kcal |
|---|---|
| Protein | 1.5 g |
| Fat | 7.9 g |
| Carbs | 16.7 g |
| Fiber | 1.8 g |
| Sugar | 11.2 g |
| Sodium | 18 mg |
