Sourdough Buns: the Ultimate Tangy Sandwich Buns for Proper Burgers
- Welcome to the Best Sourdough Buns Recipe: Tangy, Soft, and Sturdy
- The Baker's Edge: Why Cold Fermentation Creates Superior Texture and Flavor
- Gathering Your Supplies: Detailed Ingredients and Essential Notes
- Mastering the Method: Step-by-Step Instructions for Your Homemade Sourdough Buns
- Troubleshooting Your Bake: Expert Tips for Fluffy Sourdough Buns
- Maximizing Freshness: Storage and Freezing Instructions
- Beyond Burgers: Creative Serving Ideas for These Tangy Sourdough Buns
- Recipe FAQs
- 📝 Recipe Card
Welcome to the Best Sourdough Buns Recipe: Tangy, Soft, and Sturdy
The smell of freshly baked bread is just pure magic, isn't it? When these Sourdough Buns come out of the oven, they fill the whole house with a warm, slightly malty, and beautifully tangy aroma that just screams comfort.
You get that gorgeous deep gold crust, perfectly studded with sesame seeds, but the inside is somehow ridiculously soft and chewy.
This recipe is a total lifesaver, honestly, because it uses the cold, slow rest to do 90% of the work while you’re asleep. We skip the commercial yeast completely, relying solely on your active starter, which means maximum digestibility and minimum active effort.
Plus, making homemade buns is way cheaper and they taste about a thousand times better than the flimsy ones from the grocery store.
If you’re ready to ditch the boring white bread and commit to baking the Ultimate Sourdough Buns for your next burger night, grab your digital scale. Let’s crack on and get your hands sticky.
The Baker's Edge: Why Cold Fermentation Creates Superior Texture and Flavor
Leaving the Supermarket Buns Behind: What Makes Ours Different?
We are striving for a bun that is simultaneously tender and sturdy, a true champion for holding a massive, juicy filling without disintegrating. Standard buns often rely heavily on sugar and instant yeast for a quick, fluffy rise, which can result in a bland flavour.
By incorporating a generous amount of melted butter and whole milk into our dough, followed by an agonizingly long, cold proof, we maximize the development of complex acids, leading to that signature Tangy Sourdough Buns flavour. That fat is what keeps the crumb soft for days, trust me.
Time Commitment and Preparation Schedule (The Overnight Difference)
Sourdough baking requires planning, but it's mostly passive waiting. We use the cold proofing stage the overnight rest in the fridge to accomplish two critical things: flavour and structure. This stage slows the fermentation right down, allowing those beautiful acetic acids (the tang) to develop.
If you try to rush the process and bake the Sourdough Buns Same Day , they will be flatter and far less complex in flavour, guaranteed.
Essential Tools for Mastering Your Sourdough Bake
You absolutely need a kitchen scale for this; volume measurements for flour and starter are too volatile and inaccurate for successful sourdough. A good dough scraper is handy, too, especially for dividing the sticky dough into equal pieces for shaping.
I learned the hard way that weighing each bun ensures they all bake evenly and look professional.
Achieving the Ultimate Crumb: Balancing Chewy and Tender
The key here is high protein bread flour and proper kneading to develop robust gluten structure. High hydration plus added fat (butter) is the classic one-two punch for soft bread. You need enough water for chew, but enough butter to keep it from getting tough.
Maximizing the Tang: The Role of the Overnight Rest
That extended time in the fridge, usually 8 to 12 hours, is non-negotiable for serious flavour development. The cold environment encourages the Lactobacillus bacteria in your starter to produce lactic and acetic acids more aggressively than at room temperature.
If you want truly Tangy Sourdough Buns , don't skimp on this step!
Decoding the Levain Ratio for Perfect Rise
The ratio of starter to flour in this recipe is relatively high (100g starter to 400g flour) because we want a dependable rise, even after a long cold proof. Make sure your Active Sourdough Starter is peaked and vigorous fed 4- 8 hours before mixing otherwise, it won't have the strength to lift the heavy, enriched dough.
I once used a sleepy starter and ended up with discs instead of domes. Never again.
Gathering Your Supplies: Detailed Ingredients and Essential Notes
Hydration and Flour Choices: Which Flours Yield the Softest Buns?
I highly recommend using strong white bread flour (at least 12% protein) for this recipe. It absorbs moisture better and forms the necessary structural backbone to support the enriched dough and the resulting dome shape. If you use weaker all-purpose flour, you might end up with slightly flatter, less chewy buns.
Active Sourdough Starter Requirements (Feeding and readiness)
Your starter should be bubbly and have roughly doubled in size since its last feeding. It should float easily if you drop a teaspoon into a small glass of water. If you’re using Sourdough Buns Discard , you will need to add a pinch of commercial dry yeast to the recipe, but that defeats the purpose of the pure sourdough tang, so I suggest sticking to active starter.
Smart Substitutions: dairy-free Alternatives and Sweeteners
Life happens, and sometimes you need flexibility. Here are my tried and true swaps:
| Ingredient | Substitution | Resulting Change |
|---|---|---|
| Whole Milk | Oat or Soy Milk (use 1:1) | Retains softness; slightly nuttier flavour. |
| Unsalted Butter | Grapeseed or Light Olive Oil | Fully dairy-free; possibly less richness. |
| Bread Flour | Good Quality All-Purpose Flour | Less chewy structure; may require slightly less water. |
| Cane Sugar | Honey or Maple Syrup (liquid) | Slightly different moisture content; adjust liquid down 5ml. |
Mastering the Method: step-by-step Instructions for Your Homemade Sourdough Buns

Mixing and The Gentle Autolyse (Focus on Dough Structure)
- Awaken the Starter: In your large mixing bowl, gently whisk the lukewarm milk, water, and active starter until you have a frothy, milky mixture.
- Combine the Flours: Add the bread flour and sugar (if using) to the wet mixture and stir with a wooden spoon until just combined into a shaggy mass. There should be no dry flour visible.
- Rest (Autolyse): Cover the bowl and walk away for 30 minutes. This allows the flour to fully hydrate before the fat and salt are introduced, which drastically improves the eventual texture.
Shaping the Dough: Creating Perfectly Round Burger Buns
- Incorporate Fat and Salt: Sprinkle the salt over the dough, followed by the slightly cooled, melted butter. Squeeze and knead the dough briefly in the bowl until the butter is fully absorbed, which takes a surprising amount of effort.
- Knead for Structure: Knead the dough vigorously for 8– 10 minutes until it is smooth, supple, and slightly tacky. It should pass the windowpane test, meaning you can stretch a small piece thin enough to see light through it without tearing.
- Bulk Fermentation (BF): Place the dough in a lightly oiled bowl, cover it, and let it bulk ferment at room temperature for 3 to 4 hours. Perform three sets of gentle stretch and folds every 45 minutes during this time to build strength.
Chef's Note: You are looking for a visible volume increase of about 30 50% during the BF, not a full doubling. Over fermenting here leads to floppy buns.
- Divide and Preshape: Turn the dough out, divide it into 8 equal portions (weighing about 100g each for consistency), and gently preshape them into loose balls. Let them rest on the counter, covered, for 15 minutes to relax the gluten.
- Final Shaping: Using a minimal amount of flour, tighten each bun into a very taut, smooth sphere using your bench scraper or the palm of your hand. You want maximum surface tension to ensure they rise upwards, not outwards.
The Critical Proofing Stage (Cold Rest vs. Warm Bulk)
- The Cold Proof: Place the tightly shaped buns onto two parchment lined baking sheets, leaving plenty of space between them. Cover the trays completely with plastic wrap or pop them into large plastic bags. Refrigerate for 8 to 12 hours (or up to 18 hours).
Achieving the Golden Crust: Baking Temperatures and Finishing
- Preheat: Preheat your oven to 200°C (395°F) with a shallow steam pan placed on the bottom rack.
- Egg Wash and Seeds: Retrieve the cold buns. Whisk one large egg with a teaspoon of water and brush the tops of the buns very lightly. Sprinkle immediately with sesame seeds or your favourite seed mix. Working from cold prevents the buns from flattening before baking.
- Steam and Bake: Carefully pour 1/2 cup of hot water into the steam pan just before loading the trays into the oven. Bake for 18– 20 minutes, rotating the trays halfway through for even browning.
- Cooling: Transfer the Sourdough Sandwich Buns immediately to a wire rack. Slice only once they are completely cool (45– 60 minutes). This stabilizes the internal crumb structure.
Troubleshooting Your Bake: Expert Tips for Fluffy Sourdough Buns
Why Your Buns Are Spreading Too Much (Handling Wet Dough)
This is usually a double whammy: the dough was too sticky (too high hydration for your flour) and the shaping was too loose. If your dough feels overly wet after kneading, add a teaspoon of flour at a time until it's manageable.
Critically, ensure your final shaping creates a tight, taut skin on the surface; this tension forces the bun to spring up, not out.
The Ultimate Egg Wash Debate: For Shine or Softness?
The egg wash is there for two reasons: fantastic deep golden colour and excellent seed adhesion. For maximum shine, use a whole egg whisked with water. For a softer, slightly duller crust, some people prefer just milk or melted butter, but I always stick to the egg wash for these sturdy buns.
Adjusting for Altitude and Kitchen Temperature
Sourdough is deeply affected by temperature. If your kitchen is consistently warm (above 25°C / 77°F), reduce your bulk fermentation time by up to an hour and check the dough earlier.
If you live at altitude, your fermentation will likely speed up due to lower air pressure, so watch the dough volume closely and perhaps start the cold rest earlier.
Maximizing Freshness: Storage and Freezing Instructions
Short Term Storage: Keeping Buns Soft for Days
These buns will retain their soft texture and subtle tang wonderfully for about 2 3 days when stored correctly. Keep them in a simple brown paper bag placed inside a large, airtight container or Ziploc bag at room temperature.
Never store bread in the refrigerator , as the cold temperature rapidly stales the starches.
The Best Way to Freeze and Thaw Homemade Buns
These freeze brilliantly! Once the buns are completely cooled, place them in a heavy duty freezer bag, ensuring all air is expelled, and freeze for up to 3 months. To thaw, simply take them out and let them sit at room temperature for a couple of hours.
Quick Refreshing: Reheating Stale Buns
If your buns are feeling a little dry after a few days, a quick refresh makes them feel brand new. Preheat your oven to 180°C (350°F). Lightly spritz the buns with water (just a light mist!), and pop them directly onto the rack for 5– 7 minutes.
They come out warm, soft, and ready for action.
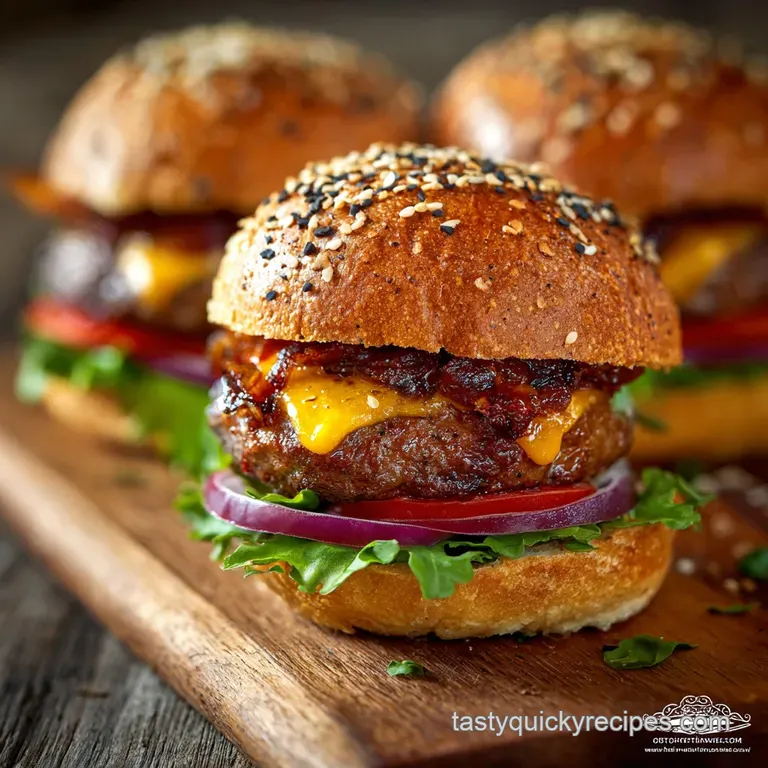
Beyond Burgers: Creative Serving Ideas for These Tangy Sourdough Buns
These aren't just for cheeseburgers, though they dominate in that role! Their slight tang makes them perfect for pairing with richness.
- Pulled Pork Powerhouse: They are sturdy enough to handle slow cooked, saucy pulled pork or shredded short ribs, piled high with creamy coleslaw.
- Grilled Cheese Upgrade: Slice them thin, brush with melted butter, and use them as the base for the ultimate, slightly sourdough tangy grilled cheese sandwich.
- Breakfast Buns: Use them toasted and open faced for eggs benedict or sausage patties. The possibilities are endless, truly.

Recipe FAQs
How do I know if my sourdough starter is ready to make these buns?
Your starter must be active and should have peaked (doubled or tripled in size) roughly 4 to 6 hours after its last feeding. The reliable "float test" is recommended: drop a small spoonful into a glass of water, and if it floats, the starter is sufficiently vigorous and ready to use.
Why are my sourdough buns dense and heavy instead of light and airy?
Density is typically caused by insufficient bulk fermentation time, meaning the dough hasn't built up enough structure and gas before shaping. Alternatively, you may have over handled the dough during the final shaping process, which knocks out too much of the precious trapped air.
Can I substitute some of the bread flour with whole wheat or ancient grains?
Yes, you can successfully substitute up to 25% of the bread flour with a whole grain like whole wheat, spelt, or rye for a nuttier flavour. Remember that whole grain flours absorb more water, so you might need to increase the hydration slightly by adding a tablespoon of extra water.
What is the best way to store these sourdough buns, and can they be frozen?
Store fully cooled buns in an airtight container or a large zip-top bag at room temperature for up to three days to maintain maximum freshness. For longer storage, slice them in half, wrap them tightly in foil, and place them in the freezer where they will keep well for up to three months.
My buns spread out sideways while proofing instead of rising tall. What caused this?
This "pancaking" effect suggests your dough was either over proofed or lacked sufficient gluten development during the initial kneading stage. Ensure you create a tight surface tension when shaping the balls so they have the structure needed to rise upwards during the final proof.
Can I skip the overnight cold proofing step entirely?
While you can shorten the process by proofing the shaped buns at room temperature for 3-4 hours, it is highly discouraged. The long, slow cold proofing is essential for developing the complex, tangy flavour profile these sourdough buns are known for, and it improves the texture significantly.
I want a shiny, golden brown crust. What is the best wash to use?
For the best colour and sheen, brush the shaped buns with a simple egg wash (one egg whisked with a splash of water or milk) just before baking. If you prefer a rustic look, simply mist the buns with water and sprinkle a topping like sesame or poppy seeds.
Ultimate Tangy Sourdough Buns Recipe

Ingredients:
Instructions:
Nutrition Facts:
| Calories | 310 kcal |
|---|---|
| Protein | 8.0 g |
| Fat | 8.0 g |
| Carbs | 52.0 g |
