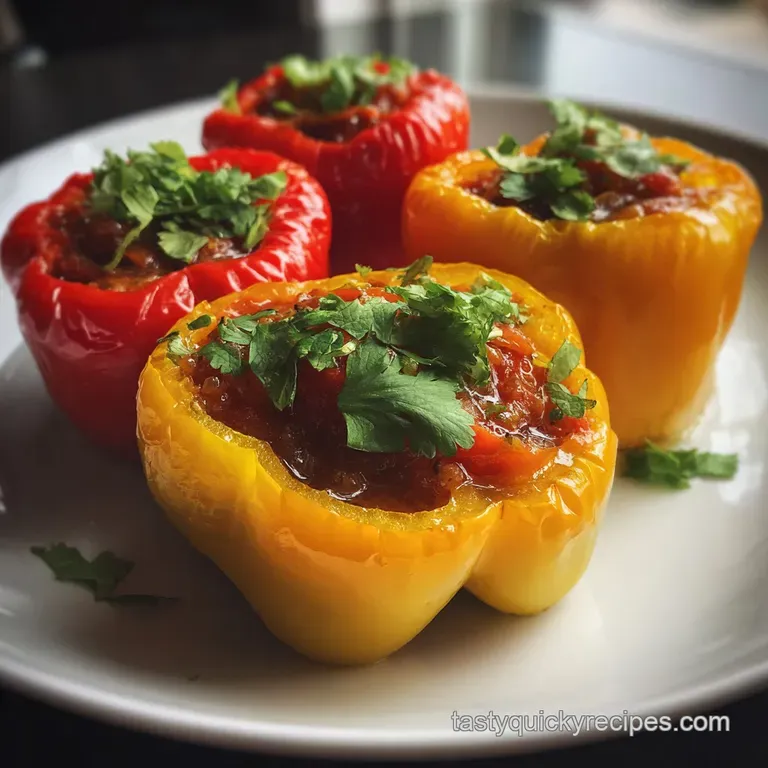
Stuffed Bell Peppers: Savory & Tender
- Time: Active 15 minutes, Passive 30 minutes, Total 45 minutes
- Flavor/Texture Hook: Velvety melted cheese over tender crisp shells and savory beef.
- Perfect for: Juggling family schedules and beginner friendly meal prep.
- Fast and Savory Stuffed Bell Peppers Recipe
- Science of The Perfect Filling
- Ingredient Analysis and Pro Tips
- Precise Ingredients and Reliable Substitutes
- Simple Tools for Home Cooks
- Precise Steps for Flavorful Results
- Solving Texture and Moisture Issues
- Scaling for Large Groups or Couples
- Tasty Swaps and Dietary Variations
- Debunking Cooking Myths
- Safe Cold Storage and Reheating
- Serving Suggestions and Side Ideas
- Recipe FAQs
- 📝 Recipe Card
Fast and Savory Stuffed Bell Peppers Recipe
Honestly, we’ve all been there. You spend forty minutes stuffing peppers only to pull a watery, collapsed mess out of the oven. I used to think that was just the "stuffed pepper experience" until I realized the problem wasn't the pepper it was the prep.
There is nothing like the aroma of roasting peppers and sizzling garlic hitting you the moment you walk into the kitchen, and once you nail the texture, this becomes a repeat request from everyone at the table.
We’re going for that sweet spot where the pepper shell is tender enough to cut with a fork but still has enough structural integrity to hold a mountain of savory beef and rice. This isn't just a "throw it in and hope" meal.
We’ve refined the steps so you aren't stuck with a pile of dishes or a lukewarm center. This is about making a meal that feels like a big win even on a Tuesday night.
Trust me, skipping the pre boil and moving straight to a focused steam roast is where the magic happens. You're going to get a concentrated flavor that isn't diluted by water. It’s fast, it’s flavorful, and it’s exactly what happens when you stop following the old "mushy" rules and start focusing on what actually works in a busy kitchen.
Science of The Perfect Filling
The success of this dish relies on two main factors: moisture management and the Maillard reaction. We pre-sauté the aromatics to ensure the onion and garlic release their sugars, creating a deep base of flavor that raw vegetables simply cannot provide.
Protein Denaturation: Searing the beef before stuffing prevents the meat from clumping into one dense, rubbery block inside the pepper shell. Starch Absorption: The cooked rice acts as a tiny sponge, soaking up the flavorful rendered fats and marinara sauce during the final bake.
| Method | Cook Time | Final Texture | Best For |
|---|---|---|---|
| Standard Oven | 30 minutes | Tender crisp shell | Maximum flavor development |
| Stovetop Steam | 20 minutes | Very soft shell | Quickest results |
| Slow Cooker | 4 hours | Melty/Integrated | Set it and forget it |
When you choose the oven method, you allow the dry heat to slightly caramelize the tops of the peppers, which adds a layer of sweetness you won't get on the stovetop. If you're looking for a different vessel for your savory fillings, these same principles apply to our Stuffed Spaghetti Squash Recipes for a lower carb alternative.
Ingredient Analysis and Pro Tips
Understanding how each component behaves under heat will help you adjust the recipe to your specific pantry. These are the heavy hitters that define the profile of the dish.
| Component | Science Role | Pro Secret |
|---|---|---|
| Bell Peppers | Structural Vessel | Choose flat bottomed peppers so they don't tip in the pan. |
| Ground Beef | Fat and Umami | Use 90/10 lean beef to prevent a greasy pool at the bottom. |
| Cooked Rice | Binding Agent | Cold, day old rice holds its shape better than freshly steamed rice. |
| Marinara Sauce | Acidity & Moisture | High acidity cuts through the fat of the beef and cheese. |
A little bit of science goes a long way here. The cell walls of the bell peppers break down just enough during the 30 minute bake to become palatable without losing their "snap" entirely.
Precise Ingredients and Reliable Substitutes
For this recipe, we are sticking to accessible staples that deliver high impact. Using the right ratio of filling to sauce ensures the interior is moist but never runny.
- 6 large bell peppers (red, orange, or yellow): These are naturally sweeter than green ones. Why this? Sweeter peppers caramelize better and have a less bitter aftertaste.
- Substitute: Large Poblano peppers for a mild, smoky heat.
- 1 lb lean ground beef (90/10): This provides the primary protein structure. Why this? Higher fat ratios will make the peppers soggy and greasy.
- Substitute: Ground turkey or plant based crumbles (like Beyond Meat).
- 2 cups cooked white or brown rice: This provides bulk and texture. Why this? Pre cooked rice ensures the stuffing doesn't draw moisture out of the meat.
- Substitute: Quinoa or cauliflower rice for a lighter option.
- 1 cup marinara sauce, divided: Half goes in the filling, half on top. Why this? Protects the beef from drying out during the over high heat bake.
- Substitute: Tomato sauce with a pinch of Italian seasoning.
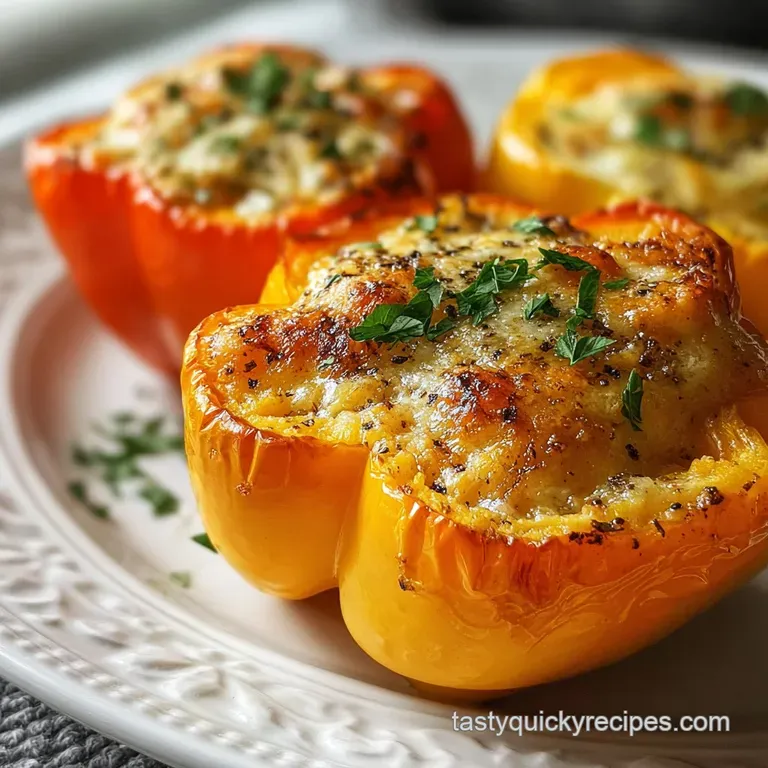
- 1.5 cups shredded Monterey Jack or sharp cheddar: For that essential melty finish. Why this? High moisture cheeses provide the "pull" and creamy mouthfeel.
- Substitute: Mozzarella or a vegan shreds alternative.
- 1 small yellow onion, finely diced: The flavor foundation.
- Substitute: Shallots for a more delicate, sweet profile.
- 3 cloves garlic, minced: Added late to avoid burning.
- Substitute: 1 teaspoon garlic powder if fresh is unavailable.
- 1 tbsp extra virgin olive oil: For sautéing the aromatics.
- 1/2 cup water or beef broth: Used in the bottom of the pan to create steam.
- Spices: 1 tsp dried oregano, 1/2 tsp smoked paprika, plus salt and cracked black pepper.
- 2 tbsp fresh parsley, chopped: For a burst of color and freshness at the end.
Chef's Tip: Freeze your cheese block for 10 minutes before grating. It makes the shredding process much smoother and prevents the cheese from clumping into a ball.
Simple Tools for Home Cooks
You don't need a kitchen full of gadgets to make this work. In fact, keeping it simple usually leads to better results because you can focus on the heat and timing.
- Large skillet: A heavy bottomed pan like a Lodge cast iron skillet is perfect for browning the beef evenly.
- 9x13 inch baking dish: This fits 6 peppers perfectly without overcrowding them.
- Sharp chef's knife: Crucial for clean cuts when removing the pepper tops.
- Measuring cups and spoons: For precision with the spices and rice ratios.
If you are looking for a more "set it and forget it" approach with your beef, you might enjoy the techniques used in our Beef Tenderloin Recipe, which also focuses on achieving a perfect crust.
Precise Steps for Flavorful Results
- Preheat and Prep. Set your oven to 375°F (190°C). Slice the tops off the 6 bell peppers and remove the seeds and membranes. Note: Keep the tops! You can dice the edible bits around the stem and add them to the filling later.
- Sauté the Aromatics. Heat 1 tbsp olive oil in a skillet over medium heat. Add the diced yellow onion and sizzle until translucent, about 5 minutes.
- Brown the Protein. Add 1 lb ground beef to the skillet. Cook, breaking it up with a spoon, until no pink remains.
- Season the Base. Stir in 3 cloves minced garlic, 1 tsp oregano, 1/2 tsp smoked paprika, salt, and pepper. Cook for 1 minute until the garlic is fragrant.
- Build the Filling. Fold in 2 cups cooked rice and 1/2 cup marinara sauce. Mix until the rice is velvety and coated.
- Stuff the Shells. Pack the filling tightly into each bell pepper. Don't be afraid to press down slightly to maximize the space.
- Add Pan Liquid. Pour 1/2 cup water or beef broth into the bottom of your 9x13 dish. Place the peppers upright in the dish.
- First Bake Stage. Cover the dish tightly with foil. Bake for 25 minutes. Note: This creates a steam chamber that softens the pepper skins quickly.
- The Cheesy Finish. Remove the foil. Top each pepper with the remaining 1/2 cup marinara and 1.5 cups shredded cheese.
- Final Melt. Bake uncovered for another 5 to 10 minutes until the cheese is bubbly and golden. Let rest for 5 minutes before serving with fresh parsley.
Solving Texture and Moisture Issues
Even with the best instructions, things can go sideways. The most common complaint is excess liquid or a pepper that feels raw while the cheese is already burning.
Peppers Falling Over
If your peppers are wobbly, it’s usually because the bottoms aren't flat. You can carefully shave a tiny slice off the bottom of the pepper to create a flat surface, just be sure not to cut all the way through or the filling will leak out.
Soggy Filling Texture
This usually happens if the rice was too wet or if you used a high fat ground beef without draining the grease. Always drain the excess fat from the skillet before adding your rice and sauce to keep things tidy.
| Problem | Root Cause | Solution |
|---|---|---|
| Tough Pepper Skin | Not enough steam | Ensure the foil seal is tight and add 2 tbsp extra water. |
| Greasy Bottom | Beef fat not drained | Drain skillet thoroughly before adding rice to the mix. |
| Cheese Burning | Baked too long uncovered | Only add cheese for the last 5-10 minutes of cook time. |
Common Mistakes Checklist
- ✓ Don't skip the water/broth in the pan; the steam is what actually "cooks" the pepper walls.
- ✓ Avoid using raw rice; it will never fully soften inside the pepper and will suck the moisture out of the beef.
- ✓ Use peppers of similar size so they all reach the same level of doneness at the same time.
- ✓ Let the peppers rest for at least 5 minutes; this allows the internal juices to redistribute so they don't pour out when you cut into them.
- ✓ Pat the inside of the peppers dry before stuffing if you washed them recently.
Scaling for Large Groups or Couples
This recipe is incredibly easy to scale. If you're cooking for two, you can cut the ingredients in half, but I actually recommend making the full batch. Stuffed peppers are one of those rare dishes that actually taste better the next day after the flavors have had time to mingle.
Downscaling (1/2 batch): Use 3 peppers and a smaller 8x8 baking dish. Reduce the pan liquid to 1/4 cup. The bake time remains roughly the same because the thickness of the individual pepper doesn't change.
Upscaling (Double batch): If you're doing 12 peppers, use two separate 9x13 dishes. Don't try to cram them all into one pan, or the air won't circulate, and you'll end up with unevenly cooked shells.
Keep the spices at 1.5x rather than a full 2x to avoid overpowering the natural sweetness of the peppers.
Tasty Swaps and Dietary Variations
The beauty of this meal is how it adapts to whatever you have in the fridge. Once you have the method down, you can change the flavor profile entirely.
- Mexican Stuffed Bell Peppers: Swap the oregano for cumin and chili powder. Use black beans instead of half the rice and top with pepper jack cheese, avocado, and a squeeze of lime.
- Vegetarian Stuffed Bell Peppers: Replace the beef with a mix of chopped mushrooms and lentils. Mushrooms provide that savory "umami" that mimics meat.
- Stuffed Bell Peppers Without Rice: For a grain free version, use cauliflower rice or simply double the amount of vegetables (like zucchini and spinach) in the filling.
- Southern Stuffed Bell Peppers: Use ground sausage instead of beef and add a dash of Worcestershire sauce and a pinch of cayenne for a bit of low country flair.
If you enjoy the charred flavor of peppers in other contexts, you should definitely check out these Recipes Using Sweet Peppers for more inspiration on how to use up your garden harvest.
Debunking Cooking Myths
Many old school recipes insist on blanching the peppers in boiling water before stuffing. This is a waste of time and often leads to a "shatter" effect where the pepper skin peels away from the flesh.
The steam bake method we use here is far more effective at softening the structure while keeping the flavor concentrated.
Another myth is that you can't use raw meat. While you can, it often results in a dense, hard "meatball" inside the pepper that isn't very pleasant to eat. Searing the meat first adds flavor through the Maillard reaction and ensures a loose, tender texture that integrates perfectly with the rice.
Safe Cold Storage and Reheating
Storage: Place leftovers in an airtight container. They will stay fresh in the fridge for up to 4 days. The peppers will soften further as they sit, making them even more tender for lunch the next day.
Freezing: These freeze surprisingly well. Wrap individual cooked (and cooled) peppers in plastic wrap, then place them in a freezer bag. They’ll stay good for up to 3 months. To reheat from frozen, thaw in the fridge overnight and bake at 350°F until warmed through.
Zero Waste Tip: Don't throw away those pepper tops! Chop the remaining "shoulders" of the peppers and toss them into the skillet with the onions. You can also save the beef fat (if it's clean) to roast potatoes later in the week.
Serving Suggestions and Side Ideas
Since these peppers are a complete meal on their own containing protein, carbs, and veggies you don't need much else. However, a crisp green salad with a sharp vinaigrette provides a nice contrast to the warm, cheesy filling.
If you want something heartier, a side of garlic bread or a simple cucumber tomato salad works beautifully. For a family dinner, I usually just put the whole baking dish in the center of the table and let everyone dig in. It's fast, flavorful, and makes for very little cleanup afterward.
This is the kind of cooking that makes the "juggling" of a busy life feel just a little bit easier. Give it a try, and don't be afraid to get creative with your leftovers!

Recipe FAQs
Should I cook my bell peppers before stuffing them?
No, not by boiling. Par-boiling can make peppers waterlogged and mushy. Instead, a brief steam in the oven with liquid at the bottom of the pan is ideal to soften them without losing flavor.
What goes inside stuffed bell peppers?
A savory mixture of cooked meat or vegetables, grains, and seasonings. Common fillings include ground beef, rice, onions, garlic, and tomato sauce, bound together to create a hearty meal within the pepper's shell.
What are some common mistakes when making stuffed peppers?
Using raw rice and not draining excess fat. Raw rice won't cook through and absorbs too much moisture, while un-drained fat makes the peppers greasy. Also, avoid over boiling the peppers, as this causes them to break down.
What fillings go well in bell peppers?
Versatile options include beef and rice, chicken and quinoa, or vegetarian mixes with lentils and mushrooms. For a change of pace, consider a Mexican inspired filling with beans and corn or a Mediterranean version with lamb and orzo.
Can I make stuffed bell peppers ahead of time?
Yes, assemble them completely and refrigerate. They can be stored in the fridge for up to 24 hours before baking, ensuring a quick weeknight meal or a great option for meal prep.
Why are my stuffed bell peppers watery?
This is often due to using raw rice or not draining the beef fat. Raw rice expands and releases water as it cooks, while excess fat pools at the bottom. Ensure all components are cooked and drained properly before stuffing.
What's the best way to reheat stuffed bell peppers?
Bake them at 350°F (175°C) until heated through. Whether from the fridge or freezer, covering them loosely with foil helps prevent the cheese from burning while ensuring the filling warms evenly.
Stuffed Bell Peppers

Ingredients:
Instructions:
Nutrition Facts:
| Calories | 398 kcal |
|---|---|
| Protein | 25.5 g |
| Fat | 20.3 g |
| Carbs | 29.2 g |
| Fiber | 4.6 g |
| Sugar | 6.8 g |
| Sodium | 472 mg |
