Cookie Icing: the Ultimate Hard-Setting Royal Recipe
- Achieving the Perfect Glaze: Why Royal Icing Reigns Supreme
- The Science of Shine: Stability and Texture Explained
- Essential Components for Flawless Cookie Icing
- Mixing Magic: Step-by-Step Guide to Royal Icing Consistency
- Mastering the Flow: Professional Tips and Troubleshooting
- Shelf Life and Storage Secrets for Prepared Icing
- Beyond the Basics: Pairing Your Icing with Showstopper Cookies
- Recipe FAQs
- 📝 Recipe Card
Achieving the Perfect Glaze: Why Royal Icing Reigns Supreme
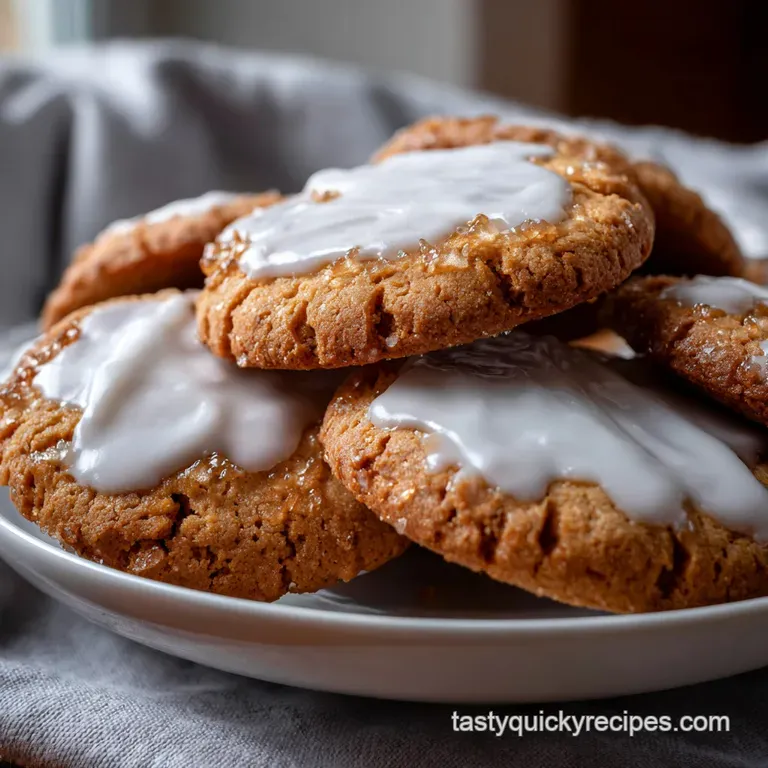
You know that satisfying, glossy clink sound when you tap a spoon against a perfectly decorated sugar cookie? That flawless, non-sticky, completely stable finish? That, my friend, is the magic of Royal Icing.
Forget flimsy glazes that smear when you stack them; we are talking about serious, professional grade Cookie Icing that hardens beautifully and holds the most intricate piped designs.
This recipe is the foundation for every truly spectacular holiday biscuit display, and trust me, it’s easier to master than you think.
If you’ve ever found yourself frustrated by a runny glaze or colours that bled into each other, you know the pain. This isn't just an easy Cookie Icing recipe; it's a foolproof method that relies on meringue powder for incredible strength, making your life infinitely easier.
It is fast, dirt cheap compared to store-bought options, and the results are stunning. If you want cookies that look like they came straight out of a posh bakery display, you need this method.
Today, we're skipping the guesswork and diving deep into the exact ratios, mixing times, and consistency checks that will ensure your Cookie Icing is absolutely flawless every time.
We will cover how to use it for outlines, for flooding, and how to store it so you always have a batch ready for your next baking obsession. Let’s get that shine locked in!
The Science of Shine: Stability and Texture Explained
Why do we bother with Royal Icing when a simple water and powdered sugar glaze exists? Because structure matters. Simple glazes rely only on sugar crystallization, which leads to a soft, sticky, and often cloudy finish.
Royal Icing, however, uses protein (from meringue powder) to create a strong, stable matrix that locks in the sugar and water, giving you that famous rock hard structure and high gloss sheen. This structure is what allows you to stack dozens of decorated cookies without ruining your hard work.
This makes it the superior Cookie Icing for professional results.
Royal Icing vs. Simple Glaze: Knowing the Difference
A simple glaze is for when you just need a quick drizzle on a pound cake. It sets soft. Royal Icing is for when you need a canvas. It dries completely hard, providing a perfect base for layering colours or adding edible glitter. It also makes your sugar cookies last significantly longer by sealing in the moisture.
I’ll be honest, once you learn the basics of this Cookie Icing process, you won't go back to the flimsy stuff.
The Meringue Powder Advantage: Safety and Structure
Traditional Royal Icing uses raw egg whites, which introduces a small but real food safety risk. Meringue powder eliminates this concern completely. It is essentially dried, pasteurized egg white combined with stabilizers. Not only is it safer, but it provides a more consistent, reliable result every single time.
It ensures your Cookie Icing dries consistently and without any nasty cracks or dull patches.
How This Recipe Creates a Rock Hard Finish
The magic happens during the whipping process. We aren’t just mixing; we are incorporating massive amounts of air into the mixture, creating microscopic bubbles stabilized by the meringue powder. This scaffolding holds the powdered sugar until the water evaporates.
When it evaporates, the sugar and meringue form an incredibly durable, crystalline shell. That hard shell is what gives our Cookie Icing its signature durability.
Understanding Consistency: Flooding vs. Piping Thickness
This is where beginners stumble. You need two different thicknesses of Cookie Icing to decorate properly:
- Piping/Outline Consistency: Thick, stiff, holds its shape perfectly, like toothpaste. This is used to create the wall or barrier around the area you want to fill.
- Flooding Consistency: Runny enough to flow smoothly and fill the piped outline, but thick enough to settle flat without dripping over the sides. We measure this using the "count" method, aiming for 10 12 seconds before the trail disappears. This runny type of Cookie Icing is essential for a smooth base layer.
The Role of Cream of Tartar (or lack thereof in commercial mixes)
Historically, recipes called for cream of tartar or lemon juice to help stabilize raw egg whites. Meringue powder already contains the necessary acids, so adding extra is usually redundant and can sometimes over stabilize, making the icing too brittle.
If you are using a quality commercial meringue powder, skip the extra acid. This simplifies the process and guarantees a predictable outcome for your Cookie Icing .
Preventing Craters and Color Bleeding
Craters are those annoying dips in your flooded areas usually caused by too much air or insufficient drying time. The fix? Tap your cookies gently after flooding and ensure your flood consistency isn't too thin.
Color bleeding happens when dark colours leech into lighter ones, often because you applied wet icing to a base that wasn't fully dry. Always let your outline set for 15 minutes and your flood layer dry for several hours before adding secondary details.
Patience is absolutely vital for beautiful Cookie Icing .
Essential Components for Flawless Cookie Icing
The quality of your ingredients directly impacts the quality of your finished Cookie Icing . We are aiming for smooth, glossy, and perfectly white. Don't skimp here!
Detailed Ingredient List and Measurement Notes
The most crucial step in this easy Cookie Icing recipe is measuring accurately. Grab your scale if you have one!
Crucial Tip: Never eyeball the water. Water is the key variable that dictates consistency, and even a quarter teaspoon can dramatically change the icing from piping stiff to unusable soup.
| Ingredient | Why it Matters | Substitution Notes |
|---|---|---|
| Confectioners’ Sugar (Icing Sugar) | Provides the bulk and the structure. Must be finely ground. | Substitute: Do not substitute with granulated sugar. If you only have coarser sugar, use a spice grinder to make it finer, but measure after grinding. |
| Meringue Powder | Stabilizes the icing and replaces raw egg whites. | Substitute: Pasteurized liquid egg whites (use 2 Tbsp for every 1 Tbsp of powder, then reduce water accordingly). |
| Warm Water | The solvent that activates the meringue powder and controls consistency. | Substitute: Lemon juice or milk (will reduce drying hardness). |
| Clear Extracts (Vanilla/Almond) | Adds flavour without altering the pure white color. | Substitute: Use pure vanilla extract only if you don't mind a slight ivory tint to your final product. |
Why Sifting Powdered Sugar is Non-Negotiable
Seriously, just do it. Confectioners’ sugar compacts in the bag and always seems to have little hard lumps of starch or sugar lurking within. These tiny lumps are invisible when dry but turn into granite pellets when they hit water.
They will immediately clog your delicate piping tips and ruin the smooth finish of your Cookie Icing . Sift the sugar, every time. It takes thirty seconds and saves forty minutes of cursing later.
Water Temperature: The Hidden Factor in Smoothness
Always use warm, but not hot, water. Why? Warm water dissolves the powdered sugar and activates the meringue powder much more efficiently than cold water. This helps prevent graininess. The goal is a super smooth texture right from the start, setting the stage for the best Cookie Icing possible.
Mixing Magic: step-by-step Guide to Royal Icing Consistency
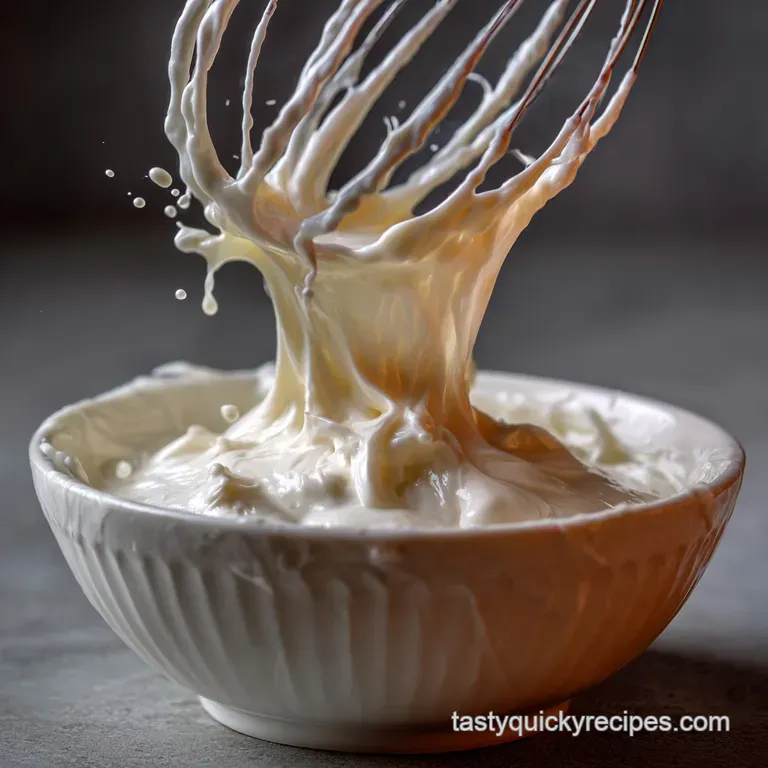
This is the part where the stand mixer earns its keep. If you are mixing by hand, prepare for a serious arm workout it needs vigorous whipping to incorporate enough air. This is how to make Royal Icing perfectly.
Phase One: Whipping the Structure
- Dry Prep: Sift your sugar and meringue powder directly into the stand mixer bowl. Attach the paddle.
- Initial Mix: Combine your measured warm water and extracts. Pour in the full amount (1/2 cup) all at once. Start the mixer immediately on the lowest speed. If you start too high, you’ll get a sugar cloud that coats your kitchen. Mix gently until just combined about 30 seconds. It will look like a chunky paste.
- Whip It Real Good: Increase the speed to Medium Low (level 4 on a KitchenAid). Let it beat for a full 5 minutes. You’ll notice the color lightening, the volume increasing, and the texture becoming thick and glossy. Scrape the sides down midway through to ensure everything is fully integrated.
Phase Two: Achieving Stiff Peaks for Piping
After 5– 7 minutes of whipping, the icing should be very thick stiff enough to hold a clean peak when you lift the paddle. This is your Piping Consistency. This stiff Cookie Icing holds intricate details perfectly.
Persona Anecdote: I once stopped whipping too early, thinking "it looks thick enough," only to have my piped borders slump into sad, soft little puddles. Don't be me. Whip until the peaks stand proud!
If you gently press a spatula into the icing and lift, the peak should curl slightly but remain upright. If it droops quickly, give it another minute of whipping time.
Thinning the Icing to Flood Consistency
Now we divide the thick base into smaller containers. Keep the stiff piping icing covered tightly. The rest needs to be thinned down for flooding. This is where patience pays off when adjusting your Cookie Icing .
- Add Water Slowly: Start adding water (or desired liquid) a few drops or 1/4 teaspoon at a time. Mix gently by hand using a spatula until fully incorporated.
-
The Count Test:
The ideal flow consistency is the 10 to-12 second count. Dip a spoon into the thinned icing and drizzle a ribbon across the surface of the bowl. Count how long it takes for the ribbon mark to disappear and the surface to become completely smooth again.
- Too fast (5 seconds)? It’s too runny. Add 1 tsp of sifted powdered sugar.
- Too slow (20 seconds)? It’s too thick. Add a few more drops of water.
- Aim for the Sweet Spot: This perfectly fluid Icing For Flooding Cookies will cover large areas without running over your outline and will smooth itself out perfectly, eliminating brush marks.
Coloring Your Icing Effectively
Use gel food colours, not the cheap liquid ones from the supermarket. Gel colours are highly concentrated, meaning you need just a tiny dot on a toothpick to achieve vibrant results, thus avoiding thinning your carefully calibrated consistency.
Rule of Thumb: Start lighter than you think you need. Colors deepen as the Cookie Icing rests and dries. Mix the colour in gently to avoid incorporating more air bubbles, which can lead to craters later.
Mastering the Flow: Professional Tips and Troubleshooting
Even with the best recipe, technique makes all the difference. Mastering this style of Cookie Icing is about practice and being prepared for minor setbacks.
Addressing Common Problems: Cracking and Bubbles
The dreaded crack! This happens when the top layer of your flood icing dries faster than the moisture underneath, causing tension.
The Fix: Ensure you are using meringue powder (for stability) and try using a dehydrator or a low oven (around 150°F / 65°C) with the door slightly ajar to speed up the entire drying process consistently. For small bubbles, the scribe tool is your best friend.
After flooding, quickly skim the surface, dragging the tip through the icing to pop any air pockets. This ensures your Royal Icing for sugar cookies remains pristine.
Best Practices for Using Piping Bags and Tips
Don't overfill your piping bags! It leads to hand strain and messy icing coming out the top. Fill the bag only halfway, twist the top tightly, and tuck the twist securely in your palm. Use a quality piping tip (like a PME or Wilton #1 or #2) for fine detail.
When outlining, hold the tip slightly above the cookie surface, allowing the Cookie Icing to fall gently onto the edge. This provides better control.
Fixing Icing That Is Too Runny or Too Stiff
If your Cookie Icing is too runny for flooding, add small amounts of sifted powdered sugar until you hit the 10 second count. If it’s too stiff, add water, droplet by droplet, stirring constantly.
Remember, fixing too-stiff icing is always easier than fixing too-runny icing, so err on the side of caution with the liquid.
Shelf Life and Storage Secrets for Prepared Icing
You can and should make your Cookie Icing ahead of time. It actually benefits from a day of resting, as it gives any microscopic air bubbles a chance to rise to the surface.
short term Storage: Preventing the Crust from Forming
Royal Icing forms a crust faster than any other frosting I know. If you step away for five minutes, cover the bowl. For short term (1 2 days) storage, place the icing in an airtight container. Crucially, press a layer of plastic cling film directly onto the surface of the icing, eliminating all air contact.
Then seal the lid.
How to Revive Stored Royal Icing
When you take the stored Cookie Icing out, it will likely have separated slightly, and the texture may seem a bit slimy or spongy. Do not panic! This is totally normal. Just give it a good, gentle stir with a spatula.
If you notice any small chunks of hardened icing (a sign of air exposure), strain it through a fine mesh sieve. You might need to add a few more drops of water to restore the original consistency, but it will be absolutely fine.
Can You Freeze Cookies Decorated with Royal Icing?
Yes, but approach with care. The icing itself holds up remarkably well. However, drastic temperature changes can cause the hard Cookie Icing to develop small hairline cracks as the cookie underneath expands and contracts.
If you must freeze them:
- Ensure the icing is completely dry ( 24 hours minimum).
- Wrap the decorated cookies individually and gently in cling film.
- Place them in an airtight container.
- Thaw Slowly: When ready to eat, move the container from the freezer to the refrigerator for several hours, then move it to the counter. This gradual transition helps prevent condensation and cracking of the Cookie Icing .
Beyond the Basics: Pairing Your Icing with Showstopper Cookies
This fantastic, durable Cookie Icing is designed for structured, sturdy cookies. It would be a crime to put all this effort into beautiful decoration only to have the base cookie crumble! That's why classic vanilla cut-out sugar cookies are its soulmate.
For an easy win, use it on a robust shortbread or a sturdy gingerbread.
If you are looking for a completely different kind of dessert, something without the fuss of drying time, check out my recipe for [Haystacks: Easy No Bake Peanut Butter Chocolate Cookies].
They are perfect for when you need a quick chocolate fix, but they definitely don't need this kind of intricate Cookie Icing .
And for a fun challenge, try using this technique on a batch of shaped cookies before tackling something intricate, like decorating my ultimate [Hershey Kiss Cookies: The Ultimate Peanut Butter Blossom Recipe] with piped details though those classic peanut butter blossoms usually get a dusting of sugar instead.
This method gives you the best Cookie Icing that hardens perfectly. It provides that beautiful, crisp finish that elevates your baking from hobbyist level to professional showstopper. Go forth and decorate, my friend! You’ve got this.

Recipe FAQs
Why is my royal icing too runny or too thick for proper use?
The perfect royal icing consistency is key, and adjustments are common. If it’s too thick, add a quarter teaspoon of water at a time until the desired "flow" is reached; for outline consistency, the icing should hold a soft peak.
If it’s too thin for piping, gradually mix in small amounts of extra sifted powdered sugar until you achieve a sturdy, defined peak.
How long can I store leftover royal icing, and how should it be kept?
Royal icing stores exceptionally well due to the stabilizing effect of the meringue powder. Keep the icing in an airtight container at cool room temperature for up to two weeks, ensuring plastic wrap is pressed directly onto the surface to prevent crusting.
Before reusing, allow the icing to rest, then gently whisk or mix it to eliminate any separation.
My royal icing is drying slowly or remaining tacky. What is the cause?
Slow drying is usually caused by environmental factors, primarily high humidity, or sometimes by adding too much liquid during the thinning process. For a reliable, hard set, try drying your decorated cookies under a fan or in the oven with the light on (which provides gentle, stable heat).
Avoid using excessive amounts of dark or liquid food coloring, which can also interfere with the drying process.
Can I use fresh egg whites instead of meringue powder in this recipe?
While traditional recipes call for fresh egg whites, meringue powder is strongly recommended for safety and stability, as it is pasteurized and produces a more consistently strong structure.
If you absolutely must substitute, use 2 tablespoons of liquid pasteurized egg white for every 1 tablespoon of meringue powder, but note that the drying time may be longer and the resulting icing slightly less sturdy.
What is the best type of colorant to use for vibrant shades?
You must always use concentrated gel food coloring for royal icing, as liquid drops will dramatically alter the crucial consistency. Add the color incrementally using a toothpick, mixing fully, and remember that colors will often deepen slightly as the icing fully sets and dries on the cookie.
For reds or blacks, prepare the color ahead of time to allow it to fully develop its depth.
How do I prevent air bubbles or craters from forming after the icing has dried?
Air bubbles are often incorporated during the initial fast mixing phase or when thinning the icing. Once you have flooded your cookies, gently lift and tap them sharply on the countertop several times to encourage any trapped air to rise to the surface.
Pop any visible bubbles with a scribe or toothpick before placing the cookie aside to dry completely.
How can I safely flavor royal icing without compromising its structure?
Use clear, high-quality flavor extracts or emulsions that are water based, as oil-based flavorings can break down the fat-free structure of the icing. Popular choices include clear vanilla, almond, or lemon extracts, which should be added after the initial meringue powder and water are fully combined.
Start with a half teaspoon of extract per batch and taste test before adding more.
Royal Icing Recipe That Hardens
Ingredients:
Instructions:
Nutrition Facts:
| Calories | 832 kcal |
|---|---|
| Protein | 0.1 g |
| Fat | 0.3 g |
| Carbs | 211.2 g |
