Chocolate Ripple Cheesecake: Silky and Foolproof
- Time: Active 25 minutes, Passive 75 minutes, Total 100 minutes
- Flavor/Texture Hook: Silky smooth filling with a shattering cocoa crust
- Perfect for: Milestone birthdays, holiday dinners, or making ahead for stress free hosting
- Why This Recipe Succeeds
- Understanding Your Components
- Required Ingredients and Alternatives
- Necessary Tools for Success
- Master the Baking Process
- Fixing Common Cheesecake Issues
- Adjusting Your Recipe Yield
- Baking Myths Debunked
- Storage and Waste Reduction
- Serving and Presentation Ideas
- Recipe FAQs
- 📝 Recipe Card
You know that silence that falls over a table when a truly beautiful dessert arrives? That is exactly what happens every single time I bring out this Chocolate Ripple Cheesecake. It is not just about the flavor, though the combination of tangy sour cream and dark Dutch processed cocoa is magical.
It is that visual "wow" factor of the deep, dark swirls cutting through the ivory filling. I remember the first time I pulled this out of the oven for a family gathering. The kitchen smelled like toasted chocolate and sweet cream, and the marble pattern looked like it belonged in a professional pastry shop window.
There is something deeply satisfying about the ritual of making a cheesecake like this. From the therapeutic sound of crushing those chocolate ripple biscuits into fine, sandy crumbs to the rhythmic whisking of the cocoa paste, it feels like an event before you even take a bite.
It is my absolute favorite "secret weapon" for when I want to impress people without spending eight hours hovering over a stove. Trust me, once you see those mahogany ripples take shape under your skewer, you will be hooked.
We are going for a texture that is dense enough to feel luxurious but light enough that you want a second slice. But what about the dreaded cracks? Or the soggy base? We will get to all of those little hurdles. This is about creating a dessert that looks like art but tastes like pure, unadulterated comfort.
It is brilliant, it is irresistible, and it is much easier than it looks. Let's crack on.
Why This Recipe Succeeds
Thermal Buffer: The water bath (bain marie) acts as a physical shield, ensuring the delicate egg proteins in the filling don't curdle or puff up from direct heat.
Cocoa Hydration: Mixing the Dutch processed cocoa with boiling water first "blooms" the chocolate, intensifying the flavor and ensuring the ripple is silky rather than grainy.
Structural Integrity: Pre baking the chocolate ripple biscuit base for exactly 10 minutes helps the butter and sugar bind, creating a firm foundation that won't crumble under the weight of the filling.
Acidity Balance: Using a generous amount of sour cream adds a necessary tang that cuts through the richness of the cream cheese, providing a brighter finish on the palate.
If you are looking for a simpler version of these flavors for a more casual get together, you might also love my vanilla marble sheet cake which uses a similar swirling technique in a one pan format.
| Preparation Method | Total Time | Texture Outcome | Best For |
|---|---|---|---|
| Full Scratch Baked | 100 minutes | Velvety, dense, and premium | Formal dinners and weddings |
| No Bake Shortcut | 30 minutes | Light, mousse like, softer | Summer parties and quick fixes |
| Mini Cupcake Style | 45 minutes | Crispy edges, creamy center | Potlucks and kids' parties |
This table helps you decide which route to take depending on how much time you have. While the baked version is the gold standard for texture, the shortcut method works in a pinch if you don't want to turn on the oven.
Understanding Your Components
| Component | Science Role | Pro Secret |
|---|---|---|
| Full fat Cream Cheese | Provides the structural fat and protein for a dense, creamy set. | Always use the block style, never the spreadable tub version. |
| Dutch processed Cocoa | Lowers acidity and darkens color for a more intense chocolate ripple. | Sift it before adding water to prevent tiny "flour bombs" in your swirl. |
| Room Temperature Eggs | Emulsify more easily into the fats, preventing the batter from breaking. | If you forgot to take them out, soak them in warm water for 5 minutes. |
| Sour Cream | Softens the gluten-free structure of the cheese for a "melt in-mouth" feel. | Use the highest fat percentage you can find for maximum creaminess. |
Required Ingredients and Alternatives
To make this Chocolate Ripple Cheesecake, you will need a few key items from your pantry and the dairy aisle. I have also included some easy swaps in case you are missing something.
- 250g Chocolate Ripple biscuits: These provide the dark, crunchy base. Why this? They have a unique deep cocoa flavor that isn't overly sweet.
- Substitute: Chocolate graham crackers or Oreo cookies (remove the cream).
- 80g Unsalted butter: This binds the crumbs together. Why this? Unsalted allows you to control the seasoning of the crust.
- Substitute: Salted butter (just omit any extra salt).
- 750g Full fat cream cheese: The heart of the cake. Why this? High fat content is non negotiable for the right "snap" and creaminess.
- Substitute: Neufchâtel cheese for a slightly lighter (but less stable) result.
- 200ml Sour cream: Adds tang and moisture. Why this? It prevents the cheesecake from being too "heavy" or cloying.
- Substitute: Full fat Greek yogurt (plain).
- 50g Dutch processed cocoa powder: For the dark ripples. Why this? It provides a darker color and smoother flavor than natural cocoa.
- Substitute: Regular unsweetened cocoa powder (the color will be lighter).
- 2 tsp Pure vanilla bean paste: For those beautiful black specks and deep aroma. Why this? Paste has a more intense flavor than liquid extract.
- Substitute: Vanilla extract (1:1 ratio).
- 2 tbsp Maple syrup: Sweetens the cocoa paste. Why this? Adds a hint of caramel like depth to the chocolate.
- Substitute: Honey or agave nectar.
Necessary Tools for Success
- 23cm Springform pan: Essential for removing the cake without destroying the sides.
- Stand mixer or electric beaters: You need consistent power to get the cream cheese completely smooth.
- Heavy duty aluminum foil: To waterproof the pan for the water bath.
- Large roasting pan: Must be big enough to hold the springform pan with space for water.
- Fine mesh sieve: For sifting the cocoa powder to ensure no lumps.
- Silicone spatula: Perfect for scraping the bottom of the bowl so no chunks of cheese hide.
Master the Baking Process

- Prep the environment. Preheat your oven to 160°C (320°F). Line the bottom and sides of a 23cm springform pan with parchment paper. Note: Parchment on the sides prevents sticking and side cracks.
- Construct the foundation. Combine 250g crushed chocolate ripple biscuits, 80g melted butter, and 1 tablespoon granulated sugar. Press firmly into the pan.
- Blind bake the base. Bake for 10 minutes until the crust smells toasted and looks matte. Let it cool while you make the filling.
- Create the chocolate concentrate. Whisk 50g Dutch processed cocoa, 60ml boiling water, and 2 tablespoons maple syrup until a glossy, thick paste forms.
- Cream the cheese. Beat 750g cream cheese and 200g caster sugar until the mixture looks like smooth silk. Scraping the bowl is vital here.
- Add the liquids. Mix in 200ml sour cream and 2 teaspoons vanilla bean paste until just combined. Don't overwork it at this stage.
- Incorporate the eggs. Add 3 large eggs one at a time on the lowest speed. Stop as soon as the yellow streaks disappear to avoid air bubbles.
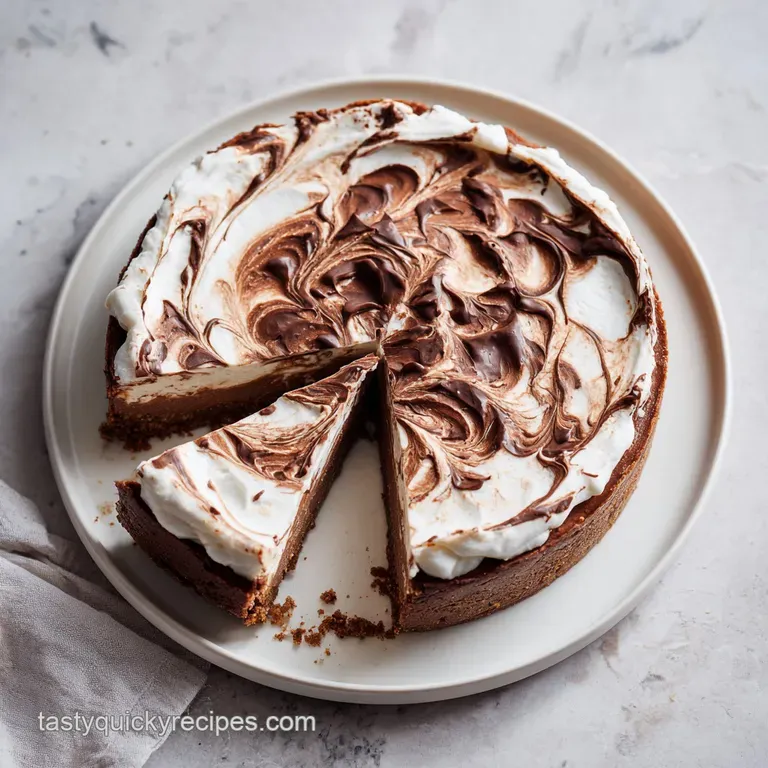
- Design the ripple. Pour the white batter over the base. Dollop the cocoa paste on top and swirl with a skewer until deep mahogany ribbons appear.
- The water bath. Wrap the pan in foil and place it in a roasting tray. Fill the tray with hot water until it reaches halfway up the pan.
- The slow bake. Bake for 1 hour and 15 minutes. Turn off the oven, crack the door, and let it cool until the center has a gentle jiggle.
Fixing Common Cheesecake Issues
Why Your Cheesecake Cracked
Cracks usually happen because of two things: too much air in the batter or the cake cooling too fast. If you beat the eggs at high speed, you incorporate air that expands in the oven and then collapses, tearing the surface.
Also, if the cake sticks to the sides of the pan as it shrinks during cooling, it will pull itself apart.
To Save a Cracked Surface
If the worst happens and you see a canyon in your beautiful ripple, don't panic. This is what toppings were made for! A thin layer of sour cream mixed with sugar, or even a simple chocolate ganache, hides a multitude of sins while adding another layer of flavor.
| Problem | Root Cause | Solution |
|---|---|---|
| Lumpy Filling | Cold cream cheese | Ensure cheese is soft enough to spread like butter before mixing. |
| Soggy Crust | Leaking water bath | Use three layers of heavy duty foil or a slow cooker liner bag. |
| Grainy Ripple | Dry cocoa powder | Always bloom the cocoa in boiling water to dissolve particles. |
Common Mistakes Checklist
- ✓ Beat the cream cheese alone for 3 minutes before adding sugar to remove every tiny lump.
- ✓ Never skip the water bath - direct heat is the enemy of creamy textures.
- ✓ Stop mixing the moment eggs are in; air bubbles lead to "soufflé" tops that crack.
- ✓ Let the cake cool in the oven with the door ajar for a full hour to avoid temperature shock.
- ✓ Wipe your knife with a warm, damp cloth between every single slice for professional looks.
Adjusting Your Recipe Yield
If you are hosting a smaller group, you can easily halve this recipe. Use a 15cm (6 inch) pan and reduce the baking time by about 20%. When halving the eggs, beat one egg in a cup and use half of the volume. For the chocolate ripple, keep the ratios the same to ensure you still get those beautiful dark streaks.
Scaling up for a massive party? Doubling the recipe works well if you have a 30cm (12 inch) pan. However, I usually find it safer to bake two separate 23cm cakes. This ensures the center cooks evenly without the edges becoming overbaked and dry. If you find yourself with extra batter, it makes fantastic individual mini cheesecakes in a muffin tin - just reduce the bake time to about 20 minutes. For a large potluck where you need square portions, you might consider my chocolate brownie squares instead, as they are much easier to transport in bulk.
Baking Myths Debunked
Springform pans are naturally waterproof. This is a dangerous lie. Even the most expensive "leak proof" pans will let water in during a 75 minute bake. Always wrap the exterior in at least two layers of heavy duty foil to protect your crunchy biscuit base.
The center should be firm when done. If the center is firm in the oven, it is already overbaked. A perfect cheesecake should have a "Jell O" like wobble in the middle two inches. Carry over heat will finish the job as it cools, leaving you with a velvety texture instead of a rubbery one.
low-fat cream cheese is fine. It really isn't. The stabilizers and high water content in low-fat versions prevent the cheesecake from setting properly. It will be grainy and likely collapse. For this specific dessert, fat is the structural component that makes it successful.
Storage and Waste Reduction
This Chocolate Ripple Cheesecake is a dream for meal prepping. Store it in the fridge, covered, for up to 5 days. In fact, the flavor actually deepens after 24 hours as the cocoa and vanilla meld.
If you want to freeze it, wrap the entire cake (or individual slices) tightly in plastic wrap and then foil. It will stay perfect for up to 3 months. To serve, thaw it in the fridge overnight.
Don't throw away those leftover biscuit crumbs from the bottom of the bag! They make an incredible topping for vanilla bean ice cream or can be folded into whipped cream for a quick parfait. If you have extra cocoa paste, stir it into warm milk for the richest hot chocolate you have ever tasted.
Nothing goes to waste in a smart kitchen.
Serving and Presentation Ideas
For the most beautiful presentation, less is often more. The ripple pattern is the star of the show. I love serving this with a small dollop of unsweetened whipped cream on the side to balance the sweetness.
A few fresh raspberries or a sprig of mint can add a pop of color that contrasts beautifully with the mahogany and cream tones.
If you want to go all out for a celebration, try shaving some dark chocolate curls over the top right before serving. The "shatter" of the cold chocolate curls against the velvety filling is a textural delight. Just remember to use a hot knife for slicing! Run your blade under hot water, wipe it dry, and make your cut.
Repeat this for every single slice. It sounds tedious, but it is the difference between a messy plate and a professional looking dessert. Enjoy every bite - you've earned it!

Recipe FAQs
How to avoid lumps in the cheesecake batter?
Beat the room temperature cream cheese alone for 3 minutes before adding any sugar. This initial step creates a completely smooth base and ensures the mixture stays emulsified, much like the silky texture required for fondue.
Is it true I should skip the water bath to save time?
No, this is a common misconception. Direct heat causes the edges to set too quickly and crack, so you must wrap the pan in heavy duty aluminum foil and use a water bath to maintain a gentle, even temperature throughout the 75-minute bake.
How to prevent the top from cracking?
Incorporate the eggs one at a time on low speed and stop immediately once blended. Excess air whipped into the batter causes the cake to rise and collapse, leading to cracks, so keep mixing to an absolute minimum once the eggs are added.
How to cool the cheesecake properly after baking?
Turn off the oven and leave the door slightly ajar for one hour. This allows the cake to transition slowly, preventing the temperature shock that often ruins the smooth surface of the cheesecake.
How to get clean, professional looking slices?
Wipe your knife with a warm, damp cloth between every single cut. Cleaning the blade ensures that leftover crumbs or cocoa paste don't smear across the face of the next slice.
Can I prepare this recipe in advance?
Yes, the flavor actually deepens after 24 hours in the refrigerator. It stores beautifully for up to 5 days covered in the fridge, or you can freeze it for up to 3 months if wrapped tightly in plastic and foil.
How to achieve the signature mahogany swirl?
Dollop the cocoa paste mixture onto the surface of the batter and use a skewer to drag it through. Move the skewer in deep, swirling motions to ensure the cocoa ribbons are distributed throughout the vanilla layer without over mixing.
Chocolate Ripple Cheesecake

Ingredients:
Instructions:
Nutrition Facts:
| Calories | 496 calories |
|---|---|
| Protein | 7.8g |
| Fat | 35.3g |
| Carbs | 40.3g |
| Fiber | 1.8g |
| Sugar | 28.5g |
| Sodium | 245mg |
