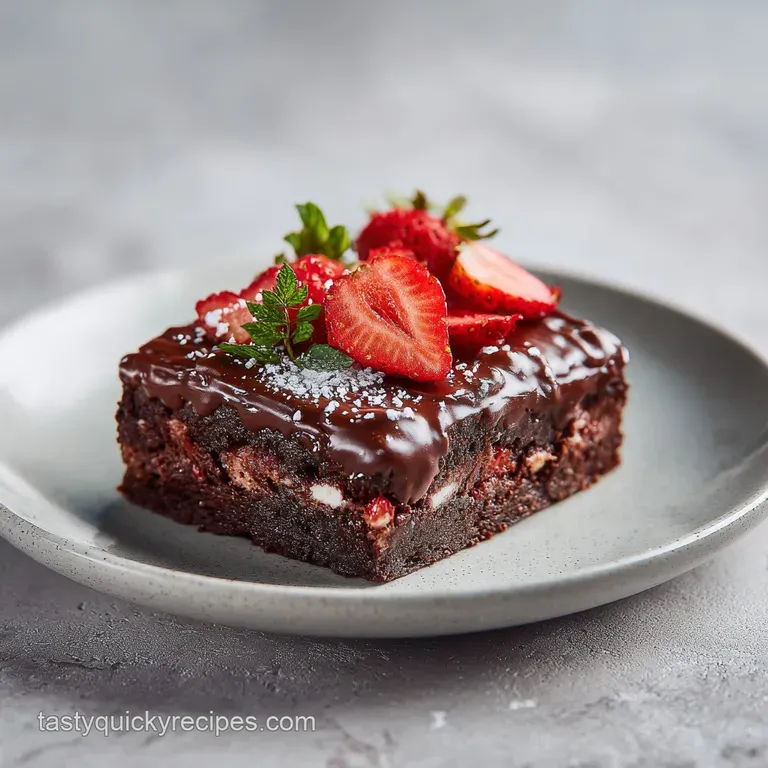
Chocolate Brownie Squares: Fudgy and Stable
- Time: Active 25 minutes, Passive 4 hours 30 mins, Total 4 hours 55 minutes
- Flavor/Texture Hook: Fudgy, velvety, and intensely chocolatey with a salty snap
- Perfect for: Office parties, family reunions, or a weekend treat for a large group
The Secret to Incredible Texture
The secret to why this recipe stands out from any other Potluck Dessert to Feed a Crowd with Chocolate Brownies lies in the physics of the batter and the temperature of the dairy. Most people just toss ingredients together, but we are looking for specific structural changes that happen before the pan even hits the oven.
- Fat to Flour Ratio: We use a high proportion of butter and sugar relative to the flour, which prevents gluten from over developing and ensures the base stays dense and fudgy rather than cakey.
- Blooming Technique: Adding Dutch processed cocoa to hot melted butter releases the flavor compounds trapped in the cocoa solids, making the chocolate taste far more intense.
- Egg Aeration: Whisking the eggs and sugar for a full 3 minutes creates a stable foam that rises slightly and then collapses into that signature "crackly" brownie top.
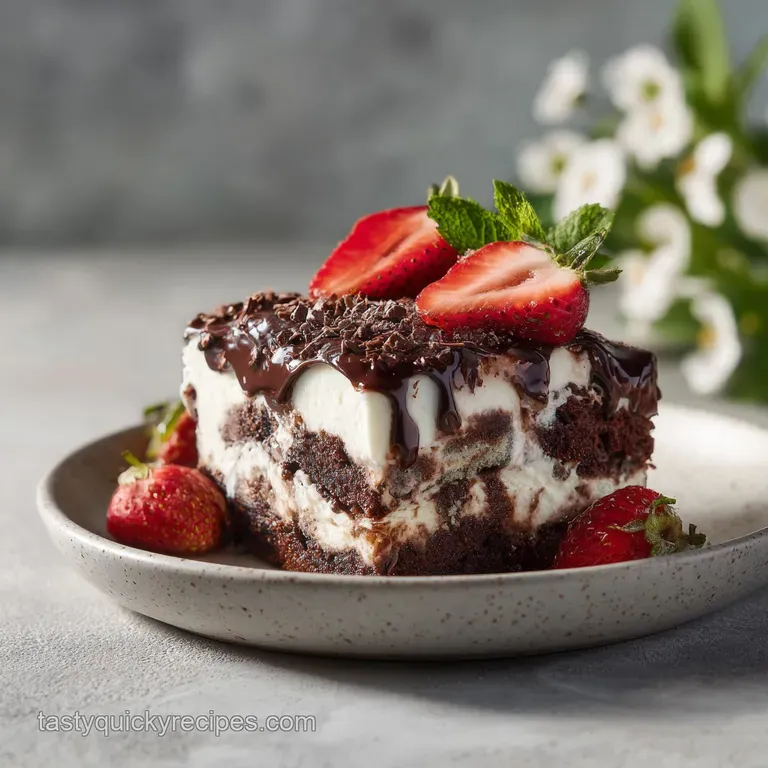
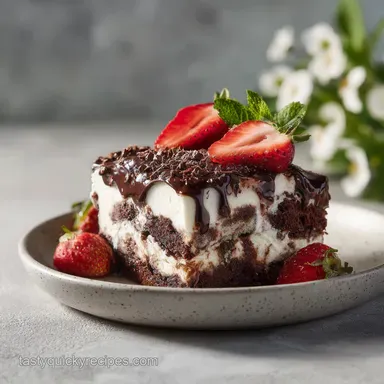
- Stable Emulsification: Combining softened cream cheese with whipped heavy cream creates a mousse that is firm enough to slice but light enough to melt on your tongue.
| Method | Time | Texture | Best For |
|---|---|---|---|
| Classic Oven | 30 minutes | Fudgy with crackle top | Traditional potluck squares |
| Chilled No Bake | 1 hour | Soft and fudge like | Quick summer gatherings |
| High Heat Bake | 22 minutes | Gooey center, crisp edges | Immediate home eating |
| Note: This recipe specifically uses the Oven method for structural stability. |
Choosing the right method for your Potluck Dessert to Feed a Crowd with Chocolate Brownies depends entirely on how long the dish needs to sit out. For a party, the oven baked base is non negotiable because it provides the "floor" for the heavier layers.
Important Recipe Statistics
Understanding what goes into your bowl helps you predict how the dessert will behave once it is finished. We are using specific ingredients that play roles beyond just flavor, and getting the balance right is what makes this a reliable choice for big groups.
| Ingredient | Role | Pro Secret |
|---|---|---|
| Dutch Processed Cocoa | Depth & Color | This cocoa is alkalized, making it darker and smoother than natural cocoa powder. |
| Large Eggs | Structure & Lift | Use room temperature eggs so they emulsify perfectly with the melted butter without curdling. |
| Heavy Whipping Cream | Volume & Richness | Ensure it is chilled to at least 40°F before whipping to achieve those sturdy, stiff peaks. |
| Cream Cheese | Tang & Stability | This provides the "backbone" for the mousse, preventing it from weeping or melting too quickly. |
When you are working with dark chocolate treats, the quality of the cocoa really dictates the final result. Dutch processed is my go to because it lacks the acidic bite of regular cocoa, which allows the sweetness of the mousse to really shine through.
Necessary Ingredients and Substitutes
To make this Potluck Dessert to Feed a Crowd with Chocolate Brownies, you will need a few pantry staples and a couple of dairy items that give it that premium feel. If you find yourself missing something, don't panic. There is almost always a workaround that still results in a crowd pleasing tray.
- 1 cup (225g) unsalted butter: Melted and hot. Why this? Hot butter blooms the cocoa and helps dissolve the sugar for a better crust.
- Substitute: Salted butter (just omit the sea salt later in the recipe).
- 2 cups (400g) granulated sugar: For sweetness and texture. Why this? Sugar isn't just for sweetness; it provides the structure and moisture in the base.
- Substitute: Half brown sugar for a chewier, more molasses forward base.
- 0.75 cup (75g) Dutch processed cocoa powder: For that deep color. Why this? It has a neutral pH that pairs better with the creamy layers.
- Substitute: Natural cocoa powder (the flavor will be slightly more acidic/fruity).
- 4 large eggs: Room temperature. Why this? They provide the protein structure that holds the fudge together.
- Substitute: 1 cup of unsweetened applesauce (note: the brownie will be much denser and less crackly).
- 1 tbsp vanilla extract: For aroma.
- Substitute: Almond extract for a nutty twist (use only 1 teaspoon).
- 1.5 cups (190g) all purpose flour: The foundation.
- Substitute: 1:1 gluten-free flour blend.
- 0.5 tsp fine sea salt: To balance the sugar.
- 16 oz (450g) full fat cream cheese: Softened. Why this? Full fat is essential for a mousse that doesn't go runny.
- Substitute: Mascarpone for an even richer, more buttery flavor profile.
- 1 cup (120g) powdered sugar: For the mousse sweetness.
- 1.5 cups (350ml) heavy whipping cream: Chilled.
- Substitute: Pre made whipped topping (though it will be significantly sweeter and less stable).
- 1 tsp espresso powder: To enhance the chocolate.
- 1 cup (175g) semi sweet chocolate chips: For the ganache.
- 0.5 cup (120ml) heavy cream: For the ganache.
- 1 pinch flaky sea salt: For the finishing touch.
Tools for Baking Success
While you don't need a professional kitchen to pull this off, having the right gear makes the process of creating a Potluck Dessert to Feed a Crowd with Chocolate Brownies much smoother. I once tried to whip the mousse by hand with a whisk and let's just say my arm didn't forgive me for three days.
A 13x9-inch metal pan is your best friend here. Glass pans take longer to heat up and longer to cool down, which can lead to overbaked edges and a raw center. Metal conducts heat evenly, giving you that perfect uniform bake across all 24 servings. Parchment paper is also a non negotiable.
You want to be able to lift the entire block out of the pan to get those clean, sharp cuts that make people think you bought them at a high end bakery.
An offset spatula is the "secret weapon" for that professional look. It allows you to spread the mousse and the ganache into a perfectly level layer without your knuckles dipping into the cream.
If you don't have one, the back of a large spoon works, but you won't get that "mirror flat" finish that looks so impressive on a serving tray.
step-by-step Baking Guide
- Preheat your oven to 350°F (175°C) and line a 13x9-inch metal pan with parchment paper, leaving an inch of overhang on the sides. Note: This creates a "sling" for easy removal later.
- Whisk the hot melted butter and cocoa powder together in a large bowl until the mixture is smooth and the cocoa smells toasted.
- Add the granulated sugar to the chocolate mixture and whisk until fully incorporated and slightly grainy.
- Incorporate the eggs one at a time, whisking vigorously after each addition for a total of 3 minutes until the batter is thick, glossy, and pale. Note: This step is what creates the shiny top.
- Gently fold in the all purpose flour and sea salt with a spatula until no white streaks remain.
- Pour the batter into the pan and bake for 25–30 minutes until a toothpick comes out with moist crumbs but no wet batter.
- Cool the brownie base completely in the pan on a wire rack. Note: Adding mousse to a warm brownie will cause it to melt and separate.
- Beat the softened cream cheese and powdered sugar until the mixture is silky and free of lumps.
- In a separate chilled bowl, whip 1.5 cups of heavy cream to stiff peaks, then gently fold it into the cream cheese mixture until no streaks remain.
- Spread the mousse evenly over the cooled brownie base, then chill for 30 minutes while you prepare the topping.
- Heat 0.5 cup of heavy cream to a simmer and pour it over the chocolate chips. Let it sit for 5 minutes, then stir until the ganache is dark, glossy, and smooth.
- Pour the ganache over the mousse, sprinkle with flaky salt, and chill for at least 4 hours until the layers are firm and set.
Solving Common Baking Problems
Even the best of us hit a snag sometimes when making a Potluck Dessert to Feed a Crowd with Chocolate Brownies. The most common issues usually stem from temperature either something was too hot when it should have been cold, or vice versa.
If your layers are looking wonky, don't throw it out; most brownie "fails" can be salvaged with a little fridge time or a clever garnish.
Why Your Brownie Base Sunk
If the center of your brownie looks like a crater, you likely over mixed the flour or opened the oven door too early. When you whisk the eggs, you're building a delicate structure of air bubbles.
If you're too aggressive once the flour goes in, you deflate those bubbles, and the weight of the sugar and fat causes the middle to collapse. It will still taste incredible, and since we're covering it with mousse, no one will ever know!
Preventing a Grainy Ganache
Ganache is an emulsion, which means you're forcing fat and water to play nice together. If you stir it too soon or too vigorously while it's still very hot, the fat can separate, leaving you with a dull, oily, or grainy mess. Let the hot cream sit on those chips for the full five minutes.
This allows the heat to penetrate the chocolate evenly so it melts into a smooth pool before you ever touch it with a spoon.
| Problem | Root Cause | Solution |
|---|---|---|
| Runny Mousse | Cream cheese was too cold or cream under whipped | Beat the cream to very stiff peaks before folding it in. |
| Tough Brownie | Over mixing after adding flour | Fold the flour in by hand just until it disappears. |
| Cracked Ganache | Slicing the dessert while too cold | Let the tray sit at room temp for 10 mins before cutting. |
Common Mistakes Checklist
- ✓ Always use room temperature eggs to ensure they emulsify properly with the fat.
- ✓ Never pour ganache over a room temperature mousse; the mousse must be chilled first.
- ✓ Use a metal pan for even heat distribution to avoid burnt edges and raw centers.
- ✓ Do not skip the "blooming" of the cocoa in hot butter for maximum chocolate depth.
- ✓ Wipe your knife with a warm, damp cloth between every single cut for clean squares.
Easy Dietary Adaptations
When you're making a Potluck Dessert to Feed a Crowd with Chocolate Brownies, you have to consider that not everyone can eat everything. Luckily, this recipe is quite sturdy and handles substitutions better than a delicate sponge cake would.
If you need to go gluten-free, a high-quality 1:1 baking flour (the kind with xantham gum already included) works almost perfectly here. Because the brownie base is meant to be fudgy rather than airy, the lack of gluten doesn't ruin the texture.
In fact, some of my friends prefer the gluten-free version because it stays even moister over several days.
For those looking for peanut butter chocolate snacks, you can actually swirl a bit of melted peanut butter into the mousse layer. Just reduce the cream cheese by 2 ounces and add 1/2 cup of creamy peanut butter. It adds a salty, nutty dimension that cuts through the richness of the ganache beautifully.
Scaling for Your Crowd
- Down (12 servings): Use an 8x8 inch square pan. The bake time will be roughly the same, but keep an eye on it at the 22 minute mark.
- Up (48 servings): It is better to make two separate 13x9 pans rather than one giant one. Large commercial sheet pans cook differently and the center often stays raw while the edges burn.
- Baking Double: If you are baking two pans at once, rotate them halfway through the 30 minutes to ensure even browning.
Storing for Maximum Freshness
Because this Potluck Dessert to Feed a Crowd with Chocolate Brownies has a high dairy content in the mousse and ganache, it cannot sit on the counter. It must be kept in the refrigerator. In fact, I think these brownies actually taste better on day two.
The flavors have time to meld, and the brownie base softens slightly from the moisture in the mousse, creating a texture that is almost like a truffle.
You can store these in the fridge for up to 5 days. Just make sure the pan is tightly covered with plastic wrap or foil so they don't pick up any "fridge smells" from your leftover onions or garlic. For long term storage, you can freeze these!
I recommend cutting them into squares first, freezing them on a tray for an hour until firm, and then wrapping each square individually. They will stay fresh in the freezer for up to 2 months. To eat, just thaw a square in the fridge overnight.
Zero waste tip: If you have leftover brownie scraps from trimming the edges to make them look perfect, don't toss them! Crumble them up and use them as a topping for vanilla ice cream, or fold them into a batch of chocolate chip cookie dough for a "brownie stuffed" cookie experience.
Creative Serving Ideas
Presentation is half the battle when you're bringing a Potluck Dessert to Feed a Crowd with Chocolate Brownies to a party. Instead of just leaving them in the pan, try lifting the whole block out using the parchment paper "sling" and cutting them into 24 perfectly uniform squares.
For a formal touch, place each square into a gold or silver cupcake liner. Not only does this look fancy, but it also makes it much easier for guests to grab a piece without getting chocolate on their fingers. I also love to add a tiny garnish right before serving.
A single fresh raspberry on top of each square adds a pop of color and a tartness that balances the heavy chocolate.
If you want to go the extra mile, a light dusting of powdered sugar or a few extra flakes of sea salt right before the tray hits the table can make a world of difference. The salt, in particular, hits your tongue first and wakes up your taste buds, making the chocolate flavor seem even more intense.
It is these little details that transform a simple tray of brownies into the "showstopper" of the entire potluck.
For Structural Integrity and Clean Cuts
To get those "Instagram worthy" clean lines, your knife technique is everything. Use a long, sharp chef's knife. Dip the blade into a tall glass of hot water, wipe it completely dry with a clean towel, and make one long, decisive cut. Do not saw back and forth!
Wipe the blade clean and re dip it in hot water before every single slice. This prevents the mousse from dragging into the ganache and keeps each layer looking sharp and distinct.
For Maximum Flavor Depth
Never skip the espresso powder. You won't actually taste "coffee" in the final product. What the espresso does is act as a flavor enhancer for the cocoa. It provides a bitter counterpoint that makes the chocolate taste "darker" and more complex.
If you don't have espresso powder, a tablespoon of very strong brewed coffee can be substituted in the brownie batter, just reduce the vanilla extract slightly to keep the liquid ratios consistent.

Recipe FAQs
What are the best potluck desserts for a crowd?
Brownies are the gold standard because they are easy to portion and transport. This specific recipe yields 24 uniform squares, making it ideal for feeding a large group without needing individual plating.
What to serve with brownies for a party?
Fresh fruit or light whipped cream balances the richness of the chocolate perfectly. If you want to impress guests with texture, you could also offer a side of fluffy mousse to mirror the cream layer already present in this dessert.
Can you bring brownies to a potluck?
Yes, they are highly portable and stable. Just ensure you use a metal 13x9-inch pan and line it with parchment paper to create a sling, allowing you to lift the entire block out for clean slicing at your destination.
How can I elevate boxed brownies for guests?
Replace the oil with hot melted butter and bloom your cocoa powder directly into it. This simple technique deepens the chocolate intensity significantly; if you enjoy this method of flavor enhancement, see how we apply similar principles to create a classic rum-infused profile.
Is it true I must leave the brownies at room temperature for the best texture?
No, this is a common misconception. Because this recipe features a dairy rich mousse and ganache layer, it must be stored in the refrigerator; the flavors actually meld better after resting overnight in the cold.
How to ensure the brownies have a clean, professional cut?
Wipe your knife with a warm, damp cloth between every single cut. This prevents the ganache and mousse from dragging across the brownie, ensuring perfectly sharp edges on every one of your 24 squares.
How to prevent the ganache from melting the mousse layer?
Chill the mousse layer thoroughly for at least 4 hours before adding the ganache. If you attempt to pour the warm chocolate mixture over a room temperature base, the layers will bleed into one another instead of remaining distinct.
Chocolate Brownie Potluck Squares
Ingredients:
Instructions:
Nutrition Facts:
| Calories | 364 calories |
|---|---|
| Protein | 4.3 g |
| Fat | 24.5 g |
| Carbs | 35.1 g |
| Fiber | 1.4 g |
| Sugar | 26.8 g |
| Sodium | 178 mg |
