Butterscotch Chocolate Chip Cookies: Chewy and Salted

- Time: Active 140 minutes, Passive 10 minutes, Total 150 minutes
- Flavor/Texture Hook: Shatter crisp edges with a chewy, toffee like center
- Perfect for: High end holiday gifting or a sophisticated dessert craving
- Best Ever Butterscotch Chocolate Chip Cookie with Sea Salt
- The Secret to Toffee Textures
- Component Analysis and Selection
- Ingredients and Smart Substitutes
- Step by Step Instructions
- Solving Common Baking Hurdles
- Adjusting the Batch Size
- Classic Method vs. Fast Method
- Popular Baking Misconceptions
- Storage and Zero Waste
- Presentation and Color Accents
- Recipe FAQs
- 📝 Recipe Card
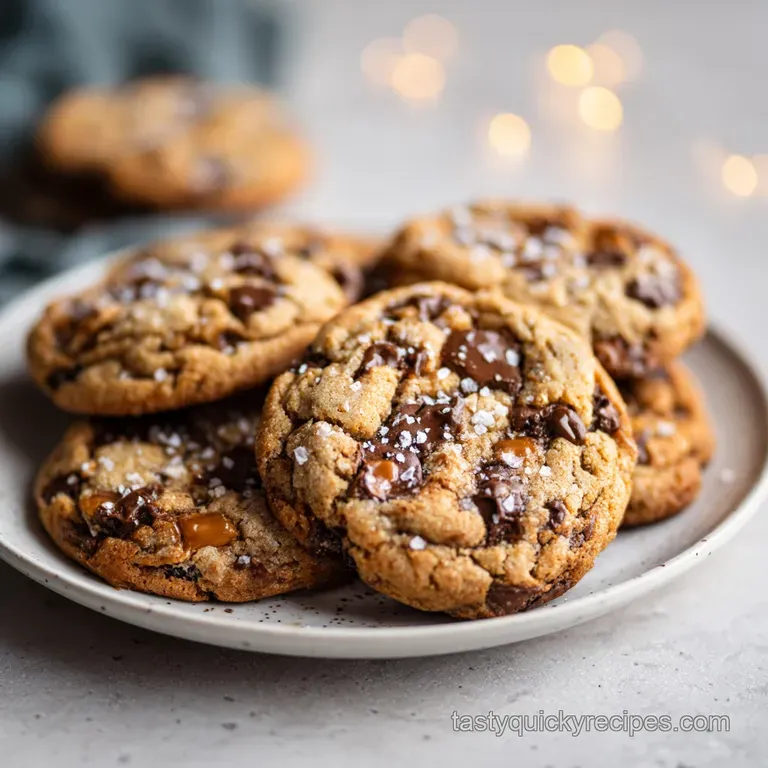
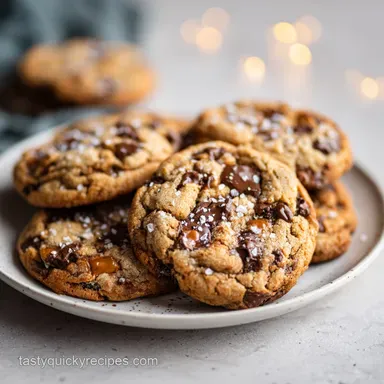
Best Ever Butterscotch Chocolate Chip Cookie with Sea Salt
Imagine biting into a cookie that smells exactly like toasted hazelnuts and melted sugar, only to find a texture that’s part fudgy and part shatter crisp. We’ve all been there: you grab a butterscotch chip from the bag, and it's cloyingly sweet, almost waxy.
When you bake that into a standard dough, you end up with a sugar bomb that lacks soul. Discover the recipe for the best ever butterscotch chocolate chip cookie with sea salt.
Most people struggle with these cookies because the butterscotch chips don't have the natural bitterness of chocolate to balance the sugar. The result is often a flat, one dimensional sweet that leaves you reaching for a gallon of water.
My breakthrough happened when I realized we shouldn't treat butterscotch like a chocolate substitute; we need to treat it like a partner to deep, nutty fats and sharp minerals.
This version is the foolproof fix for every "too sweet" cookie you've ever baked. We are going to transform ordinary fats into liquid gold and use a specific hydration technique that turns a basic dough into a gourmet dessert.
Expect a cookie that looks as good as it tastes, with amber hued pockets and pools of dark chocolate that invite you to take just one more bite.
The Secret to Toffee Textures
The magic of this recipe isn't just in the sugar; it's in how we manipulate the fats and proteins before they ever hit the oven.
- Maillard Magic: Cooking the butter until it reaches a mahogany shade creates toasted milk solids, which provide a savory backdrop to the sweet chips.
- Starch Hydration: Resting the dough for 120 minutes allows the flour to fully absorb the moisture from the eggs, resulting in a deeper tan color and a much chewier bite.
- Sugar Polarity: Using dark brown sugar instead of light provides more molasses, which reacts with the baking soda to create those gorgeous, crinkly ridges.
- Contrast Stability: Adding flaky salt at the very end prevents it from dissolving into the dough, ensuring every bite gets a sharp, clean hit of salt to cut the richness.
| Thickness | Internal Temp | Rest Time | Visual Cue |
|---|---|---|---|
| 1/2 inch | 175°F (80°C) | 5 minutes | Golden edges, pale center |
| 3/4 inch | 180°F (82°C) | 8 minutes | Deep tan, slightly firm sides |
| 1 inch | 185°F (85°C) | 10 minutes | Set edges, matte top finish |
When you choose your bake time, remember that these cookies continue to set on the hot pan. If they look "perfect" in the oven, they will be overdone by the time they cool. Aim for that slightly under baked look in the middle to keep things velvety.
Component Analysis and Selection
| Ingredient | Science Role | Pro Secret |
|---|---|---|
| Browned Butter | Flavor Base | Whisk constantly to prevent the milk solids from burning at the bottom. |
| Dark Brown Sugar | Moisture Agent | Pack it tightly; the extra molasses is what gives that irresistible toffee note. |
| Vanilla Bean Paste | Aromatic Lift | The tiny seeds provide a visual "gourmet" cue that extract simply can't match. |
| Dark Chocolate Chunks | Bitter Balance | Use at least 60% cacao to provide a necessary counter point to the butterscotch. |
Choosing high-quality fats is non negotiable here. I always reach for grass fed butter because it has a higher fat to water ratio, which means less evaporation and more richness. This is similar to how I approach the fats in my classic peanut butter buckeyes, where the quality of the base determines the final silkiness.
Ingredients and Smart Substitutes
- 1 cup (227g) Unsalted Grass Fed Butter: Why this? Higher fat content leads to a richer, more velvety crumb. (Sub: European style butter)
- 3/4 cup (150g) Dark Brown Sugar: Why this? Molasses adds moisture and a deep, smoky sweetness. (Sub: Light brown sugar + 1 tsp molasses)
- 1/2 cup (100g) Granulated Cane Sugar: Why this? Essential for achieving those crispy, golden brown edges. (Sub: Coconut sugar for a nuttier vibe)
- 1 tbsp Pure Vanilla Bean Paste: Why this? Offers a more intense, floral aroma than standard liquid extract. (Sub: 1.5 tbsp Vanilla extract)
- 2 Large Eggs: Why this? Room temperature eggs emulsify better, creating a smoother dough. (Sub: Flax eggs, though the texture will be denser)
- 2 1/4 cups (280g) All Purpose Flour: Why this? The specific protein level ensures the cookie stays chewy, not cakey. (Sub: 1 to-1 gluten-free flour blend)
- 1 tsp Baking Soda: Why this? Reacts with the molasses to provide lift and browning. (Sub: 3 tsp Baking powder, but color will be lighter)
- 3/4 tsp Fine Sea Salt: Why this? Dissolves evenly to season the entire dough base. (Sub: Table salt, use slightly less)
- 1 cup (170g) Butterscotch Chips: Why this? The star of the show; look for chips with real vanilla. (Sub: Toffee bits)
- 1 cup (170g) Dark Chocolate Chunks: Why this? 60% cacao prevents the recipe from becoming too sugary. (Sub: Semi sweet chips)
- 1 tbsp Flaky Sea Salt: Why this? Provides a textural crunch and immediate flavor contrast. (Sub: Maldon salt)
step-by-step Instructions
- Brown the butter. Place the butter in a heavy bottomed saucepan over medium heat. Melt, then continue cooking while whisking constantly until it reaches a rich mahogany color and smells like toasted hazelnuts. Note: This usually takes about 5-8 minutes after melting. Immediately transfer to a heat proof bowl and cool for 15 minutes.
- Cream the fats. Combine the cooled browned butter with dark brown sugar and granulated sugar. Beat using a stand mixer until well combined and slightly aerated. Mix until the mixture looks like wet sand.
- Emulsify the liquids. Add eggs one at a time, followed by the vanilla bean paste. Beat well after each addition until the mixture is smooth and glossy.
- Whisk dry ingredients. In a separate bowl, whisk together the flour, baking soda, and fine sea salt.
- Combine the dough. Gradually add the dry ingredients to the wet ingredients. Mix until no streaks of white flour remain.
- Fold in mix ins. Fold in the butterscotch chips and dark chocolate chunks by hand. Note: Hand folding prevents the chips from breaking or the dough from over mixing.
- Hydrate the dough. Cover the dough and refrigerate for a minimum of 120 minutes. This hydration period is critical for texture and flavor development.
- Prepare for baking. Preheat oven to 350°F (175°C). Line baking sheets with parchment paper.
- Portion the dough. Using a #20 scoop (approx. 3 tablespoons), portion the chilled dough onto the sheets, spacing them 3 inches apart.
- Bake and finish. Bake for 9-11 minutes until the edges are golden brown and crackling. Immediately sprinkle with flaky sea salt while warm.
Solving Common Baking Hurdles
If your cookies come out of the oven looking like flat pancakes or rock hard pucks, don't panic. These are common issues that usually come down to temperature control or measurement errors.
Why Your Cookies Spread Too Much
Usually, this happens because the butter was too warm when you started mixing, or you skipped the crucial 120 minute chilling step. When the fat is too soft, it melts before the structure of the flour can set in the oven.
Also, check your baking soda; if it's old, it won't provide the "lift" needed to keep the cookie from collapsing.
| Problem | Root Cause | Solution |
|---|---|---|
| Flat/Thin | Warm dough or over creaming | Chill dough for a full 120 minutes before baking. |
| Hard/Tough | Over mixing flour | Mix until just combined; stop the moment flour disappears. |
| No Browning | Oven temp too low | Use an oven thermometer to verify a true 350°F (175°C). |
Common Mistakes Checklist
- ✓ Never skip the 15 minute cooling period for browned butter (it will cook the eggs).
- ✓ Avoid using "light" butter or margarine spreads; the water content is too high.
- ✓ Don't over crowd the pan; these need 3 inches of space to breathe.
- ✓ Use a kitchen scale for the flour; a "cup" can vary by 20% depending on how you scoop.
- ✓ Sprinkle the flaky salt while the chocolate is still melted so it sticks.
Adjusting the Batch Size
Scaling cookies is generally straightforward, but you have to watch the moisture levels. If you are doubling this recipe, stick to 1.5 times the salt and spices to avoid overpowering the dough. For liquids, you might find that you need slightly less than a direct double to keep the dough from becoming too slack.
When halving the recipe, the most annoying part is the egg. I recommend beating one egg in a small bowl and using exactly half of it by weight or volume. For baking, if you've scaled the dough down, keep an eye on the oven around the 8 minute mark, as smaller batches sometimes bake faster due to better airflow in the oven.
Classic Method vs. Fast Method
| Method | Total Time | Texture | Flavor Depth |
|---|---|---|---|
| Classic (Chilled) | 150 minutes | Chewy, developed | Intense toffee/vanilla |
| Fast (No Chill) | 30 minutes | Thin, crispier | Sweet, buttery |
| Frozen Dough | 15 minutes | Extra thick | Concentrated sugar |
Time for baking only; dough must be pre made.
Popular Baking Misconceptions
One major myth is that "browned butter" and "melted butter" are interchangeable. They aren't. Melted butter still contains water; browned butter has had that water evaporated, concentrating the fat and toasted protein.
If you just melt butter without browning it, you’ll lose that hazelnut aroma that makes this recipe gourmet.
Another misconception is that the chill time is just about making the dough easier to handle. While that's true, the real benefit is enzymatic. During those 120 minutes in the fridge, the flour's proteins and starches break down into simpler sugars, which is why a chilled cookie always browns better and tastes more complex. It's the same principle I use for my roasted almond snack, where time allows the flavors to penetrate the core.
Storage and Zero Waste
These cookies stay soft and chewy for up to 5 days if kept in an airtight container at room temperature. For the best texture, toss a small piece of white bread into the container; the cookies will absorb the moisture from the bread and stay velvety.
If you want to keep them longer, they freeze beautifully for up to 3 months. Just make sure to wrap them individually so they don't pick up "freezer smells."
For a zero waste kitchen approach, save the crumbs at the bottom of the container. I love pulsing them in a blender and using them as a "sand" topping for vanilla bean ice cream or as a crust for a cheesecake.
If you have leftover butterscotch chips, don't let them sit in the pantry to get waxy; melt them down with a little cream to make a quick butterscotch ganache for your morning coffee or waffles.
Presentation and Color Accents
A "presentation" focused cook knows that we eat with our eyes first. To make these look like they came from a high end patisserie, you need to manage your color balance. We are looking for a three point color strategy.
First, the deep mahogany of the dough provides the canvas. Second, we want "pools" of color. I like to press a few extra dark chocolate chunks and butterscotch chips onto the top of the dough balls right before they go into the oven. This ensures they are visible and not buried under the flour.
Finally, the white sparkle of the flaky sea salt provides the finishing touch.
Serve these on a dark wood board or a matte black plate to make the golden amber chips really pop. They pair irresistibly with a cold glass of whole milk or a bitter espresso to cut through the richness of the butterscotch.
Keep the styling simple; the craggy, salt dusted surface of the cookie is all the decoration you really need.

Recipe FAQs
Why is refrigerating the dough for 2 hours necessary?
This step is critical for proper hydration and flavor development. Chilling the dough allows the flour to fully absorb the moisture, ensuring the cookies bake with a deep, complex flavor and the ideal chewy texture.
How to brown butter without burning it?
Whisk constantly over medium heat until the butter reaches a rich mahogany color. You are looking for a toasted hazelnut aroma, which usually takes about 5 to 8 minutes after the butter has fully melted.
Is it true I can bake these cookies immediately after mixing?
No, this is a common misconception. Baking the dough without the required 2-hour chill time will result in excessive spreading and a loss of the signature depth found in the browned butter.
How to keep these cookies soft for several days?
Store them in an airtight container at room temperature. Adding a small piece of white bread to the container helps the cookies retain moisture, keeping them velvety for up to 5 days. If you want to explore more soft batch cookie techniques, the same moisture retention logic applies to our other recipes.
How to tell when the cookies are done baking?
Look for golden brown, crisp edges while the centers remain slightly soft. You should remove them from the 350°F oven between 9 and 11 minutes to ensure they do not overbake and lose their chewy interior.
Can I use a different type of sugar for this recipe?
No, sticking to the specified dark brown and granulated cane sugars is recommended. These provide the precise balance of molasses flavor and structural stability required for the cookie's final texture.
How to properly add the flaky sea salt?
Sprinkle the salt immediately after pulling the cookies from the oven. Applying it while the cookies are still warm ensures the salt adheres to the surface and creates that signature contrast with the butterscotch and chocolate.
Butterscotch Chocolate Chip Cookies
Ingredients:
Instructions:
Nutrition Facts:
| Calories | 229 kcal |
|---|---|
| Protein | 2.3 g |
| Fat | 12.6 g |
| Carbs | 27.6 g |
| Fiber | 0.6 g |
| Sugar | 17.3 g |
| Sodium | 371 mg |
