Shattering-Crisp Breakfast Quesadillas

Mastering Crisp and Cheesy Breakfast Quesadillas
The first sound you hear in my kitchen every Saturday morning is the sharp, rhythmic tap of a knife hitting the cutting board. Then comes the sizzle. That high pitched, energetic song when the diced red bell peppers hit the hot butter it is the ultimate wake up call.
There is something about the aroma of sautéed green onions mingling with melting fat that signals the day has truly begun. I used to think a morning meal had to be either a bowl of cereal or a massive production that left me doing dishes for hours, but then I found the middle ground that actually keeps me fueled until lunch.
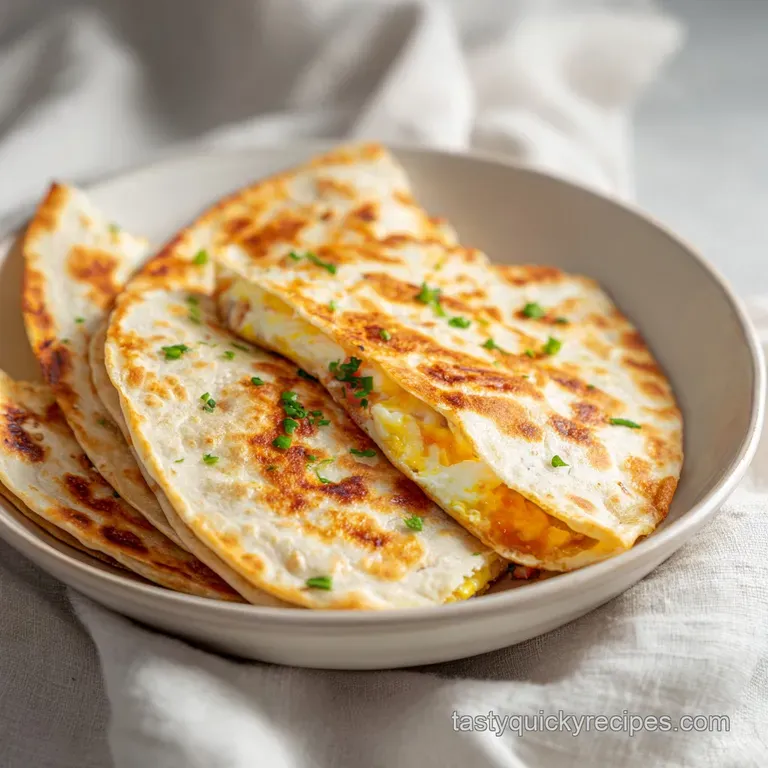
I’m talking about a texture contrast that’ll make you forget every soggy wrap you’ve ever had. Imagine the "shatter" of a perfectly toasted flour tortilla, followed immediately by the velvety, soft pillow of eggs tucked inside.
It is that sweet and savory balance the bright crunch of the peppers against the rich, sharp bite of melted cheddar that makes these Breakfast Quesadillas a staple in our house. Honestly, don't even bother with low-fat cheese here; we need that fat to act as the glue and the flavor carrier.
For a long time, I struggled with the "slippery egg" problem. You know the one, where you take a bite and the entire filling slides out the back like it’s making a break for it. I realized I was overcomplicating the scramble and underestimating the power of the cheese.
Once I figured out the "cheese barrier" method, everything changed. We are going to walk through how to get that rigid, golden brown exterior without turning the eggs into rubber. Trust me, once you hear that first crunch, you’ll never go back to basic toast.
The Trick Behind the Texture
When we talk about what makes this recipe stand out, it comes down to managing moisture and heat. Most people treat a breakfast wrap like a dumping ground for ingredients, but we are looking for a specific structural integrity.
By using the right fats and timing the egg removal perfectly, we ensure the inside stays moist while the outside gets that "cracker like" snap.
- Protein Coagulation: Keeping the heat medium low prevents the egg proteins from tightening too quickly, which would squeeze out water and make your tortilla soggy.
- Starch Toasting: The salted butter on the exterior of the tortilla doesn't just add flavor; it facilitates a beautiful golden brown crust that remains rigid even after you slice it.
- The Cheese Seal: Placing cheese on both the top and bottom of the egg layer creates a biological "glue" that binds the tortilla and the filling into one cohesive unit.
| Method | Time | Texture | Best For |
|---|---|---|---|
| Stovetop | 10 minutes | Maximum crispness, rigid shell | Quick mornings and single servings |
| Oven (400°F) | 12 minutes | Even browning, softer bite | Large batches or meal prep |
| Air Fryer | 8 minutes | Ultra crunchy, slightly drier | When you want zero mess |
If you are looking for that classic, energizing morning feel, the stovetop method is your best friend because it gives you total control over the sear. But what about the sogginess? That usually happens because people add watery vegetables or under melt the cheese.
We’ll get to how to prevent that in the troubleshooting section, but the secret is always in the sauté.
Vital Timing and Nutritional Recipe Specs
This isn't a project that requires you to wake up at 5:00 AM just to eat by 8:00 AM. It is a 20 minutes total commitment, which is just enough time for your coffee to brew and reach a drinkable temperature.
We are looking for a protein packed breakfast that doesn't weigh you down, providing 33 g of protein per serving to keep those mid morning snack cravings at bay.
- Prep Time: 10 minutes
- Cook Time: 10 minutes
- Total Time: 20 minutes
- Yield: 2 servings
| Component | Science Role | Pro Secret |
|---|---|---|
| Sharp Cheddar | Emulsified fat and structural glue | Use a block and grate it yourself for a better melt |
| Whole Milk | Steam generation for fluffy eggs | Don't overdo it; 2 tbsp is the sweet spot for 4 eggs |
| Salted Butter | Maillard reaction catalyst | Use cold butter to start the pan for a more even melt |
The choice of sharp cheddar is non negotiable for me. Mild cheddar or those "Mexican blend" pre shredded bags are often coated in potato starch to keep them from clumping. That starch prevents the cheese from fully integrating with the eggs and the tortilla. If you want that silky, stretchy pull, take the sixty seconds to grate your own from a block. It makes a world of difference in how the fats behave under heat. For another high protein option that uses a similar "low and slow" egg technique, you should check out my velvety egg casserole recipe.
Fresh Components and Wholesome Ingredient Choices
The star of this show, surprisingly, isn't the egg it's the sharp cheddar cheese. It provides the backbone of the flavor and the structural support. I always reach for a Vermont or Wisconsin sharp cheddar because the acidity cuts through the richness of the butter and eggs.
If you try to substitute a "plastic y" American cheese, you'll lose that wholesome, energizing bite that defines a good morning.
- 4 large eggs: The foundation. Why this? Provides the "velvety" internal texture and essential morning protein.
- 2 tbsp whole milk: Fat for the scramble. Why this? Higher fat content than skim prevents the eggs from drying out.
- 1/4 cup diced red bell pepper: The bright note. Why this? Adds a necessary sweetness to contrast the savory cheese.
- 2 green onions: The aromatic kick. Why this? They soften quickly and add a fresh, garden like scent.
- 2 large 10 inch flour tortillas: The vessel. Why this? Large tortillas allow for a perfect fold and sear technique.
- 1 cup shredded sharp cheddar cheese: The glue. Why this? High oil content ensures a perfect melt and "bind."
- 1.5 tbsp salted butter: The browning agent. Why this? Butter solids create the golden brown color better than oil.
- 1/2 tsp kosher salt & 1/4 tsp pepper: Seasoning basics.
| Original Ingredient | Substitute | Why It Works |
|---|---|---|
| Sharp Cheddar | Pepper Jack | Adds a spicy kick. Note: Melts similarly but alters flavor profile. |
| Whole Milk | Heavy Cream | Creates a richer, denser egg curd. |
| Flour Tortilla | Corn Tortilla | gluten-free option. Note: Will be more fragile; use two small ones instead. |
| Red Bell Pepper | Sautéed Spinach | Adds earthy notes and extra iron. |
Using the right sized tortilla is actually a big deal. A 10 inch tortilla provides enough surface area to hold a decent amount of filling without it exploding out the sides. If you use the smaller "taco" size, you'll end up with more tortilla than filling, and that sweet/savory balance will be thrown totally off.
Essential Tools for the Perfect Sear
You don't need a professional kitchen, but a few specific tools will make your life significantly easier. A non stick skillet is practically mandatory here. Eggs are notoriously clingy, and trying to make this in a stainless steel pan without a massive amount of oil is a recipe for frustration.
- 12 inch Non Stick Skillet: You need the space to sauté the peppers and then later to sear the folded quesadilla.
- Heat Resistant Silicone Spatula: Essential for "pushing" the egg curds without scratching your pan.
- Box Grater: For that fresh shredded cheddar.
- Whisk: To thoroughly emulsify the milk and eggs.
I personally love using a heavy bottomed non stick pan (like a Ninja Foodi or a high end Calphalon). The weight of the pan helps distribute heat evenly, which is the secret to getting that uniform golden color across the entire surface of the tortilla.
If your pan has a "hot spot" in the middle, you'll end up with a burnt center and pale edges.
Detailed Steps for a Golden Finish
Right then, let's crack on with the cooking. The key here is to work in stages. We aren't just throwing everything in a pan at once. We are building layers of flavor.
- Whisk the base: In a medium bowl, whisk 4 eggs, 2 tbsp milk, 1/2 tsp salt, and 1/4 tsp pepper until no streaks of egg white remain. Note: This ensures a uniform, velvety texture.
- Sauté the aromatics: Melt 1/2 tablespoon of butter in your skillet over medium low heat. Add 1/4 cup diced red bell pepper and 2 sliced green onions. Cook for 2 minutes until softened and fragrant.
- The gentle scramble: Pour the egg mixture over the vegetables. Use your spatula to gently push the cooked curds toward the center.
- Remove early: Take the pan off the heat while the eggs are still slightly wet and glossy. Transfer them to a clean bowl immediately. Note: They will finish cooking from residual heat.
- Clean the slate: Wipe the skillet clean with a paper towel. This prevents any stray egg bits from burning during the next phase.
- The cheese foundation: Lay one 10 inch tortilla flat. Sprinkle 1/4 cup of cheese over just one half of the tortilla.
- Assembly: Spread half of your egg and pepper mixture over the cheese. Top that with another 1/4 cup of cheese. Fold the tortilla in half to create a semi circle.
- The final sear: Melt the remaining tablespoon of butter in the skillet over medium heat. Place the folded quesadilla in the pan.
- Develop the crust: Sear for 2-3 minutes per side. Cook until the exterior is deep golden brown and rigid.
- The rest: Let it sit on a cutting board for 1 minute before slicing. This allows the cheese to set so the filling doesn't spill out.
I once made the mistake of leaving the eggs in the pan until they looked "done." By the time I put them in the quesadilla and seared the outside, they had turned into rubbery little pebbles. Always, always pull them off the heat while they still look a bit underdone.
They are going back into a hot pan for another 4-5 minutes anyway!
Fixing Sogginess and Common Texture Issues
Even the best of us hit a snag sometimes. The most common complaint with any breakfast quesadilla recipe is that it turns out soggy or the tortilla gets greasy instead of crispy. This usually comes down to heat management or moisture control in the vegetables.
Why Your Tortilla Is Soft
If your tortilla isn't achieving that "shatter" when you bite it, your pan probably wasn't hot enough when you added the butter. If the butter just soaks into the flour instead of sizzling on the surface, you'll get a heavy, oily wrap. Make sure the butter is foaming before the tortilla hits the pan.
Why Your Eggs Are Rubbery
This is almost always caused by overcooking in the first stage. Remember, the eggs are being cooked twice. The first "scramble" is just to get them into a solid ish state. The real magic happens inside the tortilla where they steam gently.
| Problem | Root Cause | Solution |
|---|---|---|
| Soggy Bottom | Too much moisture in the peppers | Sauté peppers until all visible liquid evaporates |
| Filling Falls Out | Not enough "glue" | Ensure cheese is on the bottom AND top of the egg layer |
| Burnt Exterior | Heat too high/Not enough butter | Reduce to medium heat; ensure butter coats the whole pan |
Common Mistakes Checklist:
- ✓ Pat your bell peppers dry after washing to avoid adding extra water to the pan.
- ✓ Don't skip the "wipe the pan" step; burnt egg bits will make the tortilla taste bitter.
- ✓ Grate your cheese fresh; pre shredded cheese doesn't melt nearly as well.
- ✓ Let the quesadilla rest for 60 seconds before cutting it saves your fingers and the filling.
- ✓ Use a serrated knife or a very sharp chef's knife to slice to avoid squishing the eggs.
Creative Filling and Flavor Variations
Once you've mastered the basic cheesy egg breakfast quesadilla, the world is your oyster. You can take this in a dozen different directions depending on what's in your fridge. If you're feeling like you need a "Southwest Kick," try adding some black beans and a dash of cumin to the egg mixture.
The Freezer Friendly Breakfast
If you want to make-ahead breakfast quesadillas, you can actually assemble them up to the point of the final sear, wrap them tightly in foil, and freeze them. When you're ready to eat, just thaw them overnight in the fridge and do the final butter sear in the morning. It's a lifesaver for busy Monday mornings.
The Vegetarian Breakfast Quesadilla
While this recipe is already vegetarian, you can bulk it up with "meatier" plant based options. I love adding sautéed mushrooms or sun dried tomatoes. If you have extra eggs and want to try something different, these techniques also work incredibly well if you're making perfect deviled eggs for a brunch side.
- The Lean Machine: Use egg whites and a low-fat feta cheese. It won't be as "gluey," but it's a great protein heavy alternative.
- The Protein Packed Breakfast: Add 2 ounces of cooked breakfast sausage or diced ham to the scramble.
- The Spice King: Add diced jalapeños and use Pepper Jack cheese for a morning wake up call that clears the sinuses.
Smart Scaling for Any Group
Scaling this recipe is fairly straightforward, but you have to be careful with the pan size. If you are trying to feed a family of four, don't try to scramble 8 eggs in a small pan; you'll end up with a giant, uneven mess.
Scaling Down (1 person): Just halve everything. Use a smaller 8 inch skillet so the eggs don't spread too thin and dry out. You can still use the 10 inch tortilla, just be more generous with the cheese to ensure it fills the space.
Scaling Up (4-6 people): I recommend doing the eggs in two batches. If you put too many eggs in the pan at once, the temperature drops, and they steam instead of scramble. For the final sear, you can actually use a large griddle if you have one. It allows you to cook 3 or 4 quesadillas at the same time so everyone can eat together. If you're scaling up for a crowd, you might also want to look into breakfast meal prep ideas that utilize a larger baking dish.
Debunking Kitchen Myths
One of the biggest myths I hear is that you need to add water to eggs to make them fluffy. That is absolute nonsense. Water just dilutes the flavor and often ends up weeping out of the eggs later, making your tortilla soggy. Milk or cream adds fat, which coats the protein and keeps it tender.
Another misconception is that you should salt your eggs only at the very end. Actually, salting them before they hit the pan helps break down the protein structures, resulting in a more tender curd. It’s a small change that makes a massive difference in the final mouthfeel of your Breakfast Quesadillas.
Smart Storage and Minimal Waste Tips
If you happen to have leftovers (which rarely happens in my house), they store surprisingly well. The key is how you reheat them. Never use the microwave unless you enjoy chewy, rubbery tortillas.
- Fridge: Keep in an airtight container for up to 3 days.
- Freezer: Wrap individually in parchment paper, then in a freezer bag. They stay good for 2 months.
- Zero Waste Tip: If you have leftover bell pepper or onion bits, toss them into a container and freeze them. Next time you make a soup or a different egg dish, you've already got your aromatics prepped! Even the ends of the green onions can be placed in a jar of water on your windowsill to regrow.
To reheat, the best method is a toaster oven or the air fryer at 350°F (180°C) for about 5 minutes. This brings back that "shatter" on the exterior while warming the cheese and eggs through to the center.
Beautiful Plating and Vibrant Serving Ideas
We eat with our eyes first, especially in the morning when we're trying to find the energy to face the day. Instead of just plopping the quesadilla on a plate, I like to use the "Geometric Cut." Slice the semi circle into three even wedges.
It makes the portion look more substantial and gives you more "points" for dipping.
- The Dipping Duo: Serve with a side of fresh pico de gallo and a dollop of Greek yogurt (a great high protein swap for sour cream).
- The Avocado Fan: Slice half an avocado and fan it out over the top. The cool, creamy avocado against the hot, crispy tortilla is heaven.
- Fresh Herbs: A final sprinkle of cilantro or extra green onion tops adds a pop of green that makes the dish look professional.
When you're done, you should have a plate that looks as energizing as it tastes. The bright reds of the peppers, the golden hue of the tortilla, and the melting white and yellow of the cheese create a color palette that just screams "good morning."
If you want a CRISPIER shell: Increase the butter by 1/2 tablespoon. Press down on the tortilla with a heavy press or another pan during the final sear. Cook on medium heat for an extra minute per side.
If you want a FLUFFIER filling: Whisk the eggs for a full 60 seconds to incorporate more air. Use heavy cream instead of whole milk. Pull the eggs off the heat when they are 70% cooked.
If you want a HEALTHIER version: Swap the flour tortilla for a high fiber whole wheat version. Use a non stick spray instead of butter (though you'll lose some flavor). Double the bell peppers and onions to add more volume with fewer calories.

Very High in Sodium
1420 mg 1420 mg (62% 62%)
The American Heart Association recommends limiting sodium intake to no more than 2,300 mg per day, ideally aiming for less than 1,500 mg for most adults.
Tips to Reduce Sodium
-
Reduce Added Salt-25%
Eliminate the 1/2 tsp of kosher salt entirely. You can add flavor back with herbs and spices instead. This change alone can significantly lower sodium.
-
Lower Sharp Cheddar-15%
Reduce the shredded sharp cheddar cheese to 1/2 cup. While cheese adds flavor, it's also a significant sodium source. This adjustment will cut down on sodium without losing all cheesy goodness.
-
Switch to Unsalted Butter-10%
Replace the 1.5 tbsp of salted butter with unsalted butter. Salted butter contributes unnecessary sodium to the dish. This is a simple swap for a noticeable reduction.
-
Boost with Herbs & Spices
Incorporate fresh or dried herbs like parsley, chives, or cilantro, and spices such as garlic powder, onion powder (not salt), or a pinch of smoked paprika to add flavor complexity without adding sodium.
Recipe FAQs
What's on a Breakfast Quesadilla?
This recipe features a blend of eggs, sharp cheddar, and vegetables. You will use 4 large eggs, 2 tablespoons of whole milk, 1/4 cup diced red bell pepper, and 2 thinly sliced green onions inside 10 inch flour tortillas.
Is it true I can make these low sodium?
No, this is a common misconception. Because the flavor relies on the salt added to the eggs and the inherent saltiness of the butter and cheddar cheese, reducing these components significantly impacts the final taste.
What cheese is best for breakfast quesadillas?
Sharp cheddar is ideal for its melting point and flavor punch. It provides the necessary fat to act as a structural glue, keeping the filling securely inside the tortilla.
Are quesadillas considered low carb?
No, they are not low carb. The 10 inch flour tortillas provide a significant amount of carbohydrates that define the structural base of the meal.
How to prevent the filling from sliding out?
Use the cheese barrier method by layering cheddar on both sides of the egg mixture. Placing cheese directly against the tortilla creates a sticky anchor that prevents the scramble from shifting during searing.
How to achieve a rigid, golden brown crust?
Sear the folded tortillas in butter over medium heat for 2-3 minutes per side. If you enjoyed mastering the sensory doneness cues here, apply them to other stovetop recipes to ensure perfect color without burning.
How to keep the eggs from becoming rubbery?
Remove the eggs from the heat while they are still slightly wet and glossy. They will continue to cook briefly once transferred and again during the final searing phase, so starting with undercooked curds is essential.
Shattering Crisp Breakfast Quesadillas

Ingredients:
Instructions:
Nutrition Facts:
| Calories | 671 calories |
|---|---|
| Protein | 33 g |
| Fat | 42 g |
| Carbs | 40 g |
| Fiber | 2.5 g |
| Sugar | 3.2 g |
| Sodium | 1420 mg |
