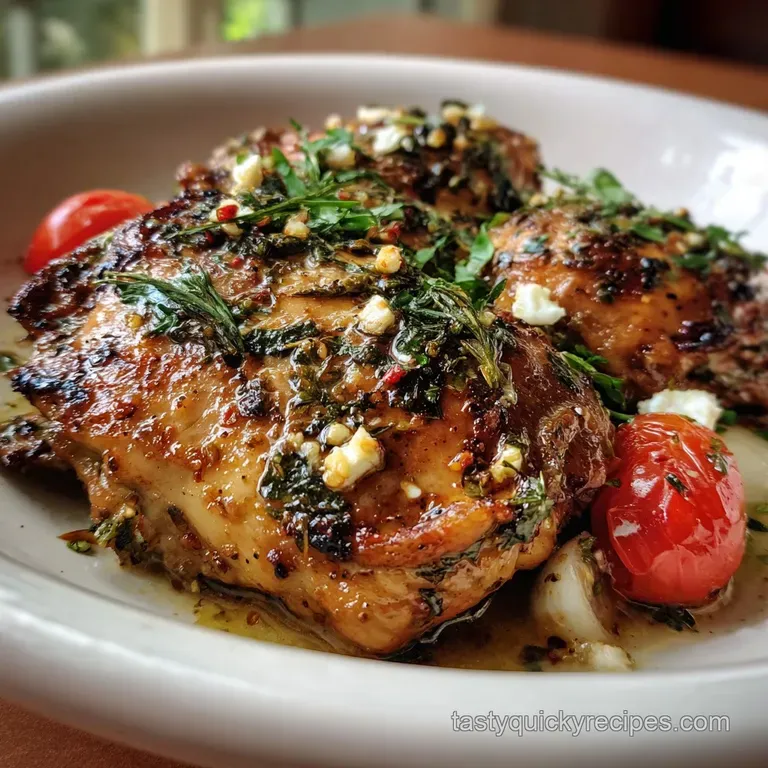
Chicken Recipe with Garlic and Herbs
- Time: Active 15 minutes, Passive 20 minutes, Total 35 minutes
- Flavor/Texture Hook: Shatter crisp golden skin with a velvety lemon herb pan sauce
- Perfect for: Busy weeknight juggling or a stress free weekend family dinner
- Savoring This Simple Chicken Recipe with Garlic and Herbs
- Why Heat Control Saves Dinner
- Essential Prep and Time Stats
- Choosing High Quality Simple Ingredients
- Minimal Tools for Better Results
- Step By Step Searing Guide
- Solving Common Texture Issues Quickly
- Simple Swaps for Every Diet
- Smart Storage and Leftover Tips
- Finishing Touches for the Table
- Recipe FAQs
- 📝 Recipe Card
Honestly, if you're like me, you've probably stared at a pack of chicken breasts at 6 PM feeling absolutely uninspired. We've all been there, juggling work calls and family chaos while trying not to order takeout for the third time this week.
I used to think you needed fancy cream sauces or complex marinades to make chicken interesting, but I was totally wrong.
The sizzle of a hot pan meeting fresh rosemary and thyme is a scent that immediately makes the house feel like a home. This specific method is my go to because it relies on what you already have in the kitchen.
No special trips to the store, just a focus on how heat interacts with fresh aromatics to create something truly flavorful.
We are going to skip the soggy, overcooked meat today. I'm showing you how to get that gorgeous golden crust while keeping the inside silky. It’s about being smart with your tools and trusting the process. Let's get into how we can turn these basic ingredients into the best meal you've had all week.
Savoring This Simple Chicken Recipe with Garlic and Herbs
Success with this dish comes down to one thing: not rushing the sear. When the meat hits the oil, you'll hear that aggressive hiss, and your instinct might be to move it around. Don't. Let the heat do its job to build that crust. That's where the flavor lives, and it's what separates a "meh" dinner from a "wow" one.
The Science of Why it Works
Maillard Reaction: High heat creates a chemical reaction between amino acids and sugars, resulting in the brown crust and complex savory flavors. Protein Denaturation: Applying steady heat causes protein strands to uncoil and then tighten, which is why monitoring internal temperature is vital to prevent moisture loss.
Another trick I've learned from too many burnt batches is the timing of the garlic. If you throw sliced garlic into a screaming hot pan at the start, it turns bitter and black before the meat is even halfway done.
We use the chicken bone broth to deglaze and create a buffer, allowing the garlic to soften and release its oils without scorching. This creates a more rounded, mellow sweetness that complements the zingy lemon.
Chef's Tip: Bruise your herb sprigs with the back of a knife before chopping. This ruptures the oil glands in the rosemary and thyme, releasing much more aromatic punch into the oil.
| Feature | Fresh Herbs | Dried Shortcut |
|---|---|---|
| Aroma | Vibrant and floral | Muted and earthy |
| Texture | Adds brightness | Can feel "dusty" if not rehydrated |
| Heat Limit | Best added mid cook | Can withstand long simmers |
Why Heat Control Saves Dinner
Temperature management is the difference between a rubbery mess and a tender masterpiece. Most home cooks (myself included, back in the day!) tend to cook chicken straight from the fridge. That cold meat drops the pan temperature instantly, leading to steaming rather than searing.
If you want that "shatter" effect on the outside, give the meat 15 minutes on the counter first.
Understanding Carryover Cooking
When you take the pan off the heat, the chicken doesn't stop cooking. The internal temperature will usually rise another 2 to 3 degrees while it rests. I always pull mine just before it hits the target. This ensures the fibers don't tighten up too much, which is the main culprit behind dry, stringy meat.
Precision Checkpoints
- Internal Temp: Pull the chicken at 72°C (162°F) for a final rested temp of 74°C (165°F).
- Pan Weight: Use a heavy bottomed skillet (at least 1.2kg) to maintain consistent heat.
- Oil Shimmer: Wait until the olive oil ripples and barely smokes before adding the protein.
This focus on thermodynamics might sound technical, but it’s actually the ultimate shortcut. When you get the heat right the first time, you don't have to spend extra time fixing dry meat with heavy sauces later. It’s the most practical way to cook for a family that actually enjoys their food.
Essential Prep and Time Stats
Before you start the pan, make sure your "mise en place" (that's just a fancy word for having your stuff ready) is set. This recipe moves fast once the sizzle starts. You don't want to be peeling garlic while the chicken is already browning.
| Ingredient | Science Role | Pro Secret |
|---|---|---|
| Lemon Juice | Acid breaks down tough fibers | Add at the very end to keep the flavor "bright" |
| Thinly Sliced Garlic | Increases surface area for infusion | Slice, don't mince, to prevent bitter burning |
| Chicken Bone Broth | Provides collagen for a velvety sauce | Use room temp broth to avoid shocking the pan |
Getting the lemon zested before you juice it is a mistake I only made once. Trying to zest a squished, juiceless lemon is a special kind of kitchen frustration! Do the zest first, then the juice. It adds a layer of essential oils that you just can't get from the liquid alone.
If you're looking for something with a bit more of an international flair after you've mastered this, you should definitely try my Persian Chicken recipe. It uses similar searing techniques but brings in saffron and turmeric for a totally different vibe. But for tonight, we're sticking to the classic herb garden profile.
Choosing high-quality Simple Ingredients
You don't need a massive grocery list for this. Since we are using so few items, the quality of your herbs and oil really matters. I always reach for extra virgin olive oil because the fruity notes pair so well with the rosemary.
- 1.5 lbs boneless skinless chicken breasts: Why this? Quick cooking and leans perfectly into the bright herb flavors.
- Substitute: Chicken thighs (boneless) for more moisture, though they take 5 mins longer.
- 2 tbsp extra virgin olive oil: Why this? high-quality fat carries the herb flavors to the meat.
- Substitute: Avocado oil if you want an even higher smoke point.
- 6 cloves garlic, thinly sliced: Why this? Slicing provides a mellow, sweet garlic flavor without the bite.
- Substitute: 1 tsp garlic powder in a pinch, but it loses the "fresh" feel.
- 1 tbsp fresh rosemary, finely chopped: Why this? Piney, robust aroma that stands up to pan searing.
- Substitute: 1 tsp dried rosemary (crush it in your palm first).
- 1 tbsp fresh thyme leaves: Why this? Earthy, citrusy notes that bridge the garlic and lemon.
- Substitute: Fresh oregano for a more Mediterranean twist.
- 1 medium lemon, zested and juiced: Why this? The zest provides oils; the juice provides acidity to balance the fat.
- Substitute: 1 tbsp white wine vinegar if lemons are missing.
- 1 tsp sea salt: Why this? Coarse grains help create a better crust on the meat.
- Substitute: Table salt (use only 3/4 tsp).
- 0.5 tsp cracked black peppercorns: Why this? Freshly cracked adds a floral heat that pre ground lacks.
- Substitute: White pepper for a milder, more subtle heat.
- 0.25 cup low sodium chicken bone broth: Why this? Creates a quick pan sauce while keeping salt levels in check.
- Substitute: Dry white wine (like Sauvignon Blanc) for extra complexity.
- 2 tbsp fresh Italian parsley, chopped: Why this? Adds a final "pop" of green and cleans the palate.
- Substitute: Fresh chives for a mild onion finish.
Minimal Tools for Better Results
I’m a big fan of the "one pan" lifestyle. Juggling multiple pots while helping with homework is a recipe for disaster. For this Garlic and Herb Chicken Marinade style finish, you really only need a few basics. A heavy skillet is non negotiable I prefer stainless steel or cast iron.
Non stick is okay, but you won't get that gorgeous brown "fond" (the tasty bits stuck to the bottom) that makes the sauce so good.
Beyond the pan, a good pair of tongs is your best friend. They give you way more control than a fork, and you won't pierce the meat, which lets the juices escape. I also swear by a microplane for the lemon zest. It’s faster and gets only the yellow part, leaving the bitter white pith behind.
If you are looking for more ideas that don't require a whole cupboard of gadgets, check out these Low Fodmap Chicken Recipes. They focus on simple, clean flavors that are easy on the gut but still feel like a proper meal. It's all about making the most of what you have without the clutter.
step-by-step Searing Guide
- Prep the meat. Pat the 1.5 lbs chicken breasts dry with paper towels. Note: Moisture is the enemy of a good sear; wet meat just steams.
- Season thoroughly. Sprinkle both sides with the 1 tsp sea salt and 0.5 tsp black pepper.
- Heat the skillet. Add 2 tbsp olive oil to the pan over medium high heat until it ripples and shows a tiny wisp of smoke.
- Sear the first side. Place chicken in the pan and cook for 6 minutes until the edges are golden and it releases easily from the pan.
- Flip and add aromatics. Turn the chicken over, then toss in the 6 sliced garlic cloves, 1 tbsp rosemary, and 1 tbsp thyme.
- Infuse the oil. Tilt the pan slightly so the oil pools with the herbs and garlic for 2 minutes until the garlic is fragrant and pale gold.
- Deglaze the pan. Pour in the 0.25 cup chicken bone broth and the lemon juice. Note: Use a wooden spoon to scrape up those brown bits from the bottom.
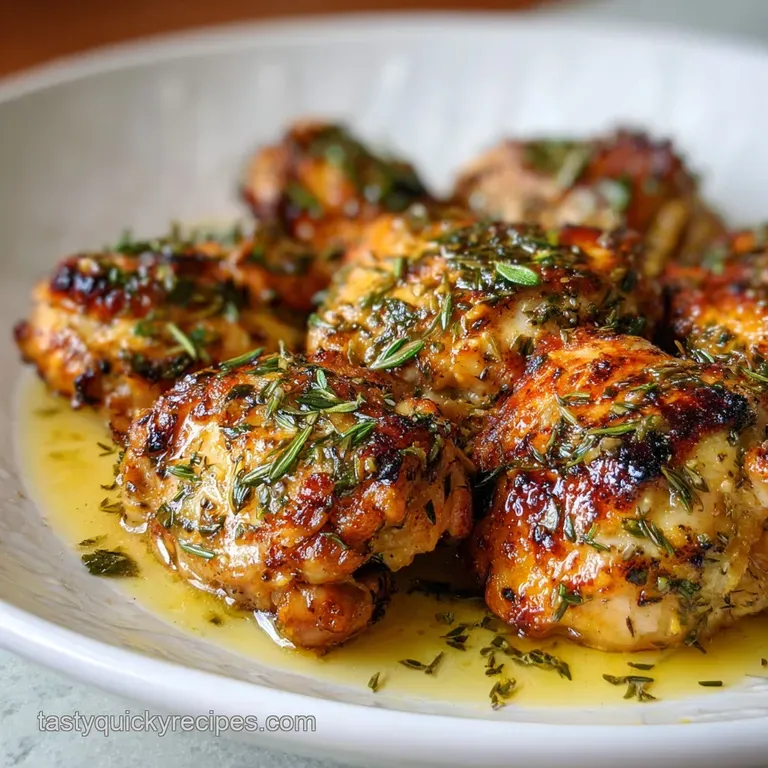
- Simmer and baste. Spoon the bubbling liquid over the chicken for 5 to 7 minutes until the sauce thickens slightly and chicken is cooked through.
- Final touch. Stir in the lemon zest and 2 tbsp fresh parsley.
- Rest the meat. Transfer to a plate and let it sit for 5 minutes until the juices redistribute throughout the fibers.
Chef's Note: If your chicken breasts are very thick (over 2cm), I highly recommend "butterflying" them or pounding them to an even thickness. This ensures the outside doesn't get dry before the inside is safe to eat. It's a small step that makes a massive difference in the final texture.
Solving Common Texture Issues Quickly
Even with the best intentions, things can go sideways in the kitchen. Usually, it's a matter of heat or timing. If your chicken feels like cardboard, you likely missed the "rest" period or the pan was too hot for too long.
Understanding Garlic Color Changes
Sometimes garlic turns a weird blue or green color. Don't panic! It’s just a reaction between the sulfur in the garlic and the acid in the lemon juice. It’s perfectly safe to eat, though it looks a bit like a science experiment. To avoid this, try to add your lemon juice toward the very end.
| Problem | Root Cause | Solution |
|---|---|---|
| Rubbery Chicken | Cooked straight from the fridge | Let meat sit at room temp for 15 mins |
| Bitter Sauce | Garlic burnt in the initial sear | Add garlic ONLY after flipping the meat |
| Pale, Wet Meat | Pan was overcrowded | Cook in two batches if the pan is small |
If the sauce seems too thin, you can take the chicken out and turn the heat up to high for 60 seconds. This rapidly evaporates the water in the bone broth, leaving behind a concentrated, syrupy glaze that coats the back of a spoon. This is the "velvety" finish we are looking for.
Simple Swaps for Every Diet
We often have to cook for different needs in one house. The beauty of a Baked Chicken Recipe with Garlic and Herbs style pan sear is how adaptable it is. You can easily pivot to a Creamy Garlic and Herb Chicken by adding a splash of heavy cream or a dollop of Boursin cheese at the very end.
- Low Carb / Keto: This recipe is already naturally keto friendly! Just serve it with roasted broccoli instead of rice.
- dairy-free: Stick to the olive oil and bone broth. It’s naturally free of butter and milk.
- Extra Comfort: If you want that "Chicken in boursin sauce with garlic and fine herbs recipe" feel, stir in 2 tablespoons of herbed cream cheese during step 8.
Decision Shortcut
- If you want a thicker glaze: Whisk 1/2 tsp of cornstarch into the cold bone broth before adding it to the pan.
- If you want it spicy: Add a pinch of red pepper flakes when you add the garlic and herbs.
- If you want it "French Style": Swap the bone broth for a dry white wine and add a cold pat of butter at the very end.
Smart Storage and Leftover Tips
This chicken keeps surprisingly well in the fridge for up to 3 days. The trick to reheating is not to use the microwave on high power, which turns the chicken into a pencil eraser. Use the "medium" setting or, better yet, reheat it in a covered skillet with a tiny splash of water to create steam.
For zero waste, don't throw away those herb stems! If you have leftover rosemary or thyme stalks, toss them into a freezer bag. When you have enough, you can use them to flavor your next batch of homemade Soup Recipe with. Even the lemon rinds can be tossed into a jar of white vinegar to make a natural, great smelling kitchen cleaner.
If you find yourself with just one leftover breast, chop it up and make a quick version of my Round Swamp Chicken Salad recipe. The garlic and herb notes from the original cook will make the salad taste much more sophisticated than standard canned stuff.
Finishing Touches for the Table
Presentation doesn't have to be a chore. Since this is a "fast and flavorful" meal, I usually just serve it family style right in the skillet. The dark herbs and golden chicken against the stainless steel look rustic and inviting. Just make sure to wipe the edges of the pan with a paper towel if any sauce splashed up.
Simple Plating for a Family Feast
- The Base: Lay down a bed of Fluffy Jasmine Rice or mashed potatoes to soak up that herb sauce.
- The Protein: Slicing the chicken into thick strips on a bias (at an angle) makes it look like it came from a restaurant.
- The Garnish: Don't skip the extra parsley and lemon zest. It provides a color contrast that makes the dish pop.
Serving this Simple Chicken Recipe with Garlic and Herbs with a side of quickly sautéed green beans or a crisp green salad balances the richness of the garlic oil. It’s a meal that feels complete without requiring you to spend two hours at the stove.
Why Searing Meat Doesn't Seal Juices
There’s a big myth that searing "locks in" juices. It actually doesn't; science shows that seared meat loses just as much moisture as un seared meat. However, we sear for the flavor and the texture. The crust provides that savory "umami" that makes the dish satisfying.
The real secret to "juicy" meat is simply not overcooking it and letting it rest properly after it leaves the pan.
Another common myth is that you should always peel garlic by smashing it. While smashing is fast, for this recipe, you want clean, thin slices. Slicing preserves the integrity of the garlic and allows it to brown evenly without turning into a mushy paste.
It takes an extra minute, but the visual and textural payoff is worth it when you're sitting down to eat.
Right then, you're all set to master this one! It’s reliable, fast, and honestly, it’s the kind of cooking that makes you feel like a pro even on a Tuesday night. Trust your senses, listen for that sizzle, and enjoy the table time with your family. That's what it's really about anyway.

Recipe FAQs
What is the best way to ensure the chicken has a crispy, golden skin?
Pat the chicken completely dry before cooking. Moisture is the enemy of a good sear, and wet meat will steam rather than brown. Ensure your pan is hot enough before adding the chicken to achieve that desirable crust.
How do I prevent the garlic from burning when searing the chicken?
Add the sliced garlic only after flipping the chicken. This ensures the garlic infuses the oil gently rather than scorching in the initial high heat. Tilt the pan to pool the oil and aromatics, allowing them to soften and become fragrant.
Can I substitute fresh herbs with dried herbs in this recipe?
Yes, but use less and add them earlier. Substitute 1 tablespoon of fresh herbs with about 1 teaspoon of dried herbs, crushed between your palms. Dried herbs have a more concentrated flavor and can withstand longer cooking times.
How can I tell when the chicken is cooked through without drying it out?
Use an instant read thermometer. Pull the chicken when it reaches an internal temperature of 72°C (162°F), as it will continue to cook and rest to a safe 74°C (165°F). Resting the meat is crucial for retaining juices.
What is the purpose of deglazing the pan with chicken bone broth?
To create a flavorful pan sauce from the browned bits. The broth lifts the fond (those tasty brown bits stuck to the pan) and, combined with the pan juices, forms the base of a velvety sauce. If you enjoyed mastering this emulsification technique, see how the same principle applies in our Lobster Tail Recipe: Broiled with Garlic Butter Sauce.
Is it okay to cook chicken straight from the refrigerator?
No, it's better to let it temper first. Cooking chicken straight from the fridge causes the pan temperature to drop significantly, leading to steaming instead of searing. Letting the chicken sit at room temperature for about 15 minutes helps achieve a better crust.
How should I store leftovers of this garlic and herb chicken?
Refrigerate in an airtight container for up to 3 days. For reheating, avoid high microwave power; use a medium setting or gently warm in a covered skillet with a splash of water. This preserves the texture and moisture of the cooked chicken.
Garlic Herb Chicken Recipe
Ingredients:
Instructions:
Nutrition Facts:
| Calories | 279 kcal |
|---|---|
| Protein | 40.5 g |
| Fat | 11.2 g |
| Carbs | 2.8 g |
| Fiber | 0.6 g |
| Sugar | 0.4 g |
| Sodium | 658 mg |
