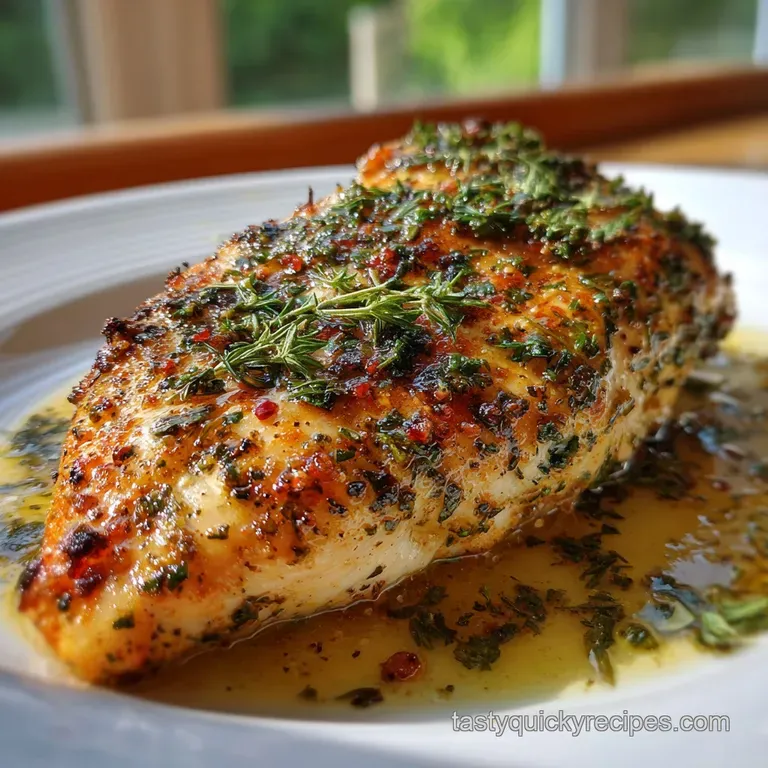
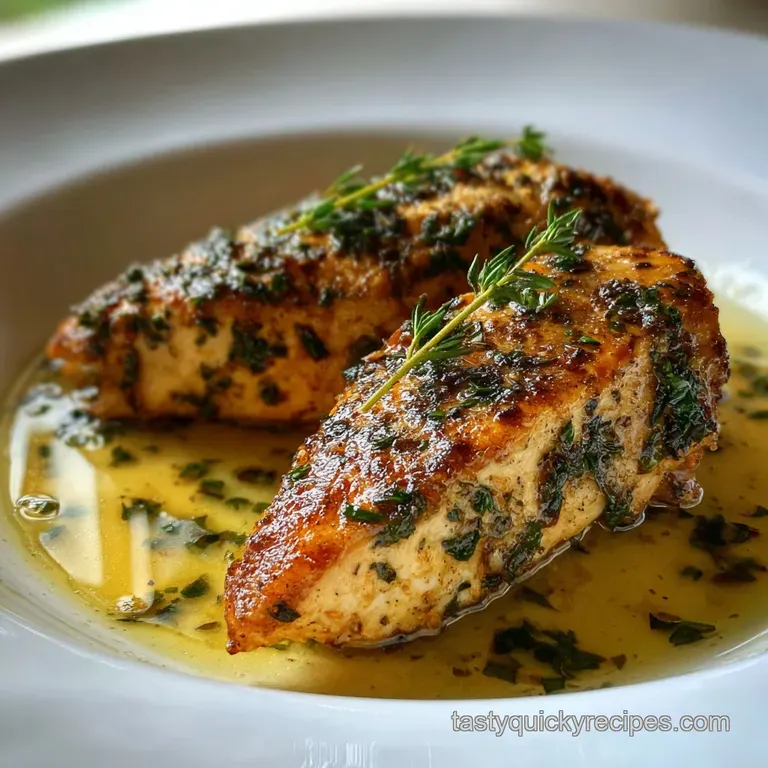
Chicken Breast Recipe with Garlic & Herbs
- Time: Active 15 minutes, Passive 5 minutes, Total 20 mins
- Flavor/Texture Hook: Sizzling golden crust with a velvety garlic butter finish
- Perfect for: Busy weeknight juggling, family dinners, or quick meal prep
- The Science of Why it Works
- Key Timing and Nutritional Data
- Quality Ingredients and Smart Substitutes
- Essential Kitchen Tools for Success
- Mastering the Garlic Butter Basting Process
- Fixing Common Chicken Cooking Mistakes
- Creative Variations for Busy Weeknights
- Storage Tips and Zero Waste Ideas
- Best Ways to Serve This Meal
- Culinary Myths Debunked
- Scaling Guidelines for Groups
- Recipe FAQs
- 📝 Recipe Card
Honestly, we have all been there. You throw a couple of chicken breasts in a pan, hoping for the best, only to end up with something that tastes like a yoga mat. It's frustrating when you are trying to get a flavorful dinner on the table while juggling a million other things.
This chicken breast recipe with garlic and herbs is a guaranteed weeknight dinner winner because it focuses on a few smart techniques that lock in moisture without requiring expensive gadgets.
I used to think that the only way to get "fancy" chicken was to spend hours marinating it or buying high end cuts. I was wrong. The secret isn't in the price tag of the bird, but in how you treat the garlic and the heat.
When that butter hits the hot pan and the aroma of toasted garlic fills your kitchen, you will know exactly why this recipe works every single time.
We are going for a shatter crisp exterior and a silky, juicy center. No more sawing through dry meat. This is about fast, flavorful results that make you feel like a pro even on a Tuesday night. Let's get into why this science backed method beats the old "toss and pray" approach.
The Science of Why it Works
The Science of Why it Works
Maillard Reaction: High heat rearranges amino acids and sugars, creating hundreds of new flavor compounds and that signature golden brown crust. Thermal Carryover: Removing chicken at 160°F (71°C) allows residual heat to finish the cooking to 165°F (74°C) without drying out the fibers.
When we talk about this recipe with garlic and herbs, we are really talking about heat management. The butter isn't just for flavor; it acts as a heat transfer medium that reaches into the nooks and crannies of the meat. This is similar to the technique I use in my Chicken Recipe with where herbs are infused directly into the fat.
- Protein Denaturation: Salt unravels tight protein strands, allowing them to hold onto more water during the "sizzle" of the sear.
- Fat Soluble Aromatics: Garlic, oregano, and thyme release their best flavors when heated in oil rather than water, creating a more intense profile.
- Emulsification: The final splash of lemon juice helps bind the rendered juices and butter into a velvety pan sauce.
| Component | Science Role | Pro Secret |
|---|---|---|
| Kosher Salt | Muscle Relaxant | Season from high up for even coverage. |
| Fresh Garlic | Aromatic Sulfur | Add late to prevent bitter carbonization. |
| Unsalted Butter | Temperature Buffer | Use cold butter for a glossier sauce. |
If you find yourself with leftover chicken, it's a fantastic addition to a Soup Recipe with chicken and vegetables the next day. The garlic notes carry over beautifully into a broth, making sure nothing goes to waste in your kitchen.
Key Timing and Nutritional Data
Cooking is often a game of seconds, especially with lean proteins. If you leave a breast in the pan for even two minutes too long, you lose that velvety texture we are after. I always keep a digital thermometer handy because guessing is the enemy of flavor.
| Feature | Stovetop Method | Oven Method |
|---|---|---|
| Texture | Extra crispy crust | More uniform tenderness |
| Active Time | 15 minutes | 5 minutes |
| Heat Source | Direct conduction | Convection/Radiant |
While the stovetop provides that amazing "shatter" on the skin side, the oven is great if you are batch cooking for a crowd. However, for this specific recipe with garlic and herbs, the pan sear is king.
It allows you to baste the meat with the garlic butter, which is something you just can't replicate as effectively in a roasting tin.
Quality Ingredients and Smart Substitutes
This recipe uses 4 (6oz) boneless skinless chicken breasts, which is the perfect size for even cooking. Larger breasts often require "butterflying" or pounding to ensure the middle cooks before the outside burns. We are also using 3 tbsp unsalted butter to create that luxurious finish.
- 4 (6oz) boneless skinless chicken breasts Why this? Uniform size ensures all pieces finish at once.
- 2 tbsp extra virgin olive oil Why this? High smoke point plus great flavor.
- 1 tsp kosher salt
- 1/2 tsp cracked black pepper
- 1 tsp dried oregano
- 1 tsp dried thyme
- 3 tbsp unsalted butter
- 4 cloves fresh garlic, minced
- 1 tbsp fresh parsley, finely chopped
- 1/2 lemon, juiced
| Original Ingredient | Substitute | Why It Works |
|---|---|---|
| Unsalted Butter | Ghee (3 tbsp) | Higher smoke point, dairy-free, same richness. |
| Fresh Garlic | Garlic Confit | Milder, sweeter flavor. Note: Use double the amount. |
| Dried Oregano | Dried Marjoram | Similar floral notes but slightly sweeter. |
When I am in a rush, I sometimes swap the individual herbs for a pre mixed poultry seasoning, but nothing beats the combination of thyme and oregano for that Mediterranean vibe. If you want a heartier meal, this chicken pairs beautifully with a Chicken RiceaRoni Casserole recipe on the side.
Essential Kitchen Tools for Success
You don't need a professional kitchen to make a world class breast recipe with garlic and herbs. I personally swear by a heavy bottomed skillet. Stainless steel is great for developing "fond" (those little brown bits), but cast iron is the champion of heat retention.
Chef's Tip: Freeze your butter for 10 mins before adding it to the pan. This slows down the melting process, giving the garlic more time to infuse into the fat without the butter solids burning.
I once made the mistake of using a thin non stick pan, and the chicken just steamed instead of searing. If you want that golden glow, go for something with some weight to it. A cast iron skillet (like a Lodge) is an affordable workhorse that will last you a lifetime.
Also, make sure your tongs are sturdy; you need to be able to press the chicken down firmly to ensure maximum surface contact with the heat.
Mastering the Garlic Butter Basting Process
- Pat the chicken dry. Use paper towels to remove every drop of moisture from the surface. Note: Surface moisture creates steam, which prevents a crispy crust.
- Season generously. Sprinkle the 1 tsp salt, 1/2 tsp pepper, oregano, and thyme on both sides.
- Heat the oil. Add 2 tbsp olive oil to the pan over medium high heat until it begins to shimmer and smoke slightly.
- Sear the first side. Place chicken in the pan and don't touch it for 5 minutes until a deep golden crust forms.
- Flip the meat. Turn the breasts over and cook for 3 minutes until the second side is lightly browned.
- Add the butter. Drop the 3 tbsp butter and minced garlic into the open spaces of the pan.
- Baste the chicken. Tilt the pan and spoon the foaming garlic butter over the meat repeatedly for 3 minutes until the garlic smells fragrant and nutty.
- Check internal temp. Use a thermometer to ensure it reaches 160°F (71°C) until the juices run clear when poked.
- Deglaze with lemon. Squeeze the 1/2 lemon over the pan and stir into the butter until it forms a silky sauce.
- Rest the meat. Move the chicken to a plate and let it sit for 5 minutes until the fibers relax and juices redistribute.
Chef's Tip: Add a tiny pinch of espresso powder or smoked paprika to your spice rub. You won't taste "coffee," but it deepens the color of the sear, making it look like it came from a high end steakhouse.
This method works because we are combining conduction (the pan) with convection (the hot butter). The result is a piece of meat that is seasoned all the way through, with a rich, garlicky exterior that feels incredibly indulgent for a healthy meal.
Fixing Common Chicken Cooking Mistakes
The most common issue I hear about is the "rubber chicken" syndrome. Usually, this happens because the pan wasn't hot enough or the chicken was cooked straight from the fridge. Taking the meat out 15 minutes before cooking makes a massive difference.
Why Your Chicken Is Tough
If your chicken feels like a bouncy ball, it's likely overcooked. Because chicken breast is so lean, there is no fat to protect the proteins from tightening up once they pass 165°F. The "carryover" is your best friend here.
If you pull it at exactly 165°F, it will hit 170°F while resting, and by then, the moisture is gone.
Why Your Garlic Is Bitter
Garlic burns faster than almost anything else in the kitchen. If you toss it in at the start with the oil, it will be charcoal by the time the chicken is done. That is why we add it with the butter at the very end.
The butter acts as a liquid blanket, keeping the garlic at a lower temperature while still extracting all that pungent goodness.
| Problem | Root Cause | Solution |
|---|---|---|
| Pale, grey meat | Pan was too crowded | Cook in two batches or use a larger pan. |
| Dry and chalky | Internal temp too high | Pull at 160°F (71°C) and rest for 5 mins. |
| Garlic tastes burnt | Added too early | Add garlic only during the final 3-4 mins of basting. |
Creative Variations for Busy Weeknights
One of the reasons I love this chicken breast recipe with garlic is that it is a blank canvas. If you are tired of the same old flavors, you can pivot the profile with just one or two ingredient changes. It's about working smarter, not harder, in the kitchen.
- For a Low Carb Power Meal: Serve the chicken over a bed of sautéed spinach and heavy cream for a "Tuscan" feel.
- Air Fryer Garlic Herb Chicken Breast: Rub the chicken with the oil and spices, then air fry at 375°F (190°C) for 12-15 minutes. Add the garlic butter at the very end for a quick 1 minute blast.
- Baked Chicken Breast Garlic Herb (Oven Method): If you are doing meal prep, sear the chicken for 2 minutes per side, then finish in a 400°F (200°C) oven for 10 minutes.
If you want X, do Y: - If you want a spicier kick, add 1/2 tsp of red pepper flakes to the butter basting stage. - If you want a creamier sauce, whisk in 2 tbsp of heavy cream after the lemon juice.
- If you want a crunchier texture, press some panko breadcrumbs onto one side before searing.
Storage Tips and Zero Waste Ideas
Leftovers are a gift to your future self. This chicken stays moist for up to 4 days in the fridge if stored correctly. I like to slice it up while it's cold and throw it over a salad or into a wrap for a fast lunch.
Storage: Keep in an airtight container for 3-4 days. You can freeze this chicken for up to 3 months, though the texture of the garlic butter sauce may change slightly upon thawing.
Zero Waste: Don't throw away that lemon half! Use the zest before juicing to add to a batch of rice. Also, if you have extra herb stems, toss them into a freezer bag. When the bag is full, you can make a incredible stock for a soup.
Even the pan drippings (the "fond") can be wiped up with a piece of crusty bread it's liquid gold.
Best Ways to Serve This Meal
This dish is quite rich due to the butter, so I usually pair it with something bright or starchy to balance things out. A simple roasted asparagus or a pile of fluffy quinoa works wonders. If you are looking for a more traditional "Sunday dinner" vibe, try serving it alongside a Dinner Idea with style side like roasted potatoes.
- The Veggie Route: Steamed broccoli with a little extra lemon juice.
- The Comfort Route: Mashed potatoes with a well in the middle for the extra garlic butter.
- The Fresh Route: An arugula salad with a balsamic glaze to cut through the richness.
One Last Secret
The real "magic" happens in those five minutes of resting. I know it's hard when the house smells like a garlic heaven, but wait. When the meat rests, the heat moves from the outside to the inside, and the juices which were pushed to the center by the heat migrate back to the edges.
This ensures every single bite is as velvety as the first. Trust me on this one; your patience will be rewarded with the best chicken you've ever made at home.
Culinary Myths Debunked
- Searing seals in juices: This is a total myth. Searing creates flavor through the Maillard reaction, but it doesn't actually create an "impermeable barrier." Moisture is lost regardless of the sear; the rest period is what actually keeps it juicy.
- Washing chicken makes it safer: Actually, washing raw chicken just splashes bacteria all over your sink and counters. The heat of the pan is what kills pathogens, not a rinse in the sink.
- You must use fresh herbs: While fresh parsley is great for the finish, dried oregano and thyme actually stand up better to the high heat of a sear. They have more concentrated oils that bloom beautifully in the hot olive oil.
Scaling Guidelines for Groups
When you need to feed more than four people, you can't just double everything and hope for the best.
- Down (1/2 or 1/4): Use a smaller pan to prevent the butter from spreading too thin and burning. Reduce the cooking time by about 20% since the pan will maintain a higher relative temperature.
- Up (2x-4x): Work in batches. If you crowd the pan with 8 breasts, the temperature will drop, and you will end up with grey, steamed meat. Cook 4 at a time, keep them warm on a plate under foil, and make a large batch of the garlic butter sauce at the very end to pour over everything. Keep spices at 1.5x rather than 2x to avoid over seasoning.

Recipe FAQs
What is the best way to ensure chicken breast stays juicy?
Pull the chicken at 160°F (71°C) and let it rest. Residual heat will continue cooking it to the safe internal temperature of 165°F (74°C) while allowing juices to redistribute.
Why does my garlic burn when cooking chicken?
Add garlic towards the end of cooking. When added too early, it can carbonize quickly; adding it with the butter during the final basting stage allows it to infuse flavor without burning.
How do I achieve a crispy crust on my chicken breast?
Pat the chicken thoroughly dry before searing. Surface moisture creates steam, which prevents browning and the development of a crispy exterior. High heat in a heavy bottomed skillet is key.
Can I use dried herbs instead of fresh for this chicken recipe?
Yes, dried herbs are excellent for this recipe. Dried oregano and thyme have concentrated oils that stand up well to high heat and bloom beautifully in the hot oil, offering a more intense flavor than fresh.
How do I make a garlic butter sauce for the chicken?
Melt butter in the pan with minced garlic during the last few minutes of cooking. Tilt the pan and continuously spoon the foaming butter over the chicken breasts to baste them.
What is the purpose of the lemon juice at the end?
The lemon juice creates a silky pan sauce. It helps emulsify the rendered juices and butter, adding a bright, fresh flavor that cuts through the richness of the garlic butter.
How should I store leftovers of this garlic chicken breast?
Store in an airtight container in the refrigerator for 3-4 days. If you have extra, it's delicious sliced cold over a salad or reheated gently for another meal, perhaps alongside a Chicken Soup Recipe.
Garlic Chicken Breast

Ingredients:
Instructions:
Nutrition Facts:
| Calories | 341 kcal |
|---|---|
| Protein | 38 g |
| Fat | 20 g |
| Carbs | 2 g |
| Fiber | 1 g |
| Sugar | 0 g |
| Sodium | 610 mg |
