Cheese Puff Fried Chicken: Crispy and Creamy

- Time: Active 20 minutes, Passive 25 minutes, Total 45 minutes
- Flavor/Texture Hook: A shattering orange crust with a velvety, molten cheddar core
- Perfect for: A fueling midday meal that provides enough energy to power through the afternoon without a slump
- Get the Crispiest Finish with Cheese Puff Fried Chicken
- Why This Works
- Smart Ingredient Science Deep Dive
- The Essential Ingredient List
- Hardware for Kitchen Success
- Bringing the Flavor Together
- Troubleshooting the Crunchy Finish
- Smarter Ways to Scale
- Common Cooking Myths Debunked
- Storage and Sustainable Kitchen Tips
- Serving for Visual Impact
- Very High in Sodium
- Recipe FAQs
- 📝 Recipe Card
Get the Crispiest Finish with Cheese Puff Fried Chicken
We have all been there, standing in the kitchen staring at a plate of chicken that looks more like a wet sponge than a satisfying meal. The biggest failure I used to run into with baked "fried" chicken was the dreaded soggy bottom.
You pull it out of the oven, and while the top looks decent, the underside is sitting in a pool of its own steam, turning into a sad, mushy mess. It is enough to make you want to give up on healthy baking altogether and just head to the nearest drive through.
But then I started experimenting with the Hasselback cut and a wire rack, and everything changed. This specific recipe for Cheese Puff Fried Chicken is my absolute secret weapon for a midday meal that actually keeps me energized.
It is hearty and filling, but because we are baking it rather than deep frying in heavy oil, you do not get that heavy, greasy feeling that leads to a 3 PM crash. It is the kind of food that feels like a total indulgence but is actually a smart way to hit your protein goals.
The first time I made this for a friend, they could not believe the crust came from a bag of snacks. There is something almost magical about how those extruded puffs transform in the heat of the oven.
They do not just sit there, they almost caramelize, creating a shell that has a distinct "shatter" when you bite into it. When you pair that with a molten, jalapeño spiked center, you have a lunch that makes your desk feel like a five star bistro.
Why This Works
- Surface Area Expansion: The Hasselback slices create tiny pockets that allow the heat to penetrate the thickest part of the breast faster, ensuring the meat stays juicy while the filling melts perfectly.
- Thermal Shielding: The cream cheese and cheddar mixture acts as an internal moisture lock, releasing steam slowly to keep the chicken fibers tender from the inside out.
- Aerated Fat Content: Cheese puffs are essentially puffed corn and oil, so as they bake, the fat rendered from the crumbs "fries" the chicken surface without needing a vat of oil.
- Enzyme Breakdown: Using a hint of buffalo hot sauce in the egg wash provides just enough acidity to lightly tenderize the outer layer of the protein for a better bite.
| Method | Time | Texture | Best For |
|---|---|---|---|
| Standard Oven | 25 minutes | Uniformly crispy shell | Routine midday fueling |
| Air Fryer | 18 minutes | High shatter crunch | Maximum texture focus |
| Convection Bake | 22 minutes | Golden and airy | Cooking for a group |
Using a wire rack is the one step most people skip, but it is actually the most important part of the process. By lifting the chicken up, you allow hot air to circulate 360 degrees around the breast. This prevents the juices from pooling and ensures that the bottom is just as crispy as the top. If you have ever struggled with a creamy chicken spaghetti feeling too heavy, you will appreciate how light this breading technique feels.
Smart Ingredient Science Deep Dive
| Component | Science Role | Pro Secret |
|---|---|---|
| Cream Cheese | Fat based insulator | Use full fat for a stable, non runny filling |
| Cheese Puffs | Dehydrated starch coating | Pulse into "sand," not "dust" for better texture |
| Buffalo Sauce | Acidic binder | The vinegar helps the flour stick to the protein |
| Jalapeño | Flavor catalyst | Minced tiny to release oils without adding bulk |
Choosing the right ingredients is about more than just flavor, it is about how they behave under heat. The cheese puffs provide a unique combination of cornmeal starch and oil that reacts differently than standard Panko.
While breadcrumbs tend to soak up moisture, the corn based puffs repel it slightly, which is why the crust stays so remarkably loud and crunchy even as the chicken rests.
The Essential Ingredient List
For the best results with this puff fried chicken, stick to these specific quantities. Each part of the dredge station serves a purpose in building that structural integrity we need for a satisfying crunch.
- 4 large chicken breasts (approx. 225g each): The foundation of our hearty meal.
- 1 tsp smoked paprika: Adds a deep, earthy color and subtle char flavor.
- 0.5 tsp garlic powder: Essential for that savory, umami rich undertone.
- 1 tsp kosher salt: Draws out just enough moisture to help the flour adhere.
- 0.5 tsp cracked black pepper: Provides a sharp, floral heat.
- 115g cream cheese, softened: Why this? It provides the creamy, insulating core that prevents the chicken from drying out.
- 50g sharp cheddar cheese, shredded: Adds a punchy saltiness and gooey pull.
- 2 tbsp fresh chives: Brings a bright, oniony freshness to the heavy cheese.
- 1 tsp jalapeño, minced: For a tiny kick that cuts through the richness.
- 100g extruded cheese puffs: Why this? They contain built in fats and seasonings that create a superior "fried" texture.
- 65g all purpose flour: The "glue" that keeps the crust from sliding off.
- 2 large eggs: Provides the protein structure for the breading.
- 1 tbsp buffalo hot sauce: Adds tang and helps the egg coat the meat evenly.
| Original Ingredient | Substitute | Why It Works |
|---|---|---|
| Cheese Puffs | Spicy Corn Chips | Same corn base, but results in a denser, harder crunch |
| Cream Cheese | Greek Yogurt (strained) | High protein but much tangier and thinner. Note: Filling may leak more |
| Chives | Scallion Greens | Similar flavor profile, slightly more pungent bite |
If you find yourself with extra chicken but no cheese puffs, do not panic. You can use this same stuffing technique for other recipes, like my crispy chicken taquitos, which also utilize a creamy center to keep the meat from getting tough. The key is maintaining that balance of fat and protein to keep your energy levels steady throughout the afternoon.
Hardware for Kitchen Success
- Chef's Knife: A sharp blade is non negotiable for making clean Hasselback cuts without tearing the meat.
- Two Wooden Spoons: These act as the perfect depth gauges to ensure you do not cut all the way through the chicken.
- Baking Sheet with Wire Rack: This is the absolute requirement for a non soggy bottom.
- Food Processor: For turning the snacks into a uniform crumb, though a rolling pin and a zip top bag also work for a more rustic texture.
- Digital Meat Thermometer: The only way to guarantee the chicken is cooked through but still juicy at 74°C.
Bringing the Flavor Together
Phase 1: The Precision Cut
Place a chicken breast between the handles of two wooden spoons. Slice across the breast at 1.25 cm intervals, using the spoon handles as guides to prevent cutting all the way through. Note: This creates the "accordion" look that holds all our flavor.
Phase 2: Filling the Reservoir
In a small bowl, combine softened cream cheese, shredded cheddar, chives, and minced jalapeño. Whip until smooth. Note: Softening the cream cheese is vital; if it is too cold, you will tear the chicken trying to stuff it.
Phase 3: Stuffing the Pockets
Carefully stuff the cream cheese mixture into the slits of each chicken breast, ensuring even distribution. Wait until they are plump but not overflowing.
Phase 4: Preparing the Crust
Pulverize the cheese puffs in a food processor or with a rolling pin until they reach a fine crumb consistency. Note: Avoid turning it into a powder; you want tiny granules for the best shatter.
Phase 5: The Triple Dredge
Set up a dredging station: one bowl with flour seasoned with paprika and garlic powder; one bowl with eggs beaten with buffalo sauce; and one bowl with the crushed cheese puffs.
Phase 6: Applying the Coating
Dredge each stuffed chicken breast in flour, dip into the egg wash, and then press firmly into the cheese puff crumbs to coat thoroughly. Ensure the crumbs get into the nooks of the cuts.
Phase 7: The Final Bake
Place the chicken on a baking sheet equipped with a wire rack. Bake at 200°C for 20-25 minutes until the crust is golden and the chicken is firm to the touch.
Phase 8: The Internal Check
Check that the internal temperature reaches 74°C using your thermometer. Rest the chicken for 5 minutes before serving to allow the juices to redistribute and the cheese to set.
Troubleshooting the Crunchy Finish
Why the Chicken is Dry
Even with the Hasselback technique, chicken can turn rubbery if it stays in the oven too long. This usually happens when the oven temperature is too low, causing the meat to bake slowly and lose moisture before the crust can crisp up.
Why the Filling Leaked
If you see a puddle of orange cheese on your baking sheet, it usually means the slits were cut too wide or the chicken was not "sealed" well enough with the flour and egg wash. It could also mean the cream cheese was a low-fat version, which has a higher water content and breaks down faster under heat.
| Problem | Root Cause | Solution |
|---|---|---|
| Burnt Crust | Rack too high in oven | Move to center rack and tent with foil if needed |
| Soggy Underside | No wire rack used | Always elevate the chicken to allow airflow |
| Coating Falling Off | Chicken was too wet | Pat meat dry with paper towels before dredging |
Common Mistakes Checklist
- ✓ Pat chicken completely dry before starting (prevents the flour from gumming up).
- ✓ Don't skip the wooden spoon trick - cutting through the bottom ruins the structure.
- ✓ Preheat the oven for at least 15 minutes to ensure an immediate "sear" on the crust.
- ✓ Let the cream cheese come to actual room temperature for a smooth, easy fill.
- ✓ Press the crumbs into the meat with your palms to ensure a solid bond.
Smarter Ways to Scale
Downsizing for One
If you are just making a single serving, use one large chicken breast and reduce the filling by three quarters. To avoid wasting a whole egg, beat it in a small cup and use only half. Use a small toaster oven to save energy, but keep the wire rack for that essential airflow.
Preparing for a Crowd
When doubling or tripling this hasselback cheese puff fried chicken, do not just pile them onto one tray. Airflow is even more critical when the oven is full. Use two separate baking sheets and rotate them halfway through the 25 minutes of cooking.
You might need to increase the total time by 5 minutes to account for the extra mass in the oven.
| Servings | Chicken Needed | Pan Size | Cook Time |
|---|---|---|---|
| 2 people | 2 breasts | Small sheet | 25 minutes |
| 4 people | 4 breasts | Large sheet | 25 minutes |
| 8 people | 8 breasts | Two large sheets | 30 minutes |
When scaling up, you do not need to double the salt and spices exactly. Use about 1.5 times the amount to avoid over seasoning, as the cheese puffs already bring a significant amount of sodium to the party.
Common Cooking Myths Debunked
One of the biggest myths I hear is that you need to sear the chicken in a pan before baking to "lock in the juices." In reality, searing a stuffed breast like this usually results in the cheese filling melting out before the chicken even hits the oven.
The Hasselback method and the high fat coating do the work of moisture retention perfectly well without the extra stovetop step.
Another misconception is that "low-fat" snacks or cheeses are a better choice for a midday meal. Honestly, don't even bother with low-fat cream cheese here. The fat is what provides the satiety and the stable texture. Without it, you end up with a watery mess and you will be hungry again within an hour.
Real, full fat ingredients provide the sustained energy you need to stay energized through the afternoon.
Storage and Sustainable Kitchen Tips
Fridge and Freezer Storage You can keep these in the fridge for up to 3 days in an airtight container. However, be aware that the crust will lose its shatter crisp texture. To revive it, avoid the microwave at all costs!
Use an air fryer at 180°C for 5 minutes or a toaster oven for 8 minutes to bring back that crunch. For freezing, I recommend freezing them "raw" but breaded. Place them on a tray to freeze solid, then wrap in foil. They will stay fresh for 2 months.
Bake directly from frozen at 190°C for 35-40 minutes.
Zero Waste Strategies Don't throw away the leftover flour or cheese puff crumbs from your dredging station. While you shouldn't use them again for raw meat, you can mix any uncontaminated crumbs (the ones that didn't touch the chicken) into a container to use as a topping for a future mac and cheese.
If you have leftover cream cheese filling, it makes an incredible spread for a toasted bagel or a dip for raw veggies the next day. Even the jalapeño scraps can be tossed into a jar of vinegar to make a quick spicy condiment for your next midday meal.
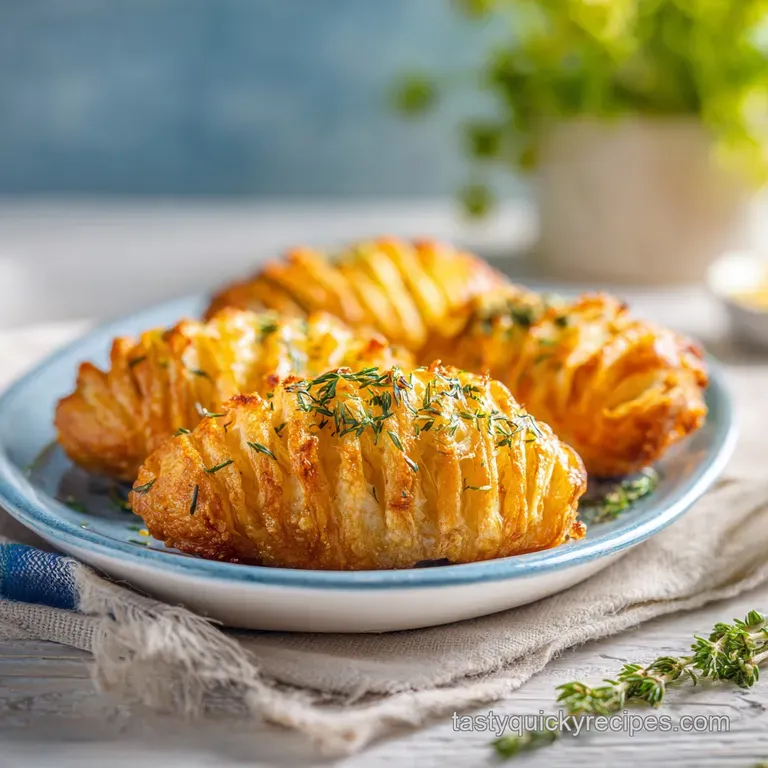
Serving for Visual Impact
To make this dish look as good as it tastes, I like to slice it slightly on the bias after it has rested. This exposes those beautiful layers of orange crust, white chicken, and the creamy green flecked center. It makes the meal feel more "chef prepared" and less like a quick lunch thrown together.
Garnish with a few extra fresh chives and perhaps a drizzle of extra buffalo sauce if you like things spicy. Serving this over a simple bed of arugula or lightly dressed greens provides a fresh, peppery contrast to the rich, cheesy chicken.
The bright green of the vegetables makes the neon orange of the puff fried chicken really pop on the plate, ensuring your meal is as visually fueling as it is nutritionally satisfying.

Very High in Sodium
885 mg of sodium per serving (38% of daily value)
The American Heart Association recommends limiting sodium intake to no more than 2,300mg per day, with an ideal limit of less than 1,500mg per day for most adults.
Tips to Reduce Sodium
-
Reduce Cheese Amount-15%
Significantly lower the amount of sharp cheddar cheese used, or opt for a lower sodium variety. This is a major source of sodium in the recipe.
-
Halve the Kosher Salt-12%
Cut the kosher salt in half. You can always add more salt at the table if needed, and the other flavorful ingredients will help compensate.
-
Lower Sodium Buffalo Sauce-8%
Substitute the buffalo hot sauce with a reduced sodium version or make your own at home to control the sodium content.
-
Boost Flavor with Herbs & Spices
Enhance the flavor profile by increasing the amounts of smoked paprika, garlic powder, and adding other fresh or dried herbs like parsley or oregano. This adds flavor without sodium.
-
Add Fresh Aromatics-5%
Incorporate finely diced onion and more jalapeño or other chili peppers. These fresh ingredients add natural flavor and a hint of heat without added sodium.
-
Choose Lower Sodium Cheese Puffs-10%
If possible, find extruded cheese puffs that are specifically labeled as lower in sodium. This ingredient significantly contributes to the overall sodium count.
Recipe FAQs
How to keep the cheese puff breading from falling off during baking?
Press the cheese puff crumbs firmly into the egg-washed surface. Ensuring the chicken is completely coated in flour first helps the egg wash adhere better, creating a secure base for the crumbs.
Is it true that I should use a microwave to reheat leftover cheese puff chicken?
No, this is a common misconception. Microwaving turns the crispy coating soggy, so use an air fryer at 180°C for 5 minutes or a toaster oven for 8 minutes to restore the original texture.
How to achieve a perfectly uniform slice when cutting the chicken breasts?
Place the chicken between two wooden spoon handles. The handles act as physical barriers, preventing your knife from cutting all the way through the meat while you create even 1/2 inch intervals.
Can I freeze the chicken after it has already been baked?
No, it is best to freeze them before baking. I recommend breading the raw chicken and freezing it solid on a tray before wrapping; this ensures the texture remains high-quality, similar to how you would manage prep work for a quick one-pot meal.
How to tell when the chicken is fully cooked?
Use a meat thermometer to ensure an internal temperature of 165°F (74°C). Checking with a thermometer is the only reliable way to guarantee food safety while keeping the meat tender inside the crunchy shell.
How to make the crumbs fine enough for an even coating?
Pulverize the cheese puffs in a food processor or with a rolling pin. Aim for a fine crumb consistency to ensure the coating adheres evenly to the flour and egg-dipped chicken.
How to prevent the stuffed cream cheese mixture from leaking out?
Ensure you do not overstuff the slits in the chicken. Keep the filling inside the 1/2 inch gaps you sliced to maintain the structural integrity of the chicken breasts during the 20-25 minute bake time.
Cheese Puff Fried Chicken

Ingredients:
Instructions:
Nutrition Facts:
| Calories | 655 kcal |
|---|---|
| Protein | 63.4 g |
| Fat | 31.2 g |
| Carbs | 27.5 g |
| Fiber | 1.2 g |
| Sugar | 2.1 g |
| Sodium | 885 mg |
