Lobster Tail: Broiled with Garlic Butter Sauce
- The Captain's Butter-Basted Lobster Tail: Broiled to Perfection
- Sourcing the Best: Ingredients for Perfect Lemon-Garlic Tails
- From Shell to Succulence: Detailed Broiling Method
- Avoiding Disaster: Essential Tips for Foolproof Shellfish
- Preservation and Planning: Handling Leftover Cooked Tails
- The Perfect Pairing: What to Serve Alongside Your Luxurious Tails
- Recipe FAQs
- 📝 Recipe Card
The Captain's Butter Basted Lobster Tail: Broiled to Perfection
You know that moment when the rich, garlicky aroma hits you, just seconds before you taste that sweet, tender meat? That’s what we’re aiming for with the perfect broiled Lobster Tail .
It smells like a million dollars, but honestly, it’s one of the easiest special occasion meals you can make.
People assume cooking a beautiful Lobster Tail at home is complicated or ridiculously expensive. But hear me out: If you buy them frozen (which is totally fine, by the way), this is a truly elegant, budget friendly dinner that takes less than 30 minutes start to finish.
Forget fussing with the grill or complicated pots of boiling water; the broiler method is lightning fast and totally forgiving.
I’ve rubberized more than my fair share of shellfish, but I finally nailed the technique. This specific lobster tail recipe uses a brilliant 'piggyback' cut and compound butter to guarantee moist results every time. Let's crack on and master this little luxury!
Why Broiling Beats Other Methods for Fast, Flavorful Results
Broiling is basically like setting the sun directly above your food. It’s high, dry heat, which is absolutely perfect for ensuring your Lobster Tail doesn't absorb excess moisture, unlike boiling. Boiling often yields waterlogged, slightly bland results, and steaming takes forever.
When you want that delicate meat cooked quickly, transforming from translucent to opaque white, the broiler is your secret weapon. This rapid cooking also lets the lemon garlic butter caramelize slightly, giving the edges a delicious golden crust.
The "Piggyback" Cut: Achieving Maximum Flavour Exposure
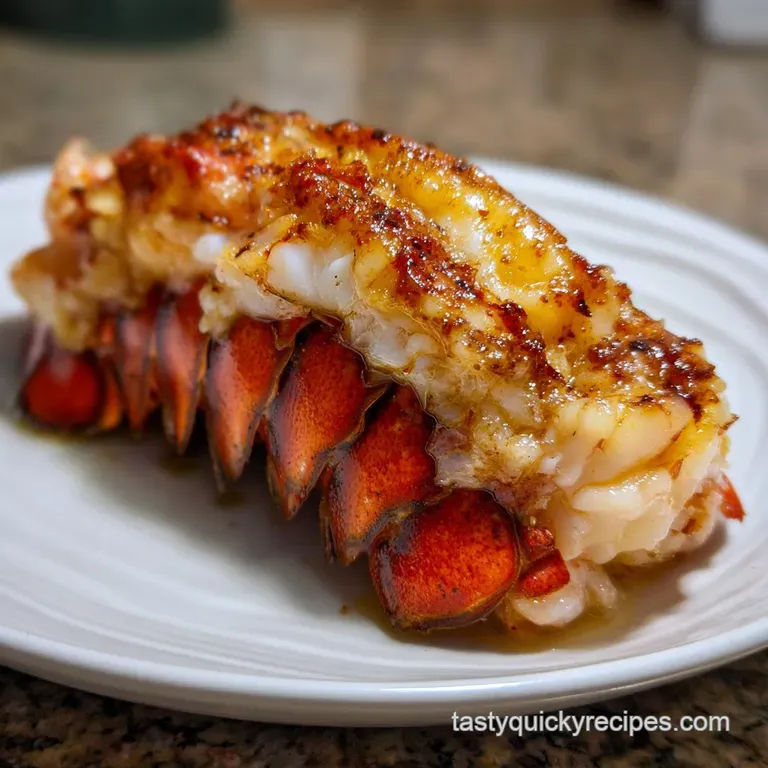
I used to just toss the whole shell in the oven and hope for the best. Rookie mistake! The "piggyback" cut where you pull the raw meat up and rest it on the shell is crucial for getting a perfect finish on your Lobster Tail . Why?
It exposes the maximum surface area to the butter and the direct heat, guaranteeing even cooking and allowing the butter to penetrate deep into the meat. Plus, let's be honest, it looks absolutely spectacular on the plate.
A Quick Guide to the Vibrant Lemon Garlic Compound Butter
This isn't just melted butter; it’s compound butter, and it’s non-negotiable for incredible flavour. We melt two-thirds of it for basting the raw meat. But here is the secret: we save the remaining one-third fresh, unmelted butter for the end.
That reserved fresh butter melts over the steaming hot Lobster Tail right out of the oven, preventing that lovely, bright, citrusy flavour from getting dulled by the intense cooking heat.
Sourcing the Best: Ingredients for Perfect Lemon Garlic Tails
Quality really matters here because there are so few ingredients. Getting a great Lobster Tail is half the battle; the other half is quality butter and fresh herbs.
Selecting Quality Frozen vs. Fresh Shellfish
Look, unless you live right by the docks in Maine, "fresh" often means "previously frozen and thawed." Don’t fear Frozen Lobster ! Just make sure they thaw properly in the fridge overnight that usually takes about 12 hours.
If you try to rush thawing your Lobster Tail , the meat quality suffers, trust me.
| Ingredient | Why We Use It | Viable Substitute |
|---|---|---|
| Unsalted Butter | Control sodium levels and rich flavour. | Ghee or high-quality vegan butter (dairy-free). |
| Fresh Parsley/Chives | Bright, clean aroma and green colour. | Use 1/4 tsp dried oregano or dried chives, but double the paprika for color. |
| Fresh Lemon Juice | Crucial acidity to cut the richness. | A splash of dry white wine or dry sherry. |
Preparing the Melted Lemon Garlic Finishing Butter
We use unsalted butter so we control the salt level, especially since the ocean water naturally makes the lobster quite savory. When prepping, mash the garlic and herbs into the softened butter really well before dividing it.
You want a uniform flavor bomb when you go to baste that gorgeous Lobster Tail .
Necessary Tools for the Prep Kitchen
You might think you can get away with standard scissors, but invest in a sturdy pair of kitchen shears. Trying to cut the hard shell of a Lobster Tail with dull scissors is how you lose your patience. Crucially, you need an instant read meat thermometer.
Never guess the internal temperature of seafood, especially when dealing with expensive protein!
From Shell to Succulence: Detailed Broiling Method

The Essential Prep: Butterfly Cutting and Pulling the Meat
This is the make-or-break moment, so take your time! Using the shears, start at the thickest end and cut straight down the centre of the top shell. Stop the cut just before the tail fan. Now, using your thumbs and fingers, gently open the shell and loosen the meat from the inside.
Pull the entire fillet of meat upward, leaving it attached only at the very tail fin. Lay the meat over the shell like it's taking a little piggyback ride. Lightly score the top of the Lobster Tail meat to help it absorb that luscious butter.
Prepping the Broiler and Positioning the Rack
Broilers vary wildly, but generally, you want that intense heat. Get your oven rack close about 6 to 8 inches away from the heating element but not so close that the shell blackens instantly. The high heat is the whole point of using this "Lobster Tails in the Oven" method, ensuring a fast cook time.
step-by-step Cooking and Basting Timeline
- Brush: Place the prepared Lobster Tail on the oiled baking sheet. Brush the meat liberally with the melted Lemon Garlic Herb Basting Butter. Season lightly.
- Broil Phase 1 ( 5 minutes): Place the tray under the broiler. The shells should start turning bright red and the edges of the meat should lighten.
- Baste: Pull the tray out briefly. Brush generously again with the remaining melted butter. This prevents drying and builds that complex Garlic Butter Sauce flavor.
- Broil Phase 2 (3– 7 minutes): Continue cooking until the meat is completely opaque white throughout. Use the thermometer! The internal temperature must register 140°F (60°C).
- Rest and Finish: Immediately remove the tails. Brush them with the reserved, unmelted fresh compound butter, letting the residual heat melt it into the surface. Rest for 2 minutes before serving.
Avoiding Disaster: Essential Tips for Foolproof Shellfish
Identifying and Preventing Undercooked Meat
If you pull the Lobster Tail too soon, the center will be translucent and gummy absolutely horrific. You cannot tell by color alone! The only way to be sure is the thermometer reading of 140°F (60°C) at the thickest part.
Overcooked lobster is tough and rubbery; undercooked lobster is unsafe and unpleasant.
How to Avoid Over Charring the Shells
Sometimes the high heat will cause the delicate tail fins to start blackening quickly, even if the meat isn't quite done. If the shells start looking overly toasted, pull the tray out, and loosely tent the shell ends with small pieces of aluminum foil.
This shields them while allowing the meat to finish cooking perfectly.
Rest Time: The Critical Step After Cooking
You wouldn't cut into a steak right away, so don't slice into your shellfish! A quick rest allows the proteins to relax and the meat juices to redistribute back into the muscle fibers. It’s only two minutes, but it makes the difference between succulent and slightly dry.
Preservation and Planning: Handling Leftover Cooked Tails
Safe Refrigeration of Cooked Seafood
If you have cooked Lobster Tail leftover (which rarely happens in my house, honestly), cool it down quickly after dinner. Store the meat, removed from the shell, in an airtight container. It will last safely for 3 days in the refrigerator.
Reheating Methods That Don't Dry Out the Meat
Never, ever microwave leftover seafood. That is a shortcut to rubber, guaranteed. The best way to reheat a cooked Lobster Tail is gently in a covered foil packet in the oven at 300°F (150°C) for 5- 7 minutes.
Add a tablespoon of water or a bit of the leftover butter sauce inside the packet for added moisture.
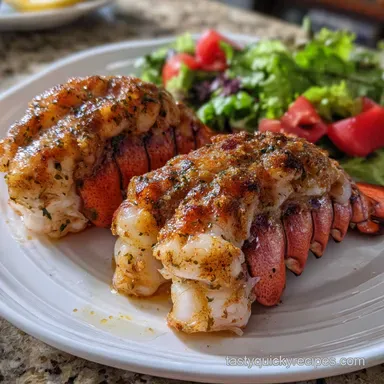
The Perfect Pairing: What to Serve Alongside Your Luxurious Tails
Classic Side Dishes That Complement the Richness
The goal of your sides is to complement the sweetness of the meat and soak up the remaining rich Garlic Butter Sauce . Creamy risotto, especially one spiked with Parmesan cheese, works wonders. Alternatively, keep it simple with classic roasted asparagus spears tossed with sea salt. If you’re making this for a special occasion brunch, you might skip the wine and pair it with something fun and fizzy, like the Bloody Molly: The Robust Irish Whiskey Brunch Cocktail Recipe .
This impressive Lobster Tail is truly one of the most rewarding dishes a home cook can master. Enjoy every buttery bite!

Recipe FAQs
Why did my lobster tails turn out rubbery or tough?
A rubbery texture is the hallmark of severely overcooked lobster. The delicate proteins tighten quickly when exposed to high heat for too long, squeezing out moisture. Stick closely to the recommended cooking time, and always verify doneness using a thermometer for the most tender results.
How do I know exactly when the lobster is done?
The easiest visual cue is color: the shell should be a bright, vivid red, and the meat must be opaque white throughout, not translucent or gray. For guaranteed perfection, use an instant read thermometer inserted into the thickest part of the tail (avoiding the shell) to confirm it has reached 140 145°F (60 63°C).
Can I grill or bake the lobster instead of broiling?
Absolutely. For grilling, place the butterflied tails meat side down for 5 minutes, then flip, baste generously, and cook for an additional 5-8 minutes over medium heat. If baking, preheat your oven to 400°F (200°C) and bake the basted tails for 12 15 minutes, which provides a gentler, more even cook.
Why did the butter burn while broiling the lobster tails?
Broilers run extremely hot, and the dairy solids (milk fats) in standard butter burn quickly, turning black before the lobster is cooked. To prevent this, ensure your oven rack is positioned 6 to 8 inches away from the heating element, and consider substituting clarified butter (ghee) or using a neutral oil for half the butter in your basting sauce.
What is the "piggyback" cut and why is it necessary for this recipe?
The piggyback or "butterfly" cut involves slicing the top of the shell lengthwise and pulling the beautiful white meat up to rest on top of the shell. This technique serves two crucial purposes: it allows the meat to cook more uniformly under the heat, and it creates a perfect surface for absorbing the butter baste.
How should I properly thaw frozen lobster tails before cooking?
Always thaw lobster slowly in the refrigerator overnight about 18 to 24 hours per pound is generally required. If you need a faster thaw, seal the tails in a leak proof plastic bag and immerse them in a bowl of cold water, changing the water every 30 minutes until thawed completely.
Can I prepare the lobster tails and compound butter ahead of time?
Yes, you can butterfly the lobster and prepare your compound butter up to 24 hours in advance, storing both separately in the refrigerator. However, only apply the butter baste immediately before placing the lobster under the broiler. Applying the lemon heavy butter too early can start to "cure" the delicate raw meat.
Broiled Lobster Tail Perfection
Ingredients:
Instructions:
Nutrition Facts:
| Calories | 551 kcal |
|---|---|
| Protein | 19.9 g |
| Fat | 50.7 g |
| Carbs | 2.8 g |
