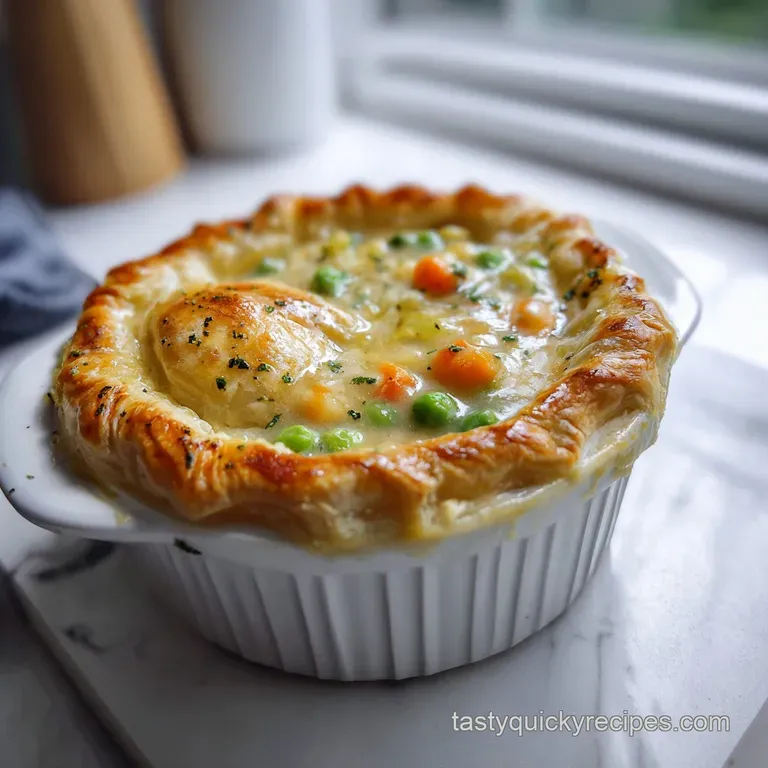
Bisquick Chicken Pot Pie
- Time: Active 10 minutes, Passive 30 minutes, Total 40 minutes
- Flavor/Texture Hook: Savory thyme scented gravy with a flaky, buttery biscuit crunch
- Perfect for: High energy midday fueling or a rapid weeknight solution
- Master the Hearty Bisquick Chicken Pot Pie
- Key Techniques for Flaky Success
- Hearty Filling and Topping Specs
- The Essential Elements
- Necessary Kitchen Tools
- The Three Step Execution Flow
- Fixing Common Pot Pie Issues
- Simple Scaling Guidelines
- Debunking Common Kitchen Myths
- Storage and Zero Waste
- Smart Serving Combinations
- Recipe FAQs
- 📝 Recipe Card
Master the Hearty Bisquick Chicken Pot Pie
Picture this: it’s 1:00 PM on a Tuesday, your morning was a marathon of meetings, and you need something that feels like a hug but doesn’t take two hours to prep. I remember the first time I tried making a "real" pie from scratch on a workday; I ended up with flour in my hair and a soggy bottom crust that was basically sadness in a bowl.
Then I rediscovered the magic of the "pour over" method, and my lunch game changed forever.
The moment you pull this out of the oven, the aroma of dried thyme and bubbling chicken gravy hits you like a warm wave. There’s something incredibly satisfying about watching that pale batter transform into a craggy, golden landscape of biscuits.
It’s the kind of meal that makes you want to put your phone away, sit at the wooden table, and actually enjoy the fuel you’re putting into your body.
We aren't just making dinner; we're building a reliable, repeatable win. This version is designed to be thick and fueling, skipping the watery mess often found in frozen alternatives.
You’ll get that velvety texture from the condensed soup, but with the punch of fresh cracked pepper and thyme to keep it tasting bright and home cooked.
Key Techniques for Flaky Success
- Starch Gelatinization: The flour in the baking mix absorbs milk and fat at high heat, creating a structured crumb rather than a gummy paste.
- Steam Expansion: The egg in the topping creates tiny air pockets as it heats, causing the "lid" to rise and stay light.
- Maillard Reaction: The sugars in the milk and the proteins in the egg react under the 400°F heat to create that deep, nutty brown crust.
- Emulsification Stability: Mixing the melted butter into the Bisquick ensures the fat is evenly distributed, preventing "grease spots" on your topping.
If you’re looking to make this even more authentic, using a homemade Chicken Stock recipe to thin your filling instead of plain milk adds a layer of depth that’s hard to beat.
| Method | Time | Texture | Best For |
|---|---|---|---|
| Standard Oven | 30 minutes | Evenly golden and crisp | Maximum volume and rise |
| Air Fryer | 20 minutes | Extra crunchy top, dense base | Small batches or singles |
| Cast Iron Skillet | 25 minutes | Crispy bottom and edges | Deep, rustic flavor profile |
The oven remains the gold standard for this dish because the circulating dry heat is what gives the Bisquick that signature "shatter" when you bite into it.
Hearty Filling and Topping Specs
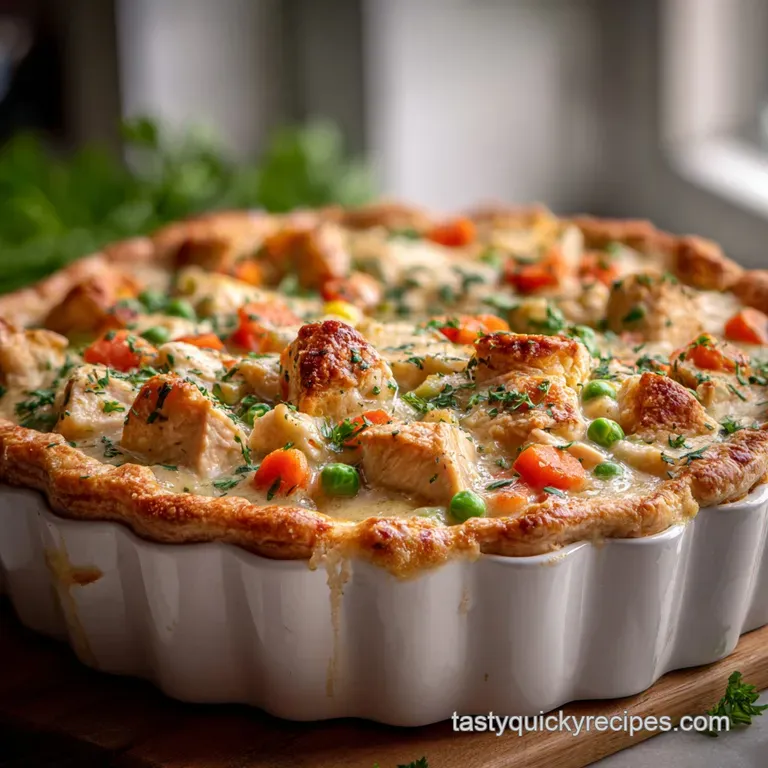
When you're aiming for a meal that carries you through the day, the ratio of protein to starch is everything. We use a full 2 cups of cooked chicken breast to ensure every bite is fueling.
Chef's Tip: Rub the dried thyme between your palms before dropping it into the bowl. This friction releases the oils and "wakes up" the herb, turning it from dusty hay into a fragrant powerhouse.
Component Analysis
| Ingredient | Science Role | Pro Secret |
|---|---|---|
| Bisquick (1 cup) | Structural base | Don't overmix; lumps keep it tender |
| Whole Milk (0.5 cup) | Hydration and browning | Use room temp milk for a faster rise |
| Large Egg (1) | Leavening agent | Beating until frothy adds extra lift |
| Melted Butter (2 tbsp) | Fat for "shortness" | Use salted butter to sharpen the flavor |
The Essential Elements
- 2 cups cooked chicken breast: Shredded or cubed. Why this? Provides 20g+ protein per serving for sustained energy.
- 12 oz frozen mixed vegetables: Thawed. Why this? Flash frozen at peak ripeness for better nutrient density.
- 10.5 oz condensed cream of chicken soup: One standard can. Why this? Acts as a stable, pre emulsified gravy base.
- 0.5 cup whole milk (filling): To reach the right consistency.
- 0.5 tsp onion powder: For savory depth.
- 0.5 tsp dried thyme: The classic "pot pie" aroma.
- 0.25 tsp cracked black pepper: high-quality pepper makes a massive difference.
- 1 cup Bisquick™ Original Mix: The primary topping component.
- 0.5 cup whole milk (topping): To hydrate the mix.
- 1 large egg: The binder for the crust.
- 2 tbsp melted butter: For that rich, bakery style finish.
If you find yourself wanting a more traditional approach later in the week, you can always compare this to a standard Chicken Pot Pie recipe to see which texture your family prefers.
| Original Ingredient | Substitute | Why It Works |
|---|---|---|
| Cream of Chicken | Cream of Mushroom | Same fat content. Note: Adds earthier, umami heavy notes. |
| Whole Milk | Unsweetened Almond Milk | Similar hydration. Note: Topping will be slightly less brown. |
| Mixed Vegetables | Sautéed Leeks & Carrots | Higher moisture. Note: Sauté first to avoid a runny filling. |
Necessary Kitchen Tools
- 9 inch pie plate: Or a similar sized oven safe casserole dish.
- Large mixing bowl: For the savory filling.
- Medium mixing bowl: For the biscuit topping.
- Whisk: To ensure the egg is fully integrated.
- Silicone spatula: To scrape every bit of gravy into the dish.
The Three Step Execution Flow
- Prep & Prime (10 mins): Preheat oven to 400°F. Thaw your vegetables and shred the chicken.
- Assembly (5 mins): Mix the filling in one bowl and the topping in another.
- The Bake (30 mins): Layer the filling, pour the topping, and bake until the center is set.
step-by-step Instructions
- Heat the oven. Set it to 400°F (200°C) and ensure your rack is in the center position. Note: This ensures the bottom heats as fast as the top.
- Combine filling. In your large bowl, stir together the chicken, 12 oz vegetables, soup, 0.5 cup milk, onion powder, thyme, and pepper.
- Transfer to dish. Spread the mixture evenly into your ungreased 9 inch pie plate. Look for a level surface so the topping doesn't sink into "valleys."
- Whisk the topping. In the medium bowl, whisk 1 cup Bisquick, 0.5 cup milk, and the egg until just combined.
- Add the butter. Fold in the 2 tbsp melted butter. Don't overwork the batter, or the biscuits will become tough.
- Pour and spread. Pour the batter over the chicken mixture. Use a spoon to spread it to the edges.
- Initial Bake. Place in the oven for 20 minutes.
- The Golden Check. At the 20 minute mark, the top should be pale gold.
- Finish the crust. Bake for another 8-10 minutes until the top is deep golden brown and the filling bubbles at the edges.
- Rest and set. Let the dish sit for 5 minutes before serving. Note: This allows the gravy to thicken and stay on the spoon.
Fixing Common Pot Pie Issues
Why Your Filling Is Runny
Sometimes the frozen vegetables release too much water, or the milk wasn't measured precisely. If the filling looks like soup rather than gravy, it’s usually a temperature or moisture issue.
| Problem | Root Cause | Solution |
|---|---|---|
| Watery filling | Vegetables weren't drained | Pat thawed veggies dry with a paper towel. |
| Pale topping | Oven temp too low | Verify oven with a thermometer; use 400°F. |
| Doughy center | Topping was too thick | Spread the batter thinly and evenly to the edges. |
Preventing a Gummy Topping
If the biscuit layer feels heavy or "wet" on the underside, it’s likely because it was poured onto a cold filling. If you have time, microwave the filling for 2 minutes before adding the topping to give the baking process a head start.
Common Mistakes Checklist
- ✓ Never use "low-fat" condensed soup; the fat is what keeps the filling velvety.
- ✓ Don't skip the egg; it's the difference between a flat pancake and a fluffy biscuit.
- ✓ Measure the Bisquick by spooning it into the cup rather than scooping (prevents packing).
- ✓ Ensure your butter is melted but not boiling hot when added to the egg mixture.
- ✓ Use cracked pepper, not the fine dust; the texture adds a necessary bite.
Simple Scaling Guidelines
Cutting the Recipe in Half Use an 18 ounce ramekin or a small loaf pan. Reduce the baking time to 22-25 minutes. Since you can't easily use half an egg, whisk the egg in a small cup and use roughly 2 tablespoons of it.
Doubling for a Crowd Use a 9x13 inch baking pan. You don't need to double the spices exactly increase thyme and onion powder by 1.5x instead of 2x to avoid overpowering the chicken. The baking time will likely increase by 5-10 minutes because of the larger surface area.
| Shortcut | Time Saved | Impact on Flavor |
|---|---|---|
| Rotisserie Chicken | 20 minutes | Salty, deeply roasted flavor |
| Pre chopped Veggies | 10 minutes | Very little; great for speed |
| Canned Gravy | 5 minutes | Less creamy; saltier profile |
Debunking Common Kitchen Myths
Myth: You must cook the vegetables first. Actually, with 12 oz of thawed mixed vegetables, the 30 minute bake time at 400°F is more than enough to tenderize them while retaining a slight "snap." Pre cooking them often leads to a mushy, unidentifiable vegetable paste.
Myth: Bisquick topping is just for breakfast. The savory additions of thyme and pepper completely transform the flavor profile. The slight sweetness in the mix actually balances the saltiness of the condensed soup perfectly, creating a "sweet savory" harmony that keeps you coming back for another bite.
Storage and Zero Waste
Storage: This bisquick chicken pot pie keeps beautifully in the fridge for up to 4 days. Store it in an airtight container to keep the biscuit topping from absorbing fridge odors.
When reheating, use the oven or a toaster oven at 350°F to bring back the "shatter" in the crust; a microwave will make the biscuit soft (though still delicious).
Freezing: You can freeze the baked pie for up to 3 months. Wrap it tightly in a double layer of foil. To reheat, bake from frozen at 375°F for 45-50 minutes, covering the top with foil for the first 30 minutes to prevent over browning.
Zero Waste Tip: Don't toss the liquid from your thawed vegetables! Add it to a container in your freezer along with onion skins and celery ends. Once you have enough, use them to make a rich base for your next Chicken Stock recipe.
Smart Serving Combinations
Since this is a hearty, all in-one meal, you want sides that offer contrast. A crisp green salad with a sharp lemon vinaigrette cuts through the richness of the cream of chicken soup perfectly.
- If you want more crunch: Add a handful of toasted pecans or sliced almonds to the top of the batter before baking.
- If you want a kick: Stir a teaspoon of hot sauce or a pinch of cayenne into the filling.
- If you want it cheesier: Fold 0.5 cup of sharp cheddar into the Bisquick topping before pouring.
This dish is all about that satisfying, midday energy. It’s dense, warm, and hits all the right notes of home cooked comfort without requiring you to spend your whole afternoon in the kitchen. Enjoy the crunch!

Recipe FAQs
Can I use fresh vegetables instead of frozen for my Bisquick chicken pot pie?
Yes, you can, but adjust the cooking time. Fresh vegetables may need a few extra minutes to cook through, so ensure they are tender before serving. It's best to dice them smaller to compensate for the potentially shorter cooking time compared to frozen.
How can I make the biscuit topping crispier?
Bake at a higher temperature for the last few minutes. After the initial 20 minutes of baking, increase the oven temperature to 425°F (220°C) for the final 5-10 minutes. This high heat will help achieve a crispier, golden brown crust.
My pot pie filling seems too thin, what did I do wrong?
Ensure you used condensed soup and didn't add too much milk. The condensed soup is key to a thick filling; using regular soup or too much milk will result in a thinner consistency. You can also try stirring in a tablespoon of cornstarch mixed with a little cold water if it's too thin after baking.
What's the best way to reheat leftover Bisquick chicken pot pie?
Reheat in the oven for the crispiest results. Place individual portions or the whole dish in a preheated oven at 350°F (175°C) until warmed through. This method helps restore the crispness of the biscuit topping, unlike microwaving.
Can I add cheese to the Bisquick topping?
Absolutely, it's a delicious addition. Fold about 0.5 cup of shredded sharp cheddar cheese into the Bisquick topping mixture along with the milk and egg. It adds a wonderful savory flavor and extra richness to the crust.
How do I prevent the bottom crust from being soggy?
Preheat your oven thoroughly and ensure the filling isn't watery. A hot oven helps the bottom of the pie cook quickly. Also, make sure to drain any excess liquid from thawed vegetables.
If you're concerned, you can also place your pie plate on a preheated baking sheet in the oven to ensure even heat distribution from below.
What's the secret to a flavorful chicken filling?
Use good quality chicken and don't skimp on the aromatics. Rotisserie chicken provides instant flavor, or use leftover cooked chicken. Beyond the onion powder and thyme, consider adding a pinch of celery salt or a dash of Worcestershire sauce for an extra layer of savory depth, much like the flavor boosters in a good Caldo de Pollo Recipe in 1 Hour: Authentic Mexican Chicken Soup.
Bisquick Chicken Pot Pie

Ingredients:
Instructions:
Nutrition Facts:
| Calories | 306 calories |
|---|---|
| Protein | 20.9g |
| Fat | 13.2g |
| Carbs | 25.4g |
| Fiber | 2.2g |
| Sugar | 4.1g |
| Sodium | 765mg |
